Thursday, 15 December 2022

CHEAP SDR!

FLEX-1500 USED BARGAIN!

There's a lot of people out there who remain very happy with their analogue radios but quite fancy dipping their toes into the pool of SDR Transceivers. They don't, however, fancy paying big bucks for the privilege. And who can blame them - SDR technology has really shot up in price due to the world economy and the ongoing silicon chip shortage. Thankfully, there's a very cheap option and it's also a really very good one too - the FLEX-1500 160-6M Transceiver.


For the newbies who are new to all this talk of SDR, I should perhaps point out that broadly speaking, there are two types of SDR radios - the ones which require a PC to work and those which don't. Originally, Software Defined Radios always needed to be connected to a computer - all the operational side of the radio was controlled via a computer program - the unit itself had no buttons or dials - they were all onscreen and you clicked the controls with your mouse and keyboard.

Later, SDRs were introduced in the traditional radio form with a built-in display, buttons, knobs and dials - but you could still connect them to a computer if you wanted to and benefit from the "big screen" and the advantages of the software.

The Flex-1500 is one of the former types - the only button it has is an On/Off. Everything else is controlled by your computer.
 
When it was launched over ten years ago, this was a bit of a marvel. A fully featured, Direct Conversion, QRP multi-band, multi-mode transceiver in a small form-factor with fantastic performance and amazing control software. It was priced around $700 at the time and provided many hams with a budget-gateway to the world of Software Defined Radio.

In 2022 it's possible to pick one of these up for around £200 if you're not too bothered about cosmetic appearances and don't mind printing your own manual from the internet. Needless to say, if you find an absolute minter in original packaging with accessories, then you may pay more.... 


The Flex-1500 is a very compact radio and takes up little space in the shack. In fact, you could use it just about anywhere - in the conservatory, in the garden, in a park, basically anywhere that you can attach it to a laptop and an antenna. 
The connectors are simple and well placed. On the front you'll find the On/Off switch, a USB Socket, Headphone Socket (stereo (inserting a mono jack-plug will cause damage)), an RJ-45 Mic Socket and a Keyer Socket. On the back you have the BNC Antenna, 13.8V Input, FlexWire I/O, and three BNC's for Transverters and Reference-In.

Even though this little marvel is getting on a bit,  it's no slouch in 2022 and is still very much relevant. Being an SDR it was regularly being updated via its superb software - PowerSDREven at launch, this software was pretty darned good, but it was nowhere near as good as it is right now.

When Flex Radio decided to discontinue the 1500 (for reasons that absolutely no one understands), someone from the ham community decided to pour themselves into improving the software further still. That person is Darrin Kohn (K9ENS) and his work has taken the Flex-1500 (and 3000 & 5000) from strength to strength over the last few years. His software can be downloaded along with a whole host of useful files, documentation and videos at his incredibly informative website

Before we move onto the software, let's just quickly look at the spec of the radio itself. The Flex-1500 has a usable receive coverage of 490kHz to 54MHz and a transmit range of all ham bands between 160M and 6M. It's a shame that the receive coverage doesn't extend to the LW section but from what I understand, you can add bandpass filters to facilitate this.

The power output is 5W PEP (3W AM) which in my experience is more than adequate to make contacts around the world using nothing more than a wire for an antenna. Personally, I use a 40-10 EFHW at home and even though I've seen people refer to end-feds as "dummy loads", I've found them to be quite the opposite. The main antenna I use for outdoor QRP activities is the SotaBeams 20-40 Linked Dipole - again - another great performer.

The physical dimensions of the radio are 7" deep, 4" wide and just over 2" tall. It weighs around one and a half pounds (680g), so it's an extremely portable device - ideal for POTA and suchlike. One has to bear in mind that in addition to this small device, you also need a LapTop and a power supply of some sort, so that soon adds up to a small rucksack or large laptop-bag.


SO WHAT'S IT LIKE IN USE?

Pretty darned good! For a small amount of money, you have got a powerful radio on your hands, with good sensitivity and selectivity and some pretty amazing filters and noise reduction.

The PowerSDR software (currently V2.8.0.262) offers so very, very much in terms of features and functionality and it's all pretty intuitive too. Even though there's a hell of a lot of options onscreen, everything is well laid out and there's an immense amount of customisation available too, if you're the type who likes tinkering with such things. Darrin Kohn's  website is absolutely brimming with information and there are many YouTube Videos to flatten the learning curve.

With this type of SDR equipment, the software is everything and among SDR users, there's quite a bit of software-envy. You may have an Expert Electronics radio but prefer the look of the Flex software. You might have an Elad but fancy the Apache software. Well be in no doubt, there are plenty of people who would love to have the Flex software to play around with. It's very good indeed! And it's 100% free.


As you can see above, the two VFO's show their frequencies in clear and simple digits. These can be adjusted in terms of size and font and even the last three digits can have a separate colour. 
 

The central portion of the screen provides enough space to display a working map of the world and still have space for the panadaptor. On the left side are the often used buttons and sliders for quick adjustment. On the opposite side are the Band and Mode buttons. Many buttons have left and right click options.  


The lower section of the screen contains a host of other controls and any one of these panels can be relocated to give you the layout of your choosing. The level of customisation is incredible.


Apart from having all the radio's control-options onscreen, you can also have the PowerSDR software overlay the Weather, Lightning-Strikes, F-Layer, D-Layer, Cloud Cover and then there's the Spotter Map and even a Designator Map view. More could be added in the future.


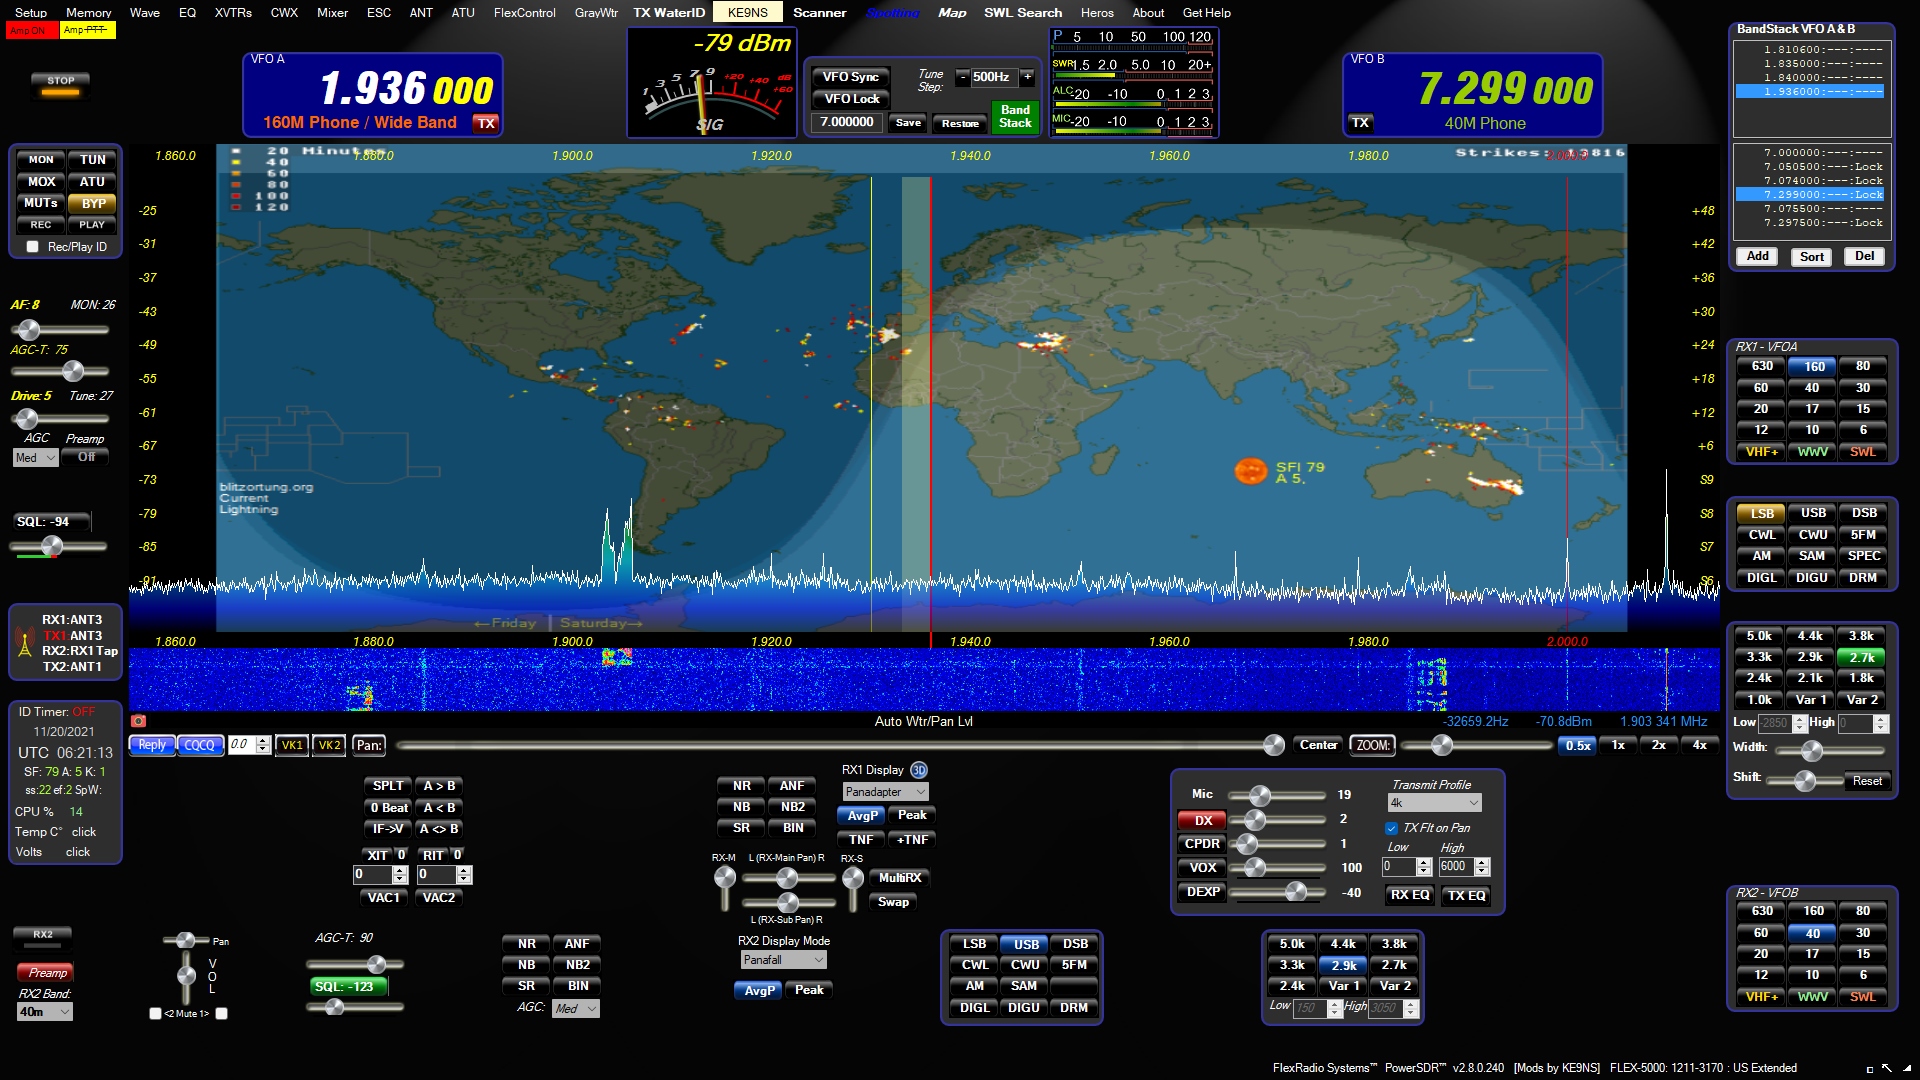
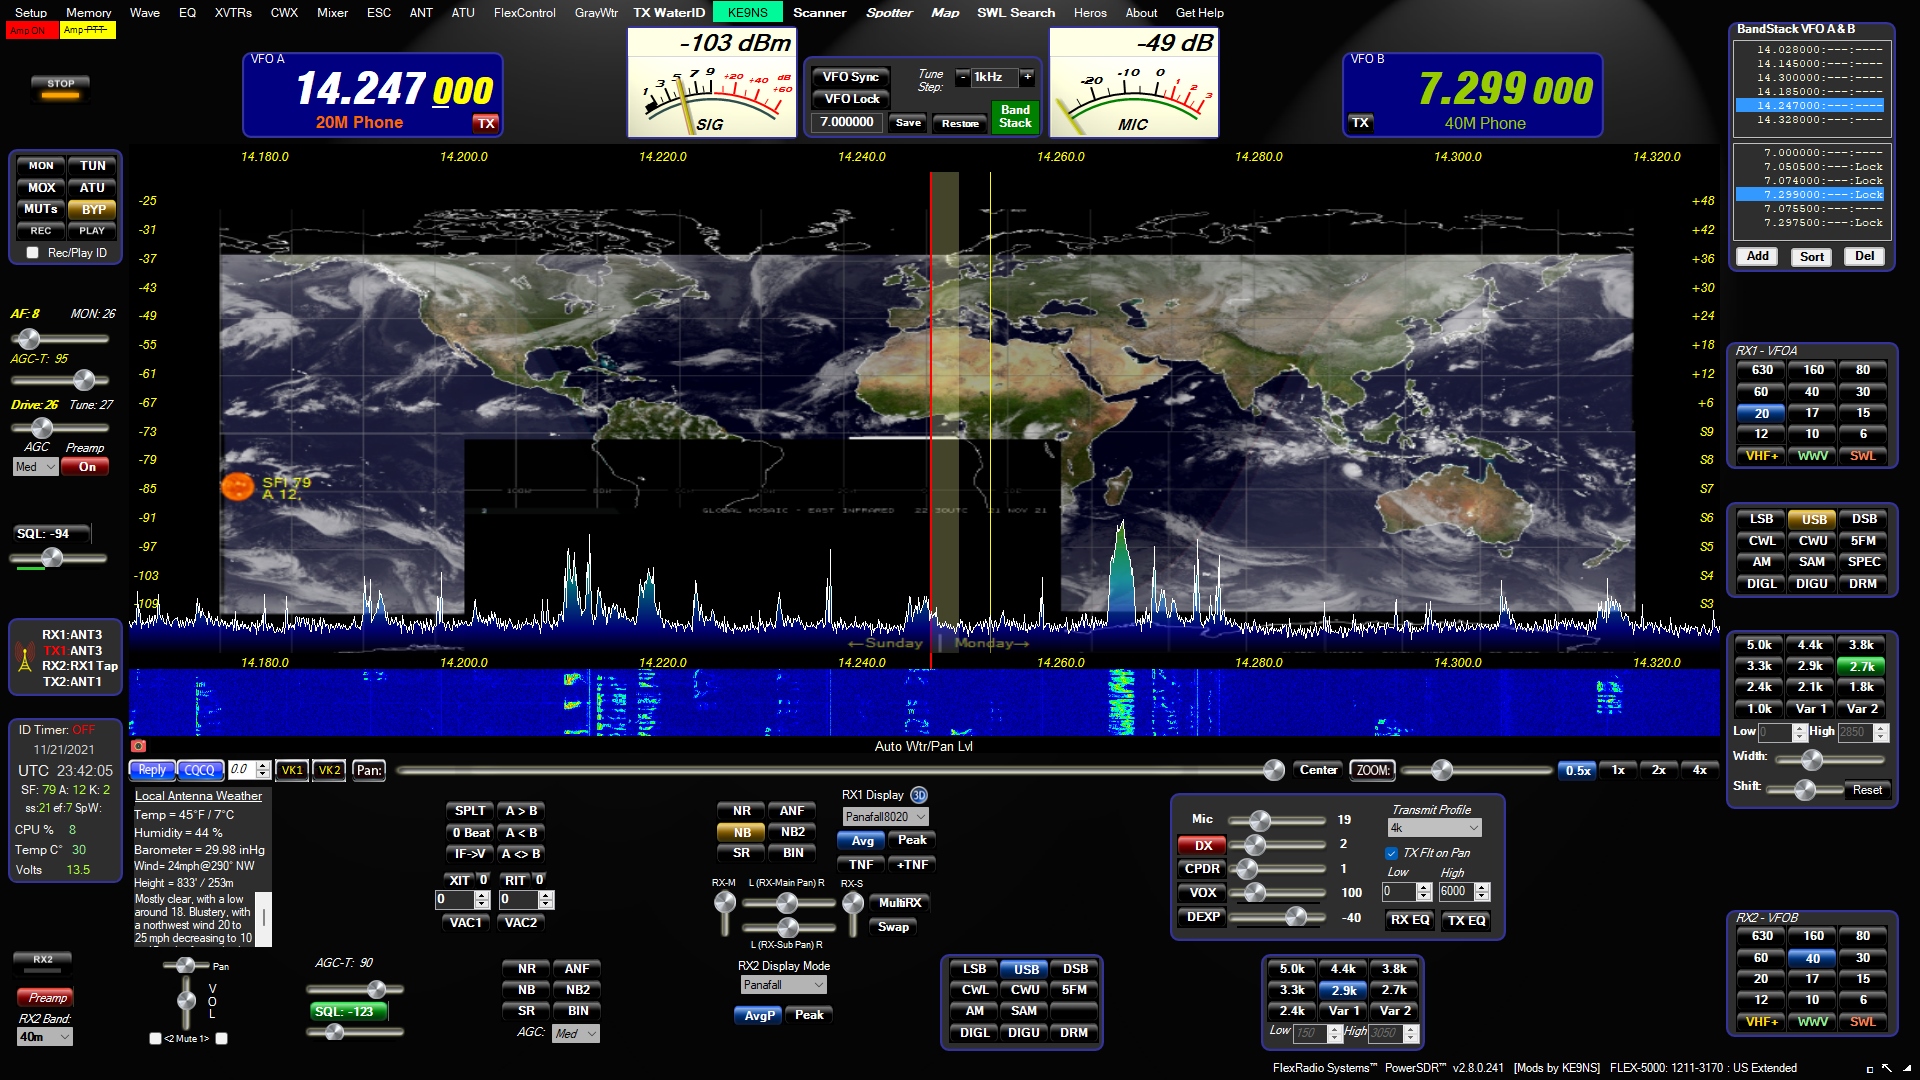
The Spotting feature is quite extensive and Darrin has made it very easy indeed to choose a source and made it simple to switch from one to another. The thing I like the best is that the Spots are shown on screen relative to the LOCATION of the operator rather than the frequency they're on. So if you see a Spot over Africa, that's where his registered QTH is and all you need to do is click that spot and the radio will be tuned to that operators frequency and the mode changed as required. Fabulous! Of course, your own transmissions will be spotted too. 


PowerSDR includes an Audio Recorder (or a QSO Recorder as I like to call it). It's possible to not only record an active QSO, but also re-transmit it. 

Needless to say you can save the audio files for playing back at any time you choose. Additionally, you can create files for Calling CQ, etc and these can be programmed to transmit repeatedly with a timed delay between transmissions.

Because the file-format is a common type, it's easy to share these files online with other interested parties.


Rather strangely, PowerSDR also has a feature called TX WaterID which transmits your CallSign in such a way that it appears on the waterfall for all to see. It obviously has no practical value as far as I can see and I'm not even sure that it would be legal to use it - but it's there. 

You can also use the same feature to transmit a simple 24bit image. Again, why you'd want to, I don't know, but if that's your thing, knock yourself out, lol.

VAC! PowerSDR has two Virtual Audio Cables built-in which make it simple to interface with external programs such as N1MM+, CW SKIMMER, WSJT-X, etc. There is a very comprehensive configuration screen in PowerSDR's Setup menu.

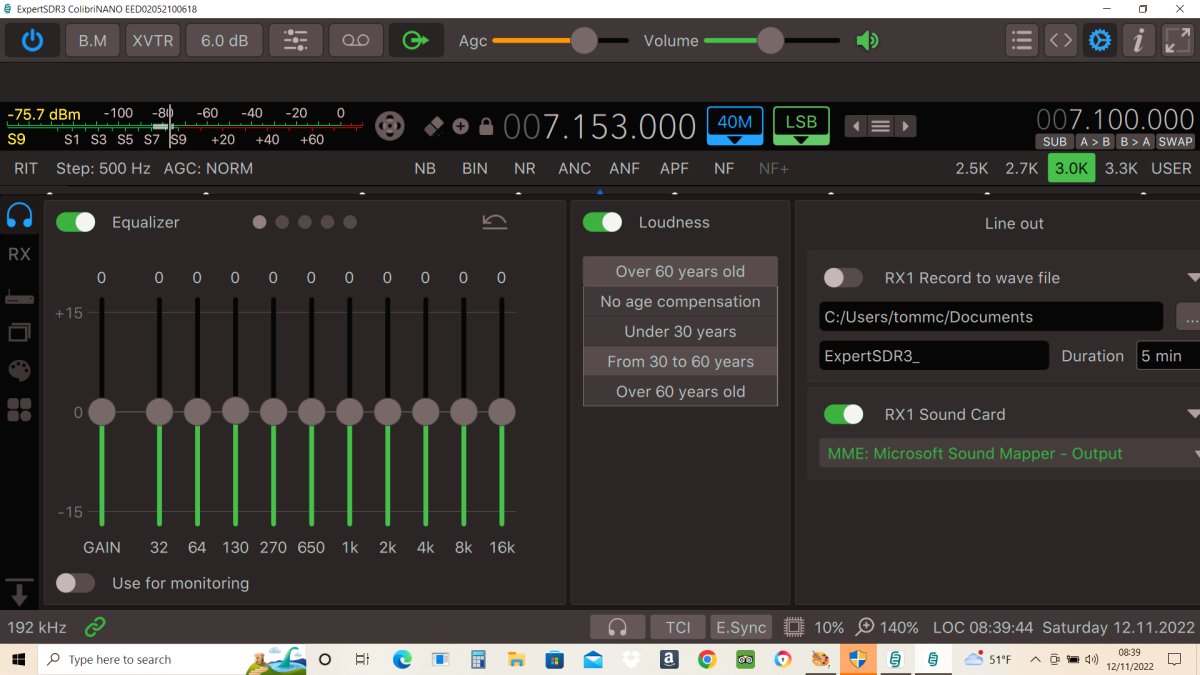
As mentioned previously, this software is infinitely configurable and apart from being able to alter the colours of almost all the components which make up the interface, there are also a number of "skins" to change the overall cosmetic theme. Even the meters can be adjusted individually.
 

It's worth mentioning that the Flex-1500 does not have an SWR meter built into it. I use an external QRP SWR meter from MFJ and if I'm using a non-resonant antenna with an ATU, then I also insert an SWR BRIDGE to protect the PA during tuning. Some may think this is overkill but the last thing you want to do after finding a bargain radio like this is to see magic smoke coming from it.


Connecting the rig to my EFHW (which is not well sited), I soon started collecting contacts. Andy in Germany gave me a 57 and was impressed with the signal from my 5W radio. He was using 700W which earned him a 59 from me.

Other contacts rolled in and I was enjoying the user interface. My only negative comment would be that there’s a tiny spike when you drop the mic. I could see it on the waterfall and could hear it in one of the QSO recordings I made. I imagine that I’ll find the solution on the KE9NS forum.

When I enquired about my transmitted audio, people were quite complimentary which was good to hear, but there's an awful lot that you can do to "tailor" your TX Audio within the software and HERE's an excellent video guide on the subject by Nige Coleman (G7CNF). There are real benefits to experimenting with this.

Is in summary, I can say that the  FLEX-1500 has been a great purchase. Big radio fun for relatively small outlay. Punches WELL ABOVE its weight!

Maybe it's time to treat yourself to a Xmas Cracker...


I’ll update this post as I do more experimenting.

73, Tom, M7MCQ.

Wednesday, 14 December 2022

HAWKINS VIPER VHF-78 Mk.II

2M Wire Antenna

When you consider taking out Yagi's and colinears up the hills, you gotta think about mounting solutions that are in addition to your HF requirements.

So when I saw the Hawkins Viper VHF78 Mk.II i thought it might offer me a simple solution by affording me the opportunity to run a vertical wire down the length of my Tactical 7000HDS mast which is holding up (normally) a HF Dipole in an inverted-V.

These antennas are "built to order" so it'll take a few days to arrive. When it does, I'll nip up to Winter Hill and run some quick tests. I also have the 6M and a 4M version of this antenna to test too.


Back soon with the results...

Thursday, 8 December 2022

HAPPY XMAS ALL

HAPPY XMAS TO MY RADIO FRIENDS ACROSS THE WORLD.

And thank you to each and every person who has gone to the trouble of responding to one of my CQ calls or to those who heard my QRP calls in your pile-up and made it possible for me to get through. And to those who provided me with some amazing DX contacts. Thanks for all those radio reports and tests. Thanks to all the people who run RBN beacons, gateways, repeaters.

Thank you to those people who made contact with me on SSB, AM, FM, CW or DV. Thanks also to those who responded on PSK, RTTY and FT8. And my appreciation to those who joined me on C4FM, DSTAR and DMR, using RF, HOTSPOTS, Peanut, EchoLink or whatever other way we linked up.

Thank you to all the Radio Clubs who work hard to spread the gospel and provide teaching platforms. And all the Elmers out there.

Thank you for your patience and also for your encouragement and lessons. Thanks for your visits here and your kind comments.

And let’s not forget all those fabulous ShortWave Listeners!

THANK YOU ALL FOR MAKING THIS HOBBY SO ENJOYABLE!

I wish you the very best Christmas & New Year.

73, Tom, M7MCQ.


Monday, 21 November 2022

ALINCO DX-10 DX-135 UK 'QUICK LOOK'

ALINCO DX-10 & SIRIO GAIN-MASTER HW

I've been aware of this radio for quite a long time and weirdly enough, it's always been the appearance of it that has caught my eye, first and foremost. I guess it reminds me of the old CB's that were around back in the 80's like the President Lincoln, etc. Not that I was a massive fan of CB - to be perfectly honest, I grew tired of it pretty quickly because I was only using FM and there were a lot of plonkers around (including me probably). I hung around for a couple of years and then got more interested in Ham Radio and general ShortWave listening.  Anyway, 30-odd years later, I'm a licensed ham with radios to cover HF, VHF and UHF, with interest in DATA, SSB, CW, DSTAR, DMR and FUSION.

So where does the DX-10 come in? Well I quite like the idea of exploring radio outside the norms of Ham Radio. A friend from the local Radio Club has spoken often about the fun he's had on 10 and 11M. I'm not talking about all the local belchers and barkers on UK-40, but more DX in nature.

Not wishing to modify any of my existing radios, I looked at the Alinco DX-10 (also known as the DX-135). Many people don't know what the difference is between the DX-10 and the DX135 : well the answer is nothing! It's just a model number change for different markets, just as Honda call the UK 'VFR800' the 'Interceptor" in the USA. It's a radio which covers 28 to 29.7MHz in standard form, but with some programming software it can be opened up to include 11M. It is not Type-Approved for 11M in the UK, so I'll only be using that band to listen, not transmit, wink wink.

Alinco DX-10 / DX-135

The DX-10/135 has a typical mobile form-factor (it should actually fit inside most car-radio apertures) and provides easy access to all the frequently used controls with straightforward and clearly labelled buttons and rotaries (some of them concentric). The display is simple and clear and there's a secondary tuning display to the right, which can also be used to step through 'channels'.

The overall construction of the radio seems quite good and it has that "Japanese Quality" about it, which I like. I have owned a few Alinco radios and have always been more than happy with them. Let's not forget though, that this is a cheap radio, so don't expect Elecraft performance. 

In use, the radio works well once you’ve got used to the tuning arrangements and pretty soon I got my first 10M SSB contact - IU3OXX in Venice

Later, I bagged an American station W2YP, a Swiss operator, HB9DSP and a German  DO1KRT. The band was very poor on the first day of testing, with LOTS of QSB, so I did struggle a bit. Plus, the antenna was in a VERY compromised location.

To get the radio working on 11M just requires you to hold down the "FUNC" and "LED OFF" button while powering up. You can then move between 10M and 11M using the Channel Selector.

The audio from the internal speaker is certainly good enough for general use, but if you were to operate the radio in a noisy environment such as a vehicle, you might want to fit an external speaker instead.

The illuminated readout can be adjusted in terms of colour - seven in all - including a rainbow effect (something which Alinco seem to like, LOL). You can't however, adjust the brightness which is a shame, because it's not that readable in bright daylight.

Power output of the DX-10 is 1-12W on AM/FM and up to 0-25W on CW/SSB. Power is nicely variable throughout each range. Thankfully, the radio will shut down the PA if your SWR is too high, offering a comforting level of protection from those ham-fisted moments when you forget to switch antennas (or even connect one) 😂. There's also over-voltage protection too.

So do I like this radio? Yes! It's one of those simple, old-fashioned, "just get on with it", type of rigs that does exactly what it's supposed to do. There's no frills with it and in addition to being quite sensitive on 10M, it also does a great job on 11M. I much prefer using something like this than having one of my expensive Ham Radios widebanded and potentially devaluing it. 

If you find a second-hand DX-10, you'll have a bargain on your hands and will get a lot of fun from it. I throw mine into a plastic storage box in the back of the truck when not being used and I don't worry about it getting scratched or marked. It's tough and won't come to any harm - other than cosmetic. I'm not looking to keep it pristine to sell it later for a lot of money - it never cost a lot of money in the first place!

So what's the down side? Well I guess the only negative is that I don't use 10/11M too often. The band has been in a terrible state for a long time and has only just started to really open up. BUT, when it is open, it's an absolute hoot!!

Recommended? Yes!!


SIRIO GAIN-MASTER HW

The antenna I chose for using with the Alinco DX-10 DX-135 is the Sirio Gain-Master Half Wave. I'll be perfectly honest and admit that I was fooled by the marketing images of the antenna, which make it look incredibly small! Even the technical spec showed it as being just 11ft long, but the truth is, it's over 18ft long! 😡😡😡

That's a bit naughty as far as I'm concerned. I've written to them to point out the misinformation, but you have to wonder if it's a "convenient" mistake to bolster sales (I'm such a skeptic, lol). Each of the 3 supplied sections measures 6ft 6" which is nothing like what I expected - I thought I'd be sticking 4ft sections into the boot of my car for portable work, but there's no way on God's earth these will fit in there 😣


Anyway, let's not dwell on that rather 'large' negative start too much - if the antenna works well, then it'll go some way to putting things right. I tested it initially while on holiday at our static caravan on the edge of the Forest Of Bowland. Because of restrictions, I had to mount it ridiculously low to the ground, but it still worked surprisingly well.


The noise-floor around here is very low, but occasionally, someone in a nearby caravan will switch something on which introduces unwanted noise, but thankfully, they're not up here as often as I am.

Sat inside a parasol-base, the Sirio can be located anywhere in the garden without needing any guying as long as it's not very windy. This is obviously only a temporary erection, since the Holiday Park don't permit permanent antennas.

With a short length of coax to the caravan decking, I can be up and running very quickly with no fuss at all and with no trip-hazards (if I erect a dipole, I end up with all sorts of potential hazards and untidiness).

I didn't use any counterpoises or radials and to be honest, I didn't need any - it worked fine without them. The SWR hovered around 1.7 but moved a little higher at the extremities of the 10 band. 11M needed a tuner. Bear in mind though, that most people would have this antenna mounted high up above the roofline of their homes where it will no doubt perform much better.

Anyway, as I mentioned earlier, getting contacts was not a problem and I managed to get as far as America and Eastern Russia from the UK, so there's no cause to complain. Unfortunately, the rain clouds started to drift over and spoiled play - it started to BOUNCE DOWN so I decided to call it a day.

I'm quite happy with this little setup and I'm especially pleased that the antenna worked so well at floor level. It's easy to slide it under the caravan when not it use, where it will stay nice and dry, ready for the next playtime.

If you fancy trying a bit of DX on 11M, you will need to get yourself a Call. Being in the UK, I got mine from CHARLIE TANGO DX.

 
If you have any comments, please write them below and try to include your CallSign.


Kind regards,

Tom, M7MCQ.

Thursday, 17 November 2022

HAM KARMA

I was trying to find a particular connector for my (tr)uSDX and soon realised that it was not a standard or common item - it basically had to be 3D Printed. I then had to source the right style of TRS jacks to fit properly in the connector (another PITA). After a lot of messing around, I found someone who agreed to print a connector for me and when I opened the package, he'd actually done 3 for me and even included nuts and bolts to clamp the two halves together. Excellent!

So in the spirit of Ham Radio, I decided to post a message on the (tr)uSDX Group Page to say that the spare connectors were available free of charge to anyone who sent a SAE. Both items were quickly snapped up.

A few days later, the envelopes arrived and inside one of them, I found a couple of gifts - a UniBalun 2022 V1.1 PCB and K6ARK Audio Adapter PCB!


These were sent to me as a thank you from Dave G8SNR in the UK - thank you! Now, none of these items (including the stuff I sent out) is high value, but they are difficult to get hold of, so it's very rewarding to be able to help out one another.

As they say, what goes around, comes around :-)

73, Tom, M7MCQ.


Monday, 14 November 2022

A SUCCESSFUL WEEKEND

TOO POORLY FOR SSB

I had a few things planned for this weekend, but on Friday night I started to feel unwell with cold symptoms, so I had an early night in the hope of feeling better Saturday morning. Unfortunately, I just felt worse and started with a sore throat too.

So I went into the Shack and started on a job that's been hanging over me for a good few days now - putting together a speaker-mic for my (truSDX). A kind soul had 3D printed a special connector for me so it was time to fit it.


I tested it briefly on SSB and using just 0.5W and a 9V PP3 battery on the radio, I managed to get a 55 report (albeit from a UK station G0OOQ). I also received an email from M7PJD (Patrick in Westcliffe-On-Sea) to say that he also heard my 0.5W transmission very well. 

I then tested the mic using the HackGreen WebSDR, which is a very useful site for me. It all sounded pretty good, so I was pleased with the outcome. The Retevis speaker/mic is a bit on the large size, but it has great volume which is adjustable with the dial on top.


The bands were very much in full swing this weekend and although I wanted to do some SSB work, my croaky voice wouldn't really permit it, so I switched to FT8 and managed to work seven bands! 10,12,15,17,20,30 and 40M.  I also tried 80M but there was no one on during the day and I couldn't be bothered during the evening, due to feeling grotty.


I was particularly pleased with my -09 report from Indonesia 7,500 miles away! Thanks YB1APD. I was using my simple EFHW antenna which is only 20ft up in the air. The transceiver was the wonderful QRP-LABS QDX - a beast of a machine for FT8 work.
 

People think that FT8 is robotic and laughably easy, but I certainly don't think so - certainly not at QRP levels. It can often be very hard work to complete a QSO for the log, involving multiple attempts. But that's also what I like about it - the chase - the fight.

Thanks for visiting my blog! If you have any comments/tips, leave a comment below with your CallSign.

73, Tom, M7MCQ.

Saturday, 12 November 2022

ColibriNANO REVIEW

COLIBRINANO by EXPERT ELECTRONICS

Some time ago I had an Expert Electronics MB1 and it was fabulous. I especially loved the software. But the radio broke and so it went back and was replaced with something else.

I miss the ExpertSDR software very much - it was really very good and so I was looking into ways of getting access to it without spending thousands on another EE radio. They do manufacture a number of options but the only one that is reasonably priced is the one that look like a cheap USB Dongle! Except it's not cheap. 


£250 seems like an awful lot of money for a USB receiver, but then again, you can pay much more than that for an ancient secondhand superhet receiver. This baby is brimming with SDR loveliness and high-tech wonders. And then there's the brilliant software. And then there's the REMOTE OPERATION capabilities!

UNBOXING>>>

Well the usual thrill of unboxing your latest toy and sifting through all the manuals, cables, bits and bobs is not what you're going to get here. It's a bit of an anti-climax - especially for a £250 product 😂.....


Okay, so what is the ColibriNANO exactly? Well for those who have been hiding under a rock for the past few years, it's an SDR receiver which uses your computer to do a lot of the hard work, such as signal processing. Instead of having a big box of electronic components to handle things, it uses the power of your PC to do a lot of it, via some very clever software. All the usual buttons, knobs and dials of a receiver are laid out onscreen instead and can be accessed by mouse, keyboard or touch.

The Nano is a 14-bit,  0.1~55MHz Direct Sampling, high quality, wideband SDR receiver with 3MHz sample-rate, in a very compact USB Dongle form factor. It's also incredibly tough thanks to its milled-aluminium casing which (apart from the strength benefit) provides fantastic RF Shielding. There's also a high level of ESD protection built into the device.


- Operating modes: LSB / USB / DSB / CW / AM / SAM / NFM / WFM
- Frequency range: 10KHz - 55MHz 
- Frequency range in undersampling mode: 10KHz- 500MHz 
- Sampling rates with 24-bit resolution: kHz 48, 96, 192, 384, 768 (visible spectrum width) 
- Sampling rates with 16bit resolution: kHz 1536, 1920, 2560, 3072 (visible spectrum width)
- Sensitivity: 0.35uV - Dynamic range: 110dB - Operating voltage 4.5 ... 5.5V 
- Power consumption: 0.41A - 14bit ADC - ADC clock frequency: 122.88MHz 
- Stable local oscillator with +/- 0.5ppm - attenuator / preamplifier in 0.5 dB steps adjustable from 
-31.5 to + 6dB - Antenna input with 15 kV ESD protection 
- SMA antenna connection 
- Dimensions L x W x H: 90Ñ…25Ñ…17mm 
- Operating temperature: +45 ... + 50 ° C 
- Weight: 43 grams
 
Apparently, it can actually operate at much higher frequencies than the specified 55MHz ceiling (up to 500MHz) but I shan't be bothering with that option because I have no interest in it as sensitivity drops significantly. The Nano has a L
ow Pass RF-filter on 55 MHz to protect from strong FM transmitters, which is very important to me, since I live very close to Winter Hill Transmitting Station which provides TV & Radio signals to over 6,000,000 homes in the North West UK.


The Nano has a clock-rate of 122.88MHz and nine IQ Sample Rates ranging from 48kHz right up to 3MHz. Choosing the right rate can provide you with the perfect frequency span on your bandscope. Frequency stability is quoted as +/-0.5ppm which is pretty good considering that the aluminium USB body temperature can change from very cold on startup, to really hot during extended use! 
The USB connector is Type-A and is USB-2. Although the device is very sturdy, I would not like to leave it hanging out of a laptop connector, preferring instead to connect via a short USB lead. I also connect the antenna to the Nano with a short SMA~SO239 pigtail.

In addition to the operating software, the ColibriNANO has some free Client/Server software for download which means that you can setup the device in an electrically-quiet location and access it from anywhere in the world through your PC/LapTop or even Phone. This is a massive feature as far as I'm concerned and more than compensates for the £50 extra cost over some of its competitors.


To operate remotely, you simply need to run the Remote Server software using something as simple as a Raspberry Pi. I'm going to try this on my Pi-3 at my sister's house. She has a 300ft long garden with a large wooded area at the end of it. Hopefully I will be able to create a temporary installation just to prove that it works before working on something more permanent. Needless to say, such an installation needs the radio, an antenna, a Pi/PC and a WiFi connection.

The Nano's software can be  demanding on a PC and but it runs well on either my i5 laptop of my i5 Surface Pro. There's no stuttering unless you try to run other demanding software, but that can change if you select the 3MHz sample-rate (but then who wants 3MHz on the scope? Not me). Up to now I've only used ExpertSDR2, but I wonder if V3 can be coaxed into playing with the Nano? I believe that you can also use SDRsharp and HDSDR.


There's a different version of ExpertSDR for each of the radios that EE sell and obviously, some have more options available according to the radio's feature set. There's no point for example, having a wide range of TX options on display for a receive-only unit like the Nano.

Once everything's connected and you have the software running, it's pretty easy to work out how to use it. As soon as you hit the START button, the bandscope and waterfall spring into life and signals are popping up everywhere. 
 
4k Display Option

One thing I like about ExpertSDR is the Attenuator Slider which allows you (in 0.5dB steps) to adjust the incoming signal from -30dB to +5dB instead of the usual On/Off switches. And whenever you do adjust the strength of the attenuator, the S-Meter reading retains its accuracy thanks to built-in compensation algorithms. Neat! 

The software includes the EiBi Database, so all the Broadcast Stations across the world are shown as blue spots across the top of the scope and holding your mouse over one of them tells you which station it is. Click a blue-spot and it instantly tunes the Nano to that station.  After setting up a DX-Cluster, any spots are displayed (CallSigns) on the scope and clicking one will instantly tune it in. It works amazingly well and regularly surprises me.

Audio quality is pretty good depending on the speakers you use. In the video below, I used a mobile phone to record a QSO on 40M, with the sound coming from the laptop. It’s infinitely better with a separate amplified speaker.


Noisy signals are easily cleaned up with ExpertSDR’s Noise Reduction options and the Noise Blockers (there are two) are just superb! There are a string of BandWidth buttons plus a Custom option. There’s something on my TS-590SG which I wish was on every other radio (including the Nano) and that’s the Beat Cancel function, which works incredibly well with some of the local noise I get.

Operating the Nano is just pleasurable! There’s no other software (that I’ve come across) that just lets you get on with having fun on the radio like ExpertSDR does. There’s no thinking about things, you just do it. This is in contrast to other 3rd party apps - to be honest, I even prefer it to SDR UNO - and that’s great software! The thing with UNO is, it feels very disjointed - some might call it modular, but the truth is, it can sometimes feel like hard work. Having said that, SDRPLAY are working on something altogether new.

UPDATE : EXPERTSDR3

I installed ESDR3 and it worked superbly. I managed to get it synced with my Kenwood TS-5900SG too, using OmniRig. ESDR3 is far more CPU-Efficient than V2. Just need to configure it to suit my personal and operating tastes. And then learn how to configure Remote Operation.


UPDATE > HEATSINK!
The NANO runs very hot in use and although it's designed to use the enclosure as a heatsink and everyone tells you it's perfectly normal, I was worried about longevity if I should choose to keep it running remotely 24/7.

I found some 20x20mm heatsinks on Amazon and thought I'd try them on the NANO. Sure enough, it now feels much cooler! I'm quite pleased with this cheap and simple mod. You can attach the heatsinks using some quality adhesive heat-transfer pads, but to be honest, I simply applied a tiny spot of Gorilla glue to each corner and lightly clamped them. Works a treat.


If you have any comments, please post below and remember to leave your name/callsign.


73, Tom, M7MCQ