
The first build of the QMX+ (HERE) ended up being a fail due to a short inside the CPU. Needless to say I didn’t make this diagnosis - it was a guy called Ian (G4GIR) who very kindly offered to examine the kit for me and he in turn received technical guidance from Jeff (W1NC) - I thank them both for their extremely helpful assistance.
As a result of Ian and Jeff’s help, I was able to convince Hans that the fault was not of my own making and so he sent over a replacement PCB and other components (but not the toroids). This meant that I had to reuse the old toroids, but rather than trying to desolder them all and then struggle to get them to fit with extremely short ‘legs’ (which would be nigh on impossible - it was tough enough originally), I decided to rewind them. Thankfully, I had two bobbins of the correct thickness enamelled wire.
The first problem though, was removing the hot-glue that I’d applied to the toroids on the original pcb! 🙄

Before I installed a single component onto the new pcb, I hooked it up to a PC with a USB-C lead and fed the pcb's Vdd with 3.3V (current-limited at 200mA) to make sure that the board showed up as an external drive - it did!
I wish I'd done this on my original kit because it would have showed that there was something wrong with the pcb because I wouldn't have wasted all that time and experienced all that frustration. It should be the first instruction in the build-manual.

Once I started the new build, it went together pretty quickly, although I will say again, it was a bitch to solder! I’ve never come across a pcb that’s given me as much trouble. It seems like the ground plane is huge and the solder pads are tiny.


Throughout the build I checked for a short between Vdd and Gnd. There were no issues this time and before I knew it, I was ready for the first power-up (again with a current-limited power supply set at 7V/200mA). The QMX showed up as a flash drive again on my PC so I dragged the firmware across to it and rebooted the radio. Bingo!….

With everything seeming to be working fine, I raised the voltage to 12V and tuned around for signals. I’m pleased to say that it seemed to be working okay, so then I tried some transmissions through my EFHW and searched the RBN to see how far I’d reached.


Once I could see that I was getting out well, I put the case together and tuned around the bands to test the CW Decoder - it was working really well!
So for now, I’m very happy! I’ve not done any proper testing of each band because I’ve had enough for now 😂 😂 I’ll do more tests next weekend and update this page.

When you make a warranty claim against a small company like this, you feel kinda bad about it and some people try to make you feel even worse, but when the claim is totally valid, I feel no guilt whatsoever and expect a very positive reaction from the supplier.
In the case of this build, the claim was appropriate and it was handled superbly by Hans Summers, without any delay or hesitation and I absolutely appreciate that. So much so that I went onto his donation page and made a voluntary contribution as a thank-you for making it easy.

UPDATE - TEST RESULTS<<<
Okay, so after successfully building my QMX+ 😵 I connected it to a PC and ran the terminal-emulator PUTTY to run some tests. I haven't evaluated the outcome - for now it's just a case of running the tests and grabbing screenshots. They may be of use to other kit-builders.
AUDIO TESTS


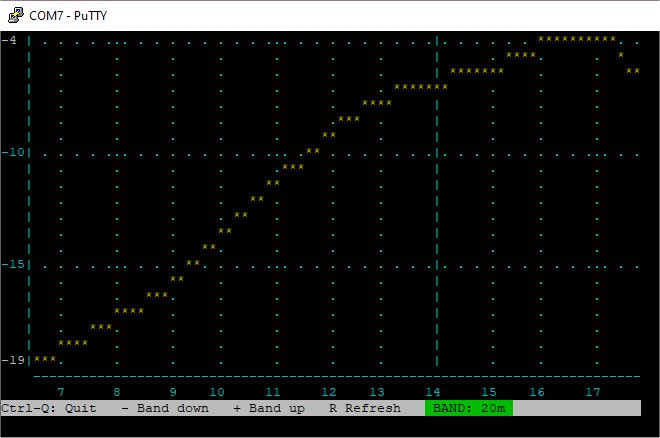


ADC I/Q TEST (all bands similar)


The main area for concern is in the AUDIO TESTS where the separation between the two traces is not particularly good - especially on 20, 30 and 40M. Well, that's how I'm reading it anyway! Your comments are very welcome and so too are your recommendations for how to improve the readings.
The DIAGNOSTICS readouts don't ring any alarm bells with me and I'm quite pleased with the power-output on most bands. As for the rest of the figures, I'm not really sure what I'm looking for. Again, any helpful comments would be greatly appreciated.
The RF TESTS indicate (to me) that 20, 40 and 80M need some work. How to improve those readings - I have no idea.
I'm guessing that the first approach should maybe be to REFLOW all the solder joints on the toroids, followed by a redistribution of the windings and see what changes. Other than that, I'm at the mercy of you, the readers 😊🙏
UPDATE <<<<<
28 AUG 2024
For the tests above, I had used a cheap Dummy Load that I'd bought from a rally, and tonight I decided to try the tests again with a good quality Dummy Load. There was quite a big difference in the readings! So before you run your tests, make sure you are using a good DL with sound connections.
Having seen the new readouts, I feel quite happy with the results 😍


The only thing remaining to do with this kit is to install the GPS unit, which I’ll do shortly.
UPDATE!
I carried out a mod to add an internal speaker - see HERE!

UPDATE!
SSB FIRMWARE!! Today I installed the latest firmware which adds SSB MODE to this amazing little radio. What a fantastic machine this is! 💖💖💖
PLEASE LEAVE A COMMENT BELOW!
(Either anonymously or with your callsign)
Thanks!
73, Tom, M7MCQ.
.
.
4 comments:
"I wish I'd done this on my original kit because it would have showed that there was something wrong with the pcb because I wouldn't have wasted all that time and experienced all that frustration. It should be the first instruction in the build-manual."
For sure, Tom! The QMX manual mentions in the USB connector "touch-up" advice section that boards are all tested before shipment and, honestly, I'm surprised your first board passed board test (speaking as a retired engineer who wrote a few "bed of nails" tests during my career). I assume that QMX+ boards are also tested before they are shipped. I'm happy that Hans provided you with the parts you needed to enjoy several more hours of your favorite hobby and addiction! ;)
I'll definitely add your suggested step to my pre-build QRP-Labs kit checks in the future.
Cal (AD8Q, N. Central Idaho, USA)
@CAL : Yeh, it’s a pretty crucial first step. Would have saved me a HEAP of grief! Ah well, at least others are now aware :-)
Thanks for the visit.
73, Tom, M7MCQ
Hi Tom
I'm glad to hear it's working this time! Have fun!
I'm sorry about the toroids though. If I'd known you'd glued then in and were going to rewind them I'd certainly have sent new ones with the new board! In any situation where we have a non-repairable board we do usually find it easiest to remove and re-use the toorods, without rewinding, even with the short leads it isn't too difficult and it saves a lot of time.
Testing with a 3.3V supply before assembly is a step that many constructors would not easily he able to do and would risk doing more harm than good. Particularly as we already test the boards so the test result st that stage should presumably be a success by definition.
The issue of the broken CPU chip on your first board is a mystery. All the boards are indeed tested here before shipment and indeed they MUST be because my team have to flash the bootloader, so the CPU must necessarily end up tested as part of that. Now on the Rev 2 boards which have the SMPS on the board, not plug-in, we do a more extensive test now that we are able to. So how it got broken is a mystery.
Anyway all's well that ends well!
73 Hans G0UPL
@HANS : Hey Hans, thanks for visiting the blog - much appreciated! And yes, all's well that end well. I'm loving the QMX+ and it performs superbly. Thanks again.
73, Tom M7MCQ.
Post a Comment