Saturday 30 March 2019

ICOM CONTROL SOFTWARE

RS-BA1 

Today I ripped out my shack and installed the IC-7100 in its permanent place. It's been one of those days where what could go wrong, did go wrong! Grrrr. Anyway, after that I decided to install some radio-software onto the new "big" PC. That was a ball-ache too! I must have upset someone, somewhere and karma was working against me.

So, some hours later, everything is working fine and dandy. Well apart from the fact that I still have to install the Elecraft KX3 and KXPA100 but I'll save that for another day. That reminds me - I need a power distributor!

The "CS-7100" Cloning Software is pretty straightforward and not dissimilar to Chirp. Does what it should and very little more.


I also installed the much more useful RS-BA1 Software which provides you with Rig-Control either locally or remotely. And when I say remotely, I mean from anywhere in the world!!


The only trouble is, it doesn't expand to full screen. On a HD monitor at 1920x1080 it looks quite small. Mind you, it makes it easy to run QRZ at the side of it.


Another MAJOR annoyance is that the software appears to expect you to be using a Mic plugged into the computer and NOT the mic on the radio!  If you use the radio-mic, an empty carrier is transmitted. Very annoying (unless it's something I'm doing wrong).

Wednesday 27 March 2019

ICOM IC-7100

NEW BASE/MOBILE STATION

The FT-897 was a lovely radio but I fancied something more modern to tie in with my HandHeld DSTAR Kenwood D74 so I look at the Mobile/Base from Icom...


Click To Read Brochure


The IC-7100 is a MultiBand, MultiMode, 100W Transceiver which provides DSTAR capability on HF, VHF and UHF. The radio covers HF/6M/4M/2M/70cm.

It has a base unit and a separate head unit which is connected via a Screened CAT-6 cable. The cable can be extended so that the unit can be operated from another room, or in the case of a car, the base-unit could be installed in the boot of of sight.

In addition to two uniform rows of switches, the radio has a bright, clear touchscreen for easily making changes to settings. It all seems pretty intuitive.


A matching ATU in the form of an LDG IT-100 is teamed up with the rig to make life simple.


Tuesday 12 March 2019

DSTAR ON THE D74

GETTING DSTAR TO WORK WITH THE D74 AND A DVAP DONGLE

Being newly licenced, I know pretty much nothing about everything, so DSTAR appears to be quite complicated to me and syntax is everything! One character in the wrong place and you get to hear nothing.

I read (or started to read) lots of articles on setting up Dstar and found them to be of little help to a beginner - mainly because the information is usually related to Icom radios and from what I understand, the Kenwood D74 is really quite different in the way you configure it.

I have spoken to a few Dstar operators and they shy away from helping as soon as you reveal that you're not an Icom user, so my intention here is to help any new D74 owners to get started. I still don't understand the system, but I can hopefully save you hours (maybe days) of struggle, anger and disappointment. 

So let's get you on the air and talking! After that, you can work on the rest yourself. I'm assuming that you have registered on the DSTAR Network - if not, do that first. Personally, I went to ICOM's WEBSITE - I recommend that you do the same. It's quick and easy. And in case you're wondering, it doesn't matter which country you're in.


and then come back here.

First of all, don't even bother trying to program from the keypad! You will just waste so much time and get so frustrated. 

You need to download the free MCP-D74 Programming Software from Kenwood's website HERE.

You also need to download a Virtual Com Port from this webpage. DO NOT CONNECT YOUR D74 TO THE COMPUTER UNTIL YOU HAVE INSTALLED THIS DRIVER

Once you have downloaded the virtual com port driver and programming software, read the installation instructions on the download pages and follow those instructions to the letter to successfully install the MCP-D74 software.


Okay so you've got the software and driver installed - now you should attach the D74 to your PC with the supplied USB lead. Switch on the radio and read the data from the radio. Select PROGRAM : Read Data From Transceiver (CTRL-R). Then click READ.

Now you need to store some commands and frequencies into Memory Locations. Don't worry, it's easy!

----------------------------------------------------

Bear in mind that if it were possible, you would normally be inputting the frequency of your local Dstar Repeater but you've got a Dongle, so I'm guessing you don't have a repeater close enough to reach reliably.

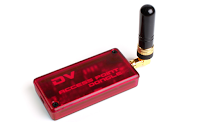
My dongle (or HotSpot) is a "DV Access Point" (DVAP) and it has a 70cm transceiver which means that I have to choose a frequency for the dongle to communicate with my D74. Initially I chose 438.625MHz. You choose your own frequency, making sure the frequency doesn't cause any problems with other users/services. The one I choose to operate from now is 438.800MHz. Of course your dongle might be 144, 220 or 433.

----------------------------------------------------

So back to the programming: Starting where you want (I scrolled down to Grp-1, Memory Position 100 for my first command), get ready to insert the frequency of your dongle.


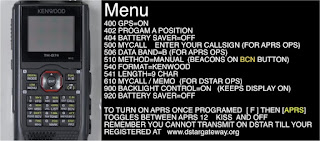
You will note that there are only a few columns visible and we need to open some more up. Click on the Display Items button and tick the boxes shown in the image below. 


With all the necessary columns displayed, you can enter the commands into the columns and rows.

Let me just explain (as I understand it in my uneducated way) that when wishing to work Dstar, you have to LINK to a reflector before you can talk on it. When you've finished, you should UNLINK from it. You CQ (talk) on the linked reflector. You can ECHO your transmission (have your transmission played back to you to check how your transmission sounds). You can request INFO from the reflector.

We want to put these commands into separate memories so that it's easy to get to them, simply by rotating the dial. So let's start doing that.

>>>>>>>
In your first chosen Memory Location, insert your dongle's chosen frequency...

Enter NAME as DVAP CQ
Change the Mode to DV.
Enter URCALL as CQCQCQ
Enter RPT1 as DIRECT
Enter RPT2 as DIRECT
>>>>>>>>

That's the first memory complete. Move to the next row down and input the data as shown on the image above, until you've completed all 6 rows.

Send the data to your radio by clicking on the Send Icon.

You now have all the required commands and you have two Reflectors programmed in. Both these reflectors just happen to be American, but that doesn't matter one bit. You will find Hams from all over the world on these two. I particularly like Charlie30 (REF030).

So, what now?

With your dongle active and the blue led flashing, you can go to your radio's memory bank and select the a Reflector from Memory - eg.. Charlie30 (REF030CL). Remember that this memory is programmed to LINK to the Reflector. Once selected, press the PTT button and hold it for a couple of seconds.

You should hear a voice telling you that you are linked to the reflector.

Now go to the memory DVAP CQ and talk!! Just try it by saying something along the lines of....

"<your callsign> requesting a quick radio check"

When you let go of the PTT, there will be a short delay and then (hopefully) someone will come along and respond to your call. Always leave 2 or 3 seconds between overs. 

When you've finished talking to your new buddy, say your farewells and then go to the memory that says "DVAP U" to UNLINK from the reflector.


THAT'S IT!! You're a DSTAR user!

Now you can start experimenting by adding more reflectors into memory banks. Just remember that you always start your session by LINKING to a reflector and you always end by UNLINKING. Inbetween you CQ.

Once you start using your radio this way and have fun talking to people across the world, you will soon pick up more tips and tricks and will hopefully learn to connect to Repeaters and Gateways.

I'll say again, I know nothing about everything and I don't claim to understand DSTAR but as I pick up more knowledge, I will add it for the benefit of newbies. If you have snippets to add, then please leave a helpful comment :-)


____________________


UPDATE-1
I forgot to mention that when I first got into one of the Reflectors, there was a LOT of noise in the background as people were speaking to me - it was terrible! The people speaking to me said that my audio was fantastic with full quieting, so I was puzzled. 

I explained to the other operators that it sounded like someone had opened up the squelch on an FM signal, allowing a load of floor noise through.

Well guess what? That is exactly what was going on. My D74's sub VFO had been left on the UHF Calling Channel (433.500MHz) and the transmission from the DVAP on 433.625 was opening up the squelch on VFO-B. Operating on 438.800 resolved all issues and is the correct place to use a hotspot anyway.

:-D So the fix was quite simple. Either change the frequency of the DVAP away from the 70cm calling channel or alter the VFO-B frequency. The former is recommended of course.


____________________


UPDATE-2

I received a brief (but very helpful) email from Chris Anderson M6VTX.....


If you are using the Kenwood D74 
On a Hot spot you can change 
Reflectors with the keypad. 
Using DTMF tones. 
Here’s how. 
Press PTT and then Press # this will unlink you from your current reflector. 
To connect to new reflector for example REF001c 
Press PTT and then press *1C
A-B-C-D are the top 4 buttons
And for say REF030C *30C
For DCS Reflectors start with D
Say DCS005B=D5B
For XRF start with B
Say XRF012A=B12A
Press PTT and 0 to find out what you are connected to. 
You do need to have the CQCQCQ
in the radio as if you were talking on a reflector for this to work.
It makes changing reflector fast and easy. 
Ps. Not sure if this works if you are working through a repeater. 


73s Chris M6VTX 

____________________


Saturday 9 March 2019

YAGI UDA

PORTABLE 3-ELEMENT 2M YAGI

A member of the West Manchester Radio Club, David Forshaw, very kindly brought in a portable 2M yagi for me to try out so I thought I'd take note of all the dimensions and construction techniques so that I could replicate it (and pass it on to others).

The longest piece is 46" which is pretty long, but with everything being made of aluminium, it's still quite light. It folds quickly, so you could slip in in a thin shoulder bag and carry it around easily.

NOTE that the driven elements terminate inside a plastic component case which is secured to the boom with a bolt and wingnut, so it's a very simple operation to loosen the wingnut and turn the driven element 90 degrees so it is lined up with the boom for storage/transporting.

The other two elements are also secured with wingnuts.


Wednesday 6 March 2019

MFJ-1708B SDR

Protecting the RSP1A

I use the RSP1A primarily to provide me with a panadapter for the FT-897D (or even the Elecraft KX3). The trouble is, when the RSP1A is sharing the same antenna as the 897, I'm unable to transmit for fear of blowing the front-end of the RSP1A. It would take very little power to render it useless.

So the answer is to 'disconnect' the RSP1A from the antenna each time I wish to TX. That would be a little tedious if it were not for the MFJ-1708B SDR, which disconnects the RSP1A each time I press the Mic key on the FT-897D.

The unit works in two ways - one is by sensing RF and the other is by detecting a control signal from the FT897's PTT circuitry. The latter is the preferred method and it is achieved by purchasing a CAT cable which has an RCA Phono lead that is connected directly to the MFJ-1708B.

As soon as I key-up, the signal from the 897 tells the MFJ to disconnect the RSP and as soon as I drop the Mic, it reconnects the RSP to the antenna. There is an adjustable delay setting to allow you to decide when the re-connection is made.


The “B” series offers better isolation, achieved by additional relay isolation, and is specified up to 450MHz. An internal hybrid splitter reduces the antenna loading effect and provides isolation between the rig’s input and the SDR input. A TX LED on the front panel provides visual confirmation of correct operation when the transmitter is keyed.

The MFJ-1708B-SDR features 3 SO-239 connectors, the MFJ-1708B-SDR-S substitutes an SMA female connector for the SDR connection.


  • Product Code: Y8PCATLIN

CAT control AND linear switching with one clever cable!
One problem with the FT-8x7 series of transceivers is that the CAT interface and the PTT output share the same connector. This unique cable not only allows you to control your radio from your PC, but also provides a linear amplifier PTT switching output too!CAT/programming cable
This handy cable allows control of your Yaesu transceiver by your computer.
  • High quality screened (shielded) cable to reduce noise and RF interference
  • Every cable is individually assembled and tested in our UK workshop
  • Superior quality USB to serial chips for guaranteed reliability
  • Length approx 1.7m/5ft 6ins - long enough even if your PC is under your desk
  • Extend up to 5m by adding a USB extension cable
For example, you can use remote control software like Ham Radio Deluxe or edit and backup your memory channels easily with FTBasicMMO. Contest and logging software can fetch your operating frequency and mode direct from the radio. If you are working satellites, your computer can automatically track your transmit and receive frequencies and compensate for doppler shift.
One end of the cable has an 8-pin mini-DIN plug which connects to the radio:

FT-100 – Band Data pigtail
FT-817 – ACC socket
FT-857/897 – CAT/Linear socket

The other end has a USB plug which connects to the PC's USB port. The cable contains a USB to serial converter, so the radio appears as a COM (serial) port on the PC.
The standard cable uses the SiLabs CP2102 USB to serial chipset.
If you prefer the FTDI FT232RL chipset, select the premium version.
Both work with Windows up to version 10.
For more detailed information please read our USB chipset information page.
Please note that a CAT cable is not an audio interface for data-modes.
Linear amplifier keying/PTT/switching output
This cable also enables your Yaesu radio to control the transmit/receive switching of your linear amplifier. Essential if your linear doesn't have RF sensed switching. Even with amplifiers with RF switching, it eliminates the need for switching delays that often mean missing the first part of the other station's transmission - irritating at best, but disastrous while contesting or working fast CW!

The transceiver end of the cable has a short pigtail with a phono (RCA) socket. You will need a 
screened (shielded) phono (RCA) cable to connect to the Key, Tx or PTT input connector of your linear amplifier. 


Monday 4 March 2019

DSTAR DV ACCESS POINT

DSTAR PERSONAL HOTSPOT

I was reading reviews on eHam about the DV ACCESS POINT USB DONGLE and it seems that everyone loves it. It has a rating of 4.9/5 so no issues there! The device description on eHam reads....

The DVAP, produced by INet Labs is similar to many of the homebrew D-STAR Hotspots. The device is used for simplex operations, but it does connect to the gateway. The DVAP plugs into your Windows or MAC computer via the computer's USB port and uses the internet connection to communicate with the D-STAR gateway.

The DVAP has a very low-power signal at only about 10 mW. It’s similar to the functionality of a simplex Echolink link node. The device’s 10 mW signal is intended to reach only a few hundred feet, but it allows you to use your D-STAR HT away from the computer around your house or around your neighbourhood at low power.

If you are using a small DSTAR radio like me (Kenwood TH-D74) and don't have a repeater closeby, you can connect this device to the internet via your Desktop/Laptop and then use your radio to tune into the DVAP's working frequency. I'm guessing that you can switch that tiny SMA antenna to an external one to provide extended coverage - I'll try it when it arrives.

And that brings me onto my next subject - the price. These vary from £250 to £299 depending where you go. Mine cost £30 from eBay as a used item. I figured there's not much to go wrong with a solid-state device, so I took a chance on it.


I will post more about it when it has been installed and tested.


Sunday 3 March 2019

FIRST DX ATTEMPT

QRP DXING

Today I was reorganising my shack, finishing the RF Earthing and installing an MFJ-1708B SDR antenna switch. It took a lot longer than I thought it would and by the time I'd finished I was ready for a mid-afternoon beer :-)

Once I'd got everything connected up, I sat down and switched the Elecraft KX3 on and ran the RSP1A to give me a panadapter. 40M was dead so I flicked to 20M and BOOM, there were loads on - mainly Americans and Canadians.

I tuned one guy in from Ontario - VE3EJ, John Sluymer, and listened for a while. He had very clear audio and a nice S7 on the meter. With 10W I thought I wouldn't stand a chance of him hearing me, but to my surprise he shouted back immediately! He gave me a 5/9 report and asked me how much power I was using. When I told him 10W he was surprised and asked me to confirm, lol.

Well he was no more surprised than me! With that success (and a grin on my face), I tuned around and scooped up a few more contacts in Canada and USA. I had been thinking of tweaking my half-size G5RV but this success made me decide to leave it well alone!

A great first day DXing from the shack. Can't wait to get up in the hills and try it :-)