Three and a half years ownership of the ICOM IC-705 have passed and I thought it might be an idea to take another look at it to see if it still rules the roost for Portable Radios in 2024. In this 'look back', I'm only going to focus on what I've been doing and how well the 705 has worked for me. My original review is >>HERE<<
What should I compare it to? Well the truth is, there's nothing currently on the market to compare - that's a fact! Yaesu have dropped their old FT817/818 range and it was way out of date anyway. The Elecraft KX3 was a great alternative if you could live without all the features of the 705, but they're next to impossible to get hold of in the UK and the price has just gone plain silly anyway!
If you put the IC-705 and the KX3 side by side in a shack at home, you might be able to detect that the KX3 is slightly better at receiving really weak signals, but for the other 99% of the time, when you've driven, walked, hiked to the perfect take-off spot and set up your antennas, there's little practical difference between a KX3 and the 705. Or between a 705 and an 817. In fact, my $89 (tr)uSDX will probably get you as many QSO's in the log as the others from the top of a hill!
Over the last couple of years I've relied almost exclusively on my IC-705, using it outdoors, on hillsides, in the back garden, in a park, at the caravan, by the seaside and even at home as a base station. It's been utterly reliable and surprisingly tough even though it's not been wrapped in cotton wool. Unlike my Elecraft, I've never really worried about it - I guess I look upon it as a bit of a workhorse. If it gets a little scratch or a ding, it doesn't really matter. I don't believe it would substantially affect its resale price either.
The notable difference between the IC-705 and other radios is flexibility, features and what I call 'friendliness'....
The Icom IC-705 is more feature-rich than any other portable radio. It puts together such an awfully good package that you don't have to buy anything else (assuming that you use resonant antennas). You can operate throughout HF, 6M, 2M and 70cm on LSB, USB, CW, AM, FM, DV and DSTAR.
With the radios built-in server, you can operate remotely. With the built-in WiFi you can tether to your mobile phone and operate Digital Modes out in the field. Thanks to the built-in GPS, you can even ensure accurate timing for FT8, etc.
Forgot to take a pen for logging your QSO's?? Don't worry - you can record all QSO's onto the SDCARD and run back through it later to get the callsigns - it even records the time and date of each individual QSO!! How good's that??
After using it so frequently and for so long, I'm now in that happy place where I know I just need to grab my small rucksack and head off outdoors for some radio fun. I don't need to carry a million bits of ancillary items - it's just my radio, my antennas and my iPad. If I'm just going out for a couple of hours, then I rely on the Icom battery, but if I'm out for the day I will take a 13.2V LifePO too.
Up on a hillside, I tend to stick with 5W and there's little need for more. Usually, the take-off is excellent and my SotaBeams Dipole works amazingly well - enough to have SSB chinwags across to America from the UK. In fact, one of my favourite chats was from a beach to two hams in America using only 2.5W (KE5EE and WD4NGB).
If I'm struggling to get a response to my CQ calls on 5W, I might move up to 10W, but once I establish contact with someone, I ask them to let me drop to 5W and get another report. If the report is very good (it often is) then I'll ask for another at even lower power. Needless to say, I don't want to make the QSO hard work for the other operators, but most people are happy to experiment with me and they often end up dropping their power to me too and because they've been so used to knocking out 400W+ for years, they've forgotten how far they can get on a tiny fraction of the power. All very entertaining (to me at least) 😂
I have to admit that it's easier to answer someone elses CQ Call than it is to get a response to your own CQ Call at QRP levels. But patience often does reward. I find that using the IC-705's TX Memories makes light work of repetitive calling. I have a Long and a Short CQ Call recorded in memory and it's easy to set a TX-Loop going. The call is repeated over and over with a small pause inbetween to allow you to listen for any responses.
Once I've finished with SSB, I tend to briefly switch to the 705's CW TX-Memories and put out a "CQ TEST" for a few minutes on various bands to see how far I get on the Reverse Beacon Net before switching over to DSTAR depending on how close I am to a repeater. The IC-705 comes with a comprehensive list of repeaters already programmed in and thanks to the built-in GPS it can quickly determine which repeaters are the closest to your location and list them in order of distance (showing you the distance of each one in miles or kilometres).
After DSTAR I might switch to FT8 which gives me a chance to grab a drink and a sandwich.
The IC-705 has proven to be a true all-rounder and can seemingly do it all, without any fuss or alterations or expensive plugin modules. The only thing that isn't included is an ATU, but neither does the KX3 come with one (unless you pay almost £300). Most of my portable antennas are resonant, so I usually have no need for a tuner, but if I want to use a multi-band end-fed, then one is required.
I own three ATUs - the LDG Z100PLUS, the Elecraft T1 and a recently added MAT-705PLUS. My favourite is the Elecraft T1. It's compact, light and incredibly good at finding a match - quickly!! And finding a quick match is very important when it comes to QRP equipment because many QRP Transceivers don't seem to have a very robust PA, resulting in blown transistors during long tuning sessions.
Thankfully, the 705 is pretty strong in this respect and I've never had a problem when tuning up using any of my tuners.
The success of the IC-705 in the marketplace has led to much third-party and community support. One of the most useful addons for the 705 is Marcus Roskosh's SDR-CONTROL app which not only provides remote-control operation, but also provides a host of other tools which make the 705 (or 7610 or 9700) an absolute dream to work with. It's a game-changer.
SDR-CONTROL is available on IOS or MAC and I personally use it with my iPad 11. It performs flawlessly with virtually no lag between the readings on the radio and the readings on the iPad. It's all very fluid!
All the functions of the radio are available on the software display and the bandscope and waterfall are superb!! It's nice and easy to adjust the bandscope to increase the signal-peak display size and the ratio of scope to waterfall. The meter is nice and clear but I was hoping for an analogue option which isn't there (in the current version). Long-pressing the "TUNE" button sets the power to 10% (adjustable in menus) and transmits in AM mode so that any attached tuner will activate safely. Long-pressing the PTT button will allow you to choose between the radio's mic or the iPad's mic.
VFO AandB are visible onscreen and it's easy to switch between the two. Everything is very intuitive and there's never a struggle to figure anything out. Take FT8 for example - you can switch to it and be making contacts within seconds! No fiddling around with cables, no special drivers or VACs - it just works. Simple!
Any FT8 contacts that you make are logged automatically and that brings me to the next feature in the SDR-CONTROL toolbox - the LOGBOOK. Yes, there's a logbook built-in and it has an easy export function to transfer your contacts to your QRZ, etc.
By clicking on a button, you can see the full contents of the ToolKit which includes some very handy features such as the DX Cluster. This can show you active signals on the bandscope, allowing you to quickly spot and engage desired DX. There's also a BandPlan, a set of CW Macros, QRZ LookUp and PSK Reporter.
There's lots more to this amazing App and it adds so much to the already pleasurable IC-705. I suggest that you go read the manual by clicking on the image below to find out much more about it...
So, as you can guess, I've been very happy with my 705 - probably more so than any other radio I've owned (and that's saying something). It does pretty much everything I want and it does it all simply, effectively and without fuss. I can play on all the ham bands, in all the modes, I can do analogue and digital and I can enjoy fantastic support from third-parties and a knowledgeable community.
What do I dislike?? Not much really - in fact it seems a bit churlish to complain when a radio offers so very much. If I had to be Oliver Twist and ask for more, then.... I'd ask for CW Decoder instead of the RTTY Decoder. Having said that, the 705 interfaces very easily with my PreppComm Morse Encoder/Decoder....
I do believe that the IC-705 is genuinely the best portable transceiver ever to hit the market. It offers such great value for money and has so many features and functions. And it's not just about the specification list - it's about how everything works - it's incredibly intuitive. Everything falls to hand and makes sense.
There's so many features which make life easy for the operator and where some radios end up looking like a bowl of spaghetti when trying to do something different, the IC-705 often does it wirelessly via WiFi or BlueTooth. Even small things like getting a pair of AirPods working - I've come across so many radios which have BlueTooth but then fail to connect to BlueTooth headsets! The Icom even works with Yaesu's headsets! The very fact that you get a server built into the radio to enable remote operation is pretty darned amazing - especially when you consider that even Yaesu's £3,100 Flagship 101 doesn't have such a feature 😮.
And yes, the £45 SDR-CONTROL software significantly adds to the richness of the 705 which some might say is down to Marcus Roskosch and not the radio, but the fact that the Icom is flexible enough to permit such interaction/connectivity is something that should be applauded.
Okay, so what about something other than a KX3 or 705? Let's say you bought an FT818 or a G90 or a TX-500?
Well for a start, I wouldn't even give the Russian-built TX500 a second thought because I wouldn't want to support the economy of the disgusting terrorist Putin. Although the HF TX-500 is a very visually appealing transceiver and is around 2/3rds of the price of a 705, it lacks most of the features that I personally value.
The G90is a fabulous budget HF transceiver which offers lots for little, but at the end of the day, it's a cheap Chinese radio which I could never consider to be my 'forever radio'. Like the TX-500, the G90lacks valuable features.
The FT818 is an old favourite of most hams. It's been out there for over 20 years and at half the cost of a 705 is always going to be the QRP radio of choice for people who are happy with the basics. But let's face it, it's old technology and looks like a dinosaur compared to the 705. A rugged, reliable shack-in-a-box but limited in a modern world.
So in summary, I am still over the moon with the Icom IC-705 and I'm glad I invested in it. In the past, radios have 'come and gone' but this one has stayed with me and I can't imagine a time when I would swap it for something else. Maybe Yaesu will bring out something to compete, but I can't imagine how they'd actually make something better! If they do, I'll be all over it 😁
HIGHLY RECOMMENDED!
Please remember that these are just the opinions of an M7 operator. My goals, desires and requirements will be different to yours. I'd be interested to hear about them. Please feel free to leave a comment below and include your CallSign if possible. 73, Tom.
UPDATE <<<<<<<
Read THIS POST to see how I connected the 705 with an Expert Electronics ColibriNANO SDR receiver to provide a large screen panadapter.
UPDATE <<<<<<<
Read THIS POST to see how easy it is to use an external amplifier with the IC-705, in this case an MX-P50...
UPDATE <<<<<<<
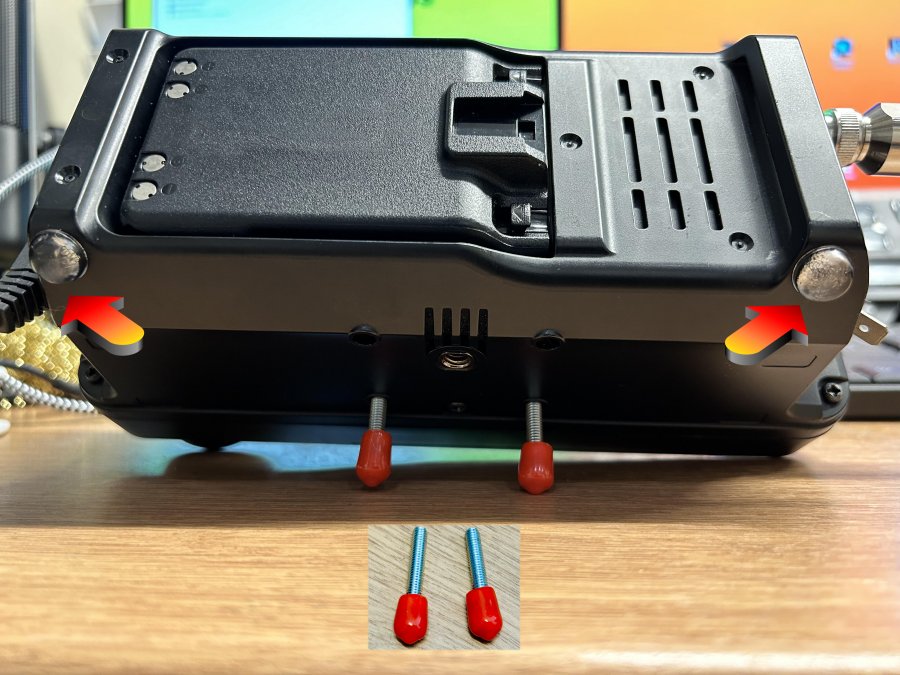
I paid over £20 for my tilt-stand and although it's good for shack use, it makes it a little awkward to fit neatly in my ruckshack, so I've started using a couple of 25mm roundhead bolts instead. Takes seconds to lightly screw them into the base and it results in the radio being tilted to the perfect angle. I got the screws from the local £shop in one of those little multi-pack screw sets.
SMA Caps hot-glued to bolts to provide non-slip solution
Quick 5W QSO - internal battery
UPDATE August 2024
Yaesu just announced the planned launch of the FTX-1F (early 2025) and all the Yaesu fanboys are waving their flags, claiming victory over Icom, who led the way with the 705 FOUR YEARS AGO! 😂
The FTX-1F will be a great radio and having Dual Receive is a big plus for many people, but will it have all the amazing features and benefits that Icom have been supplying for years??
Look at the FT-DX101D : that was launched 3 years after the glorious 7610 and it still didn’t have a built-in Server! It didn’t even have a clock!! 😂 But it did have a 3D scope to keep the Under-12s happy 😂
I hope the FTX-1F has all the bells and whistles of the 705 like built-in Server, QSO Recorder, GPS, WIFI, Bluetooth, etc. I will probably buy one if it’s not stupid money. But I reckon it will cost about £1700 (or more). We’ll see.
The Icom IC-7100 is an amazingly versatile little radio, loved by many and underrated by more. It's the only 100W mobile transceiver in the world to provide you with HF, 6M, 4M, 2M, 70cm and DSTAR in the world.
As good as it is (read about it here), it lacks what many people want these days - a nice colourful scope and waterfall. Of course you could always add an external sdr receiver and share the antenna between it and the IC-7100, but then you'd run the risk of blowing your SDR's front end when you transmit, so you'd have to find a solution to that little problem.
Wouldn't it be much nicer though if the IC-7100 had an IF-OUT port on the back? Well sadly, it doesn't - but you can add one and you'll be pleased to hear that it's quite a simple task as long as you're okay making some soldering connections inside your radio (don't worry - they're very easy to do).
SDR-KITS offer a range of Panoramic Adapter Tap boards to fit most radios and the one for the IC-7100 is the PAT150M. The kit I purchased was the cheapest at £12 which is basically, the pcb and nothing else! What I should have bought is the pcb and one of their fitting kits which provides you with a length of coax terminated with a chassis-mounted SMA socket.
Without the fitting kit, I had to use an SMA-SMA lead that I had spare, which meant the connector would be floating at the back of the radio - no big deal, but if I was to do it again I'd definitely buy the fitting kit.
To do the job, you'll need the PAT V board, an SMA lead (or the official fitting kit), some double-sided tape, a small ring-terminal, some solder and ideally, a hot-glue gun.
The first job is to remove the top and bottom covers of the IC-7100 which is a simple task involving unscrewing 6 screws on each cover (they're all the same size).
Looking at the photos below, you will quickly recognise where the PAT V has to be located. It goes underneath the radio onto the main board and fits over the area where there's 10 large soldered connection in a circle as shown in the image below. You can also see in this diagram the other locations we'll be connecting to...
Those 10 pointy solder connections are the reason we want to isolate the PAT V board. Cut out a piece of the double-sided tape to cover the underside of the little pcb, making sure that the tape is fractionally larger than the pcb. You could use that common foam-filled tape, but I went for 3M VHB Tape which you can buy on a small roll.
Knowing that I would have cable passing over some nearby connections, I also added an extra piece of 3M tape to make sure no stray wires came in contact (yes, I know there should be no stray bits, but better safe than sorry).
When you're ready to fix the PAT V board into place, make sure that the far two solder connections of the ten remain showing and align the board to match the image above (note I have drawn a blue line to help).
With the board in place, you can make up a wire to bridge the connections shown in the image (the single red wire).
Then route your coax from the rear of the IC-7100 to the PAT V board and solder into place as shown in the image. This was my chosen route, but there are many options available to you depending on where you want to connect your external receiver. There's even a route to the front of your IC-7100, but it's trickier.
With that part done, it's time to finish the final connection to the PAT V board. Fix a small ring-terminal to a wire and fix it to the ground screw on the radio's pcb. Then solder another piece of wire to the connection shown in the image below. NOTE: I used a hot-glue gun to keep the wire fixed in place close to the pcb.
The other ends of these wires go to the PAT V board as shown below. Finally, make a small link wire to bridge the PATV board to the third connection.
That's it! Reassemble the radio and test. I used an SDRPLAY RSPDX for my external receiver, but you can use any similar product. The software I started with was SDR UNO but I also tested it with SDR CONSOLE and both were spot on!
Once it's up and running, you can use the external receiver as just that (an extra receiver) or you can use it to provide you with a panadapter for the IC-7100's using Omni-Rig to keep the radio and the external receiver's frequency locked in together.
There are a few panadapter options out there for the 7100 but I reckon this is the most simple to fit. And it's cheap too!
For the last few years I've been using the amazing ELECRAFT T1 with my IC-705. Well actually, I've been using the Elecraft with all my QRP radios and I've been extremely happy too!
My only gripe with the T1 has been the lack of an interface cable. Elecraft have been saying for years that they are making a lead for the IC-705 and it's just never materialised - annoying!
Anyway, when Icom introduced their AH-705, I thought it would be worthwhile investing in one, but at £300, I quickly changed my mind! And apart from the silly money, they're also quite big and heavy considering the application.
I'd previously looked at the Mat-705 but the first version of it was not very highly rated, so I gave it a miss. When the PLUS model was introduced, it looked to be much more interesting, so I looked further into it. It too was a bit pricey when it was launched, but I was always going to wait for one to appear on the second-hand market anyway.
MOONRAKER
I found one on Facebook Marketplace for £100including postage. Bargain!!
The MAT-705 PLUS brings USB-C charging to the tuner and a redesign which removes the need for an On/Off switch. The unit turns on automatically when plugged into the radio.
The unit is small, light and looks pretty robust. It is not, however, waterproof. Some people are complaining about that, but it's not something that bothers me at all - I don't work in the rain either 😂
The MAT-705 comes with a USB-C charging lead and a 3.5mm TRS interface cable. The LEDs on the faceplate are large and bright - easy enough to see in bright sunlight.
The tuner has thousands of memories, which makes tuning super fast once it has learned the antenna its connected to, but even on a fresh tune, it only takes a few seconds anyway. It's pretty quiet too (especially compared to something like an LDG Z100PLUS).
Tuning through all the bands
I've got my MAT-705 and IC-705 configured to tune on PTT which means everything is just automatic - I simply press the PTT on the mic (or the VOX button on the radio) and tuning instantly begins. It's seamless and effortless.
If I'm using my Elecraft T1, I have to make sure I'm on 5W, change mode to RTTY, press the tune button on the T1, key up and wait for a tune, then change the mode back and adjust the power (if needed). A bit of a faff.
So having played around with the MAT-705 PLUS, I have to say I am impressed! I love the compact dimensions and the integration. Some people have complained about the battery life between charges, but it's not something that bothers me too much, because I'm always careful to prepare for a day out playing radio.
I always charge things which need charging the night before and in addition to that, I'm anal enough to always carry a USB Battery Pack with me.
So in summary, I think this is a fabulous IC-705 companion and it means I can leave my Elecraft T1 in my FX-4CR case.
USING THE MAT 705 WITH OTHER RADIOS
Neil, G1AAD wrote to me, telling me that he’d figured out a way to use the tuner with other radios and he very kindly put together this document to explain how it’s done….
Manually using the MAT 705 Plus ATU with any radio.
There is basically a two line interface (plus ground) between the IC-705 and the Mat ATU. The Key Line and Start line.
The Key line coming out of the 705 to the Mat tuner has 3.3V on it. When connected to the Mat tuner this drops to approx. 2.7V and basically tells the Mat tuner to wake
up and power on. At the Mat tuner end this allows the Mat tuner to tell the 705 to keep the transmit on until the ATU tuning cycle has finished.
With the Mat tuner is connected it wakes up and then puts 5V on the Start line which goes back to the 705. This tells the 705 it is connected to the tuner and illuminates
the Tuner icon in the Function menu.
On transmit the 705 pulls the Start line to ground to tell the ATU to start the tuning cycle. Once the tuning cycle has started the Start line is released after approx. 1 second and goes back up to 5V. But this timing isn’t critical which is helpful for us because this starts the tune and can be done simply with a momentary push button switch.
During the tuning cycle the Key line is held low by the Mat tuner and is released high on completion which stops the 705 transmitting. The 705 tune power is also reduced for tuning.
So all we need to do is to put approx. 3.3V on the Key line to wake the Mat tuner up and manually pull the Start line down just before pressing PTT on your connected transceiver, then release the start line and wait until the tune cycle has finished. When you hear the relays stop chattering release the PTT. Remember the Mat tuner will remember frequencies so subsequent tunes could be very short.
Unlike the 705 you will not get any indication that any particular tune has not been successful. This is signalled to the 705 using a pulse on the Key line just before it goes high and TX stop. You will have to use your own connected SWR meter or transceiver display.
I chose to use a single 3.6V AA sized battery (search for 3.6v lithium aa battery on Amazon). The diode is to drop the voltage a little to match the 705 and the resistor is to
limit the current taken by the Key line again to tie with that found on the 705. The current taken down the Key line is approx. 10uA and 70uA in Tune so the battery will last a very long time. Once tuning is complete the switch can be turned off as well because the Mat tuner has latching tuning relays and full pass through on power down.
So tune procedure is :
Connect up – reduce TX power
Press Start - then press PTT – then release Start (after approx. 1 sec)
Keep PTT pressed until tune cycle finishes
Switch off if you want
RISKS and unknowns.
I measured the current being drawn down the Key line from the 705 and chose the components below accordingly. The Start line is pulled to ground inside the 705 anyway so a momentary switch to ground is fine. So confident on the circuit and the procedure.
The key risk as I see it is the transmit power to tune. The 705 tune protocol deliberately reduces the output power for the tune whatever the 705 transceivers power setting – you MUST remember to do this manually on your transceiver. It looks like the 705 uses less than ½ Watt to tune and then jumps up to full set power after tune. This means you would need an in-line >10dB 5W attenuator for something like the tr(u)SDX but the FX-4CR could be turned right down to a lower setting.
There are no obviously big load resistors inside so I would definitely stick to less than ½ watt for tuning to avoid damage to the tuner. In the AH-4 ATU document there is reference to 350mW tune power which would tie with my power readings – is that relevant ? The more recent AH-705 is quite different at 5 to 10W.
UPDATE : did some testing with my FX-4CR and it seemed to only tune and get the green LED on when I was transmitting about 1 Watt. Definitely more delving needed here then.
And of course then wick it up to no more than 10W once tuned.
Many thanks to Neil for this valuable information - very much appreciated!
Doesn't everyone hate Micro-USB?? Wouldn't we all love to have just one type of USB connector? Well I would for sure. I think that USB-C should be the only type out there and all variations should be banned, lol.
With that in mind, I was very interested to see the introduction of an upgrade from iHelpUTech for the Icom IC-705 which swapped out the Micro-USB and replaced it with the far handier USB-C. Now let's make it clear from the get-go that this 'upgrade' does not upgrade the USB connector's functionality and does not allow for any USB-C charging benefits - it merely gives you the convenience of having a USB-C socket.
So is it worth changing the control board just for that?? Well that's a personal choice, but with this new control board you also get a vast improvement in protection for the radio when using an external amplifier. That alone is worth swapping out the board!
The tiny transistors inside the original Icom control board can only handle a very small amount of current and in some cases they could easily be destroyed with just a few mA whereas the new control board has transistors which can handle around 1A, so that's a HUGE safety margin, should there be any spikes.
The board cost £68 and I think that's a reasonable price to pay for this convenience and protection. The actual fitting of the board is an absolute doddle and all you need is a screwdriver to complete the job.
First of all, remove the battery, followed by the four screws on the back of the radio. Then you remove the top and bottom screws holding the front panel on and gently pull apart, noting that there are a couple of ribbon cables connecting the two halves together.
I left the ribbon cables in situ and simply rested the two halves next to each other. You can see that the control-board is held in place with 3 screws, so remove those and gently lift up the control board and remove the ribbon cable once you've lifted the tiny black release-tab.
Then connect the ribbon cable to the new control board, close the release-tab and screw the board back in place, but before tightening, insert a USB-C cable into the port to make sure it's aligned properly.
Join the two halves of the radio back together and before inserting the screws, refit the battery and make sure everything springs back to life. Insert a USB-C cable and plug it into a charger to check that the 705's charging light comes on. If it does, you can screw the radio back together. Job done!!
Below is a video from iHelpUTech covering the whole installation....
VIDEO
This installation was super easy but the previous owner of my radio (for whatever crazy reason) decided to Loctite the upper and lower screws in the front panel which resulted in me totally stripping one of the screws 😡😡😡 If the screws don't come out easily, make sure that you have the absolute correct screwdriver or the same will happen to you. These radios require a JIS type screwdriver.
Having owned some of the best transceivers in the world, is it a surprise to see what it's been whittled down to today? I guess many will think I'm an out and out nutcase, but the fact is, I've experimented and enjoyed every minute of it. Being the sort of person who loves a bargain (and the art of negotiating), I've managed to snaffle some fantastic deals over the last few years which has usually allowed me to get my money back when I've sold the equipment and even make some money along the way. Sometimes I've been able to pass on a bargain to a friend, which is also nice. I learned that you can get a 7610 for under £2400 and you sell one for the same amount 4 years later. You can buy a KX3 for £700 and sell it later for £1700 😮
Farewell my beautiful friend
The very best radio I've owned was the IC-7610 without a doubt. Better than my FT-DX101D and better than my EE MB1 PRIME. It was just a magnificent machine, but I had to face the fact that I barely used it since buying a holiday home. The big radios just sat gathering dust in my shack and with times being how they are, it seemed ridiculous to have all that money sat idle, so I thought long and hard about how I typically spend my radio time and made some drastic changes.
Being unable to have a 'proper' antenna at my home QTH was always the elephant in the room. I had two EFHW's oriented North-South and East-West and that's it - they were the best I could make of a bad situation. Having said that, I've managed to bag some seriously good contacts with those antennas and the 7610.
But I've also bagged some amazing contacts from the shack using a £60 QDX and a £90 (tr)uSDX. So you have to question the cost-efficiency of those big radios, especially when you are a QRP operator.
So, with the jewel removed from the crown, I decided that my IC-7100 would remain in the shack and become my main radio there. It's the only transceiver in the world which covers HF, 6M, 4M, 2M, 70cm and DSTAR. These are probably the most underrated radios of all time and it will be fine for everyday use.
Because the 7100 isn't an SDR radio with all the benefits of a scope and waterfall, I also installed a HERMES LITE 2 PLUS which is simply incredible value for money and has some of the best software available at any cost! I recently spotted another one of these on Facebook Marketplace for £200 and the day it arrived, I posted out to a buyer for £275 😁
For things like POTA and FIELD DAYS where you have the benefit of being in a vehicle, I have the stunning MISSION RGO ONE radio which is just an absolute joy to use. For SOTA type outings I sometimes use the amazing ELECRAFT KX3 transceiver which has become a classic and is highly sought after, not only as a portable, but also as a base-station when using an amplifier. The receiver is just stunning!
And that leaves the glorious IC-705 for no other reason than I love it. I very nearly sold this and then came to my senses. It's the most advanced QRP transceiver in the world - bar none! Apart from covering HF, VHF and UHF, it also has a myriad features and functions that leave you in awe of the Icom design team.
Have you changed your shack a lot? Or are you the sort of person who sticks with the same trusted rig for years? I'd be interested to know in the comments section below.
Most hams who love to operate outdoors, prefer to work at QRP levels. Being in the great outdoors usually gives you a fabulous take-off and provides a super-low noise-floor. 10W, 5W, even a couple of Watts can get you across the Atlantic on SSB and that’s something that just thrills me and keeps me interested in the hobby.
Back home however, all the stars need to be aligned for long distance QSO’s to take place. It’s doable of course, but it can be hard work for people at the other end of your transmission, which means that I avoid joining in on any overseas Nets. It’s the main reason that I don’t do much transmitting from the shack. No big deal, cos during Spring, Summer and Autumn it’s easy to setup outdoors. A pleasure, in fact!
I actually have a Xiegu XPA125B amp (boxed and on sale (now sold)), which produces 100W from a 5W input, but it’s useless to me (it came with a radio that I bought (X6100)). The problem with it is that you can’t turn down the power - it’s 100W or nothing! I’d keep it if I could feed it with 1W and get 25W out. Why?? Because at the end of February OFCOM will be allowing Foundation License holders to use 25W.
What I wanted was an amp which would provide me with 25W comfortably without putting strain on it. I looked at the Neptune 50W but, for the amount of use it would get, it was more than I wanted to pay (and I couldn’t find any used models anywhere).
And then I read some reviews of the MX-P50 made by Sun Xiao in Shandong, China. Being a very happy owner of a fabulous radio from China (FX-4CR), I'm not one of those "Let's hate China" brigade, so the MX-P50 seemed to fit the bill. It was just a case of finding a used one for a decent price.
With the 80-10M MX-P50 being able to produce 45W from a 5W input, I knew that it would be positively coasting along at the 25W limit I’d be setting, so longevity shouldn’t be an issue.
When it arrived, I could see that it had never really been used. It had been a backup amp to a HardRock/Hermes setup and had spent most of its short life in the box. The amp is really very compact and light - great for those who want to take it with them on a Field Day.
Apparently, it works well with a range of radios including the FT-817, KX3, IC-705, etc, but people using more obscure transceivers may experience issues.
The amp’s power cable was fitted with Anderson Power Poles and the interface cable was terminated with a 3.5mm stereo jack plug. This was perfect for my Icom IC-705 and worked straight from the get-go.
I know I'm drifting a bit here, but I think it's important to realise that amps can send current back into your radio if a spike is generated by the relays during switching. This current might be small, but it can cause damage to your radio's keying circuitry. This isn't a problem unique to the MX-P50M - it can happen with any generic amp.
I'm guessing that most people ignore this potential problem (or just aren't aware of it) and probably get away with it, but I don't want to put my radios at risk, so I use a buffer device from a guy called RADIODAN in the USA. He calls it an RBI-1 (Relay Buffer Interface) and it can be adapted to work with virtually any radio (although he sells specific interface kits anyway). It will work with any radio that has a keying output which goes to GROUND when transmitting.
Using this relay buffer provides peace of mind and is (IMHO) a very worthwhile accessory for all your QRP radios - all you need to do is make up a different lead for each keying connection type - for example on many radios it will be a simple 3.5mm jack, while on others it will be phono (RCA) or even something like a multi-pin DIN.
There is also a 'mod' which can be carried out to prevent spikes into your radio involving you opening up the amp, cutting a couple of wires and soldering few small components. It's detailed HERE in this video where the construction method is better explained. The mod was designed by Kevin Loughin and his video can be found HERE. When I opened up my amp, I discovered that the previous owner had already carried out the mod.
So, back to the amp itself. When connected to power the MX-P50M circuit is live all the way through to the relays even though the Power Toggle is in the OFF position, so don't switch the amp off thinking that it's not draining any power from your battery - it is - only a tiny amount, but it's there.
With all the connections made between the MX-P50M, the RBI-1 and the IC-705, I switched the amp on, set the radio's power to 1W, switched to CW and briefly stabbed the key - the amp worked! I sent a few more dits and dahs before switching over to RTTY mode and keying the mic to send a more sustained output. Everything went well.
Now it was time to insert a Power Meter so that I could find out how much power into the amp would result in 25W out (to the dummy load). With the meter inline, I observed the following results...
The power-out reading on the radio pretty much mirrored the power-out on the meter (x10), so that was great. It altered slightly on different bands, but not a mile off. So 2.5W in, 25W out 👍
Obviously, for those who are licensed to use it, there's 45W available. So there you have it, a nice little amp which is just perfect for UK Foundation License holders and their QRP radios.
UPDATE JAN 2025
Since writing this post I have managed to connect the Elecraft KX3 and the Elad FDM DUO to the amplifier too - click here!
73, Tom, M7MCQ.
MX-P50M HF POWER AMPLIFIER
Specifications
Frequency Band : 80m 40m 30m-17m 15m-10m Operating Modes : SSB CW AM, RTTY and FM-Reduced duty cycle RF input : 5W Output power : 45W+ Band mode : Manual Power requirement : 13.8V 8A , RED “+” BLACK “-” Cooling method:passive air cooling Antenna connector : SO-239 50Ω Size : 155*100*35 ( mm )D*W*H Weight : 0.55Kg