
QUICK >>UK<< REVIEW
OF PREPPCOMM MMX

It's always bothered me that I can’t work CW - I find it very appealing and recognise its ability to potentially reach much further than SSB. Even in poor band conditions, CW Operators seem to be able to have QSO’s. But what can I do?? I’m too old and too damned busy to learn a new language.
I borrowed a Morse Tutor and Key and I tried my heart out for a while, but soon realised that it was going to take me many, many months to reach the point where I could call myself proficient - and that means many months of not doing something else with my leisure time.

Traditionally, decoders/encoders have been very poor performers. A few companies have manufactured Morse Code Readers/Keyers such as MFJ with their 464 model, but reviews of this and other similar devices are not very complimentary at all 😢
Machine decoding of Morse is not easy. Some people think of CW as ‘digital’ because of its ON/OFF nature, but of course it is very much analogue. Apart from the on/off element, there’s also the shape of Dits and Dahs and the oh so important spacing between them and the spacing between the letters and between the words.
Human beings cannot send perfectly timed and spaced morse code, but thankfully, they don’t need to, because the human on the receiving end has a brain which is powerful enough to cope with the variances - a machine can’t!
So all was lost! Then I heard about the PREPPCOMM DMX-40...

The DMX-40 SDR Morse Decoder & Encoder Transceiver (designed and built in Idaho, USA by Eric Anderson and his team) is a standalone, portable single band (40M) SDR QRP device which allows users to decode morse signals and it also allows you to transmit morse code by simply typing your message on the supplied keyboard with up to 3W output.
Now, similar claims have been made in the past and some manufacturers have got closer than others in achieving this holy grail, but according to an American reviewer, the PreppComm actually works - almost every time!!
That is great news and it will be of considerable interest to many people out there who want to join in the fun of CW and benefit from its long reach. The DMX-40 has a CW receiver which is said to match some of those on more expensive radios. Thanks to its high-noise immunity decoder, it has superb sensitivity and selectivity and decodes text even when the band is very noisy and busy with people transmitting very close to one another.
One of the most appealing features of this transceiver is that it's compact and portable and will be a fantastic aid in SOTA & POTA operations. Unfortunately, you have to use the supplied keyboard - you can't just use any old USB keyboard, but thankfully, the supplied unit is light and will fit into your go-bag with ease. I managed to find an alternative on Amazon called the SR Mini Keyboard as a backup.
The 3.5" colour-screen is a Touch Screen, making operation very simple and intuitive. There are 28 menu screens in total, including a built-in Help Section - that's always good to have when you're out in the field and you've forgotten how to use a particular feature.
In addition to being a self-contained 3W CW Transceiver, you can also connect the device to your existing radio and (in theory) use it to decode/transmit CW on any of the bands that your radio has - including VHF/UHF. That would be amazing!
Finally, this device could become your active (and passive) morse tutor. You can attach a key and practice as much as you like and instantly see the results on screen. Currently, you can only use a straight key, but hopefully, there'll be a firmware update in the future which allows paddles.
PreppComm is a small company, but the benefit of that is that you feel like you can relate to them and it's both interesting and amusing to read through their Development Blog and learn about the trials and tribulations of getting an idea to a working product. One part of the Blog relates to installing SMD components on PCBs and boy, I think everyone in ham radio can symapthise, LOL.
I purchased my PreppComm directly from America and due to chip shortages, it took a loooong time to arrive in the UK. I was then hit with import duties and to be honest, had a bit of a nightmare with the courier.
On opening the parcel, you will find (depending on what you ordered) the radio, a protective lid, a compact keyboard, a power adapter, cable-set, a pair of 'legs' and a screen cleaning cloth.

The thin legs which came with the MMX were not very practical as far as I was concerned, so I replaced them with a pair of slimline Laptop Stands from Amazon. These are permanently attached to the base of the rig and fold away neatly when not in use.


Before using the MMX, you should take a few precautions. Don't rush into things like you might do with a regular radio - this isn't a regular radio! You really do need to read the manual or you may end up pulling your hair out and even worse, damaging the rig.
Here's what I suggest you have to hand...
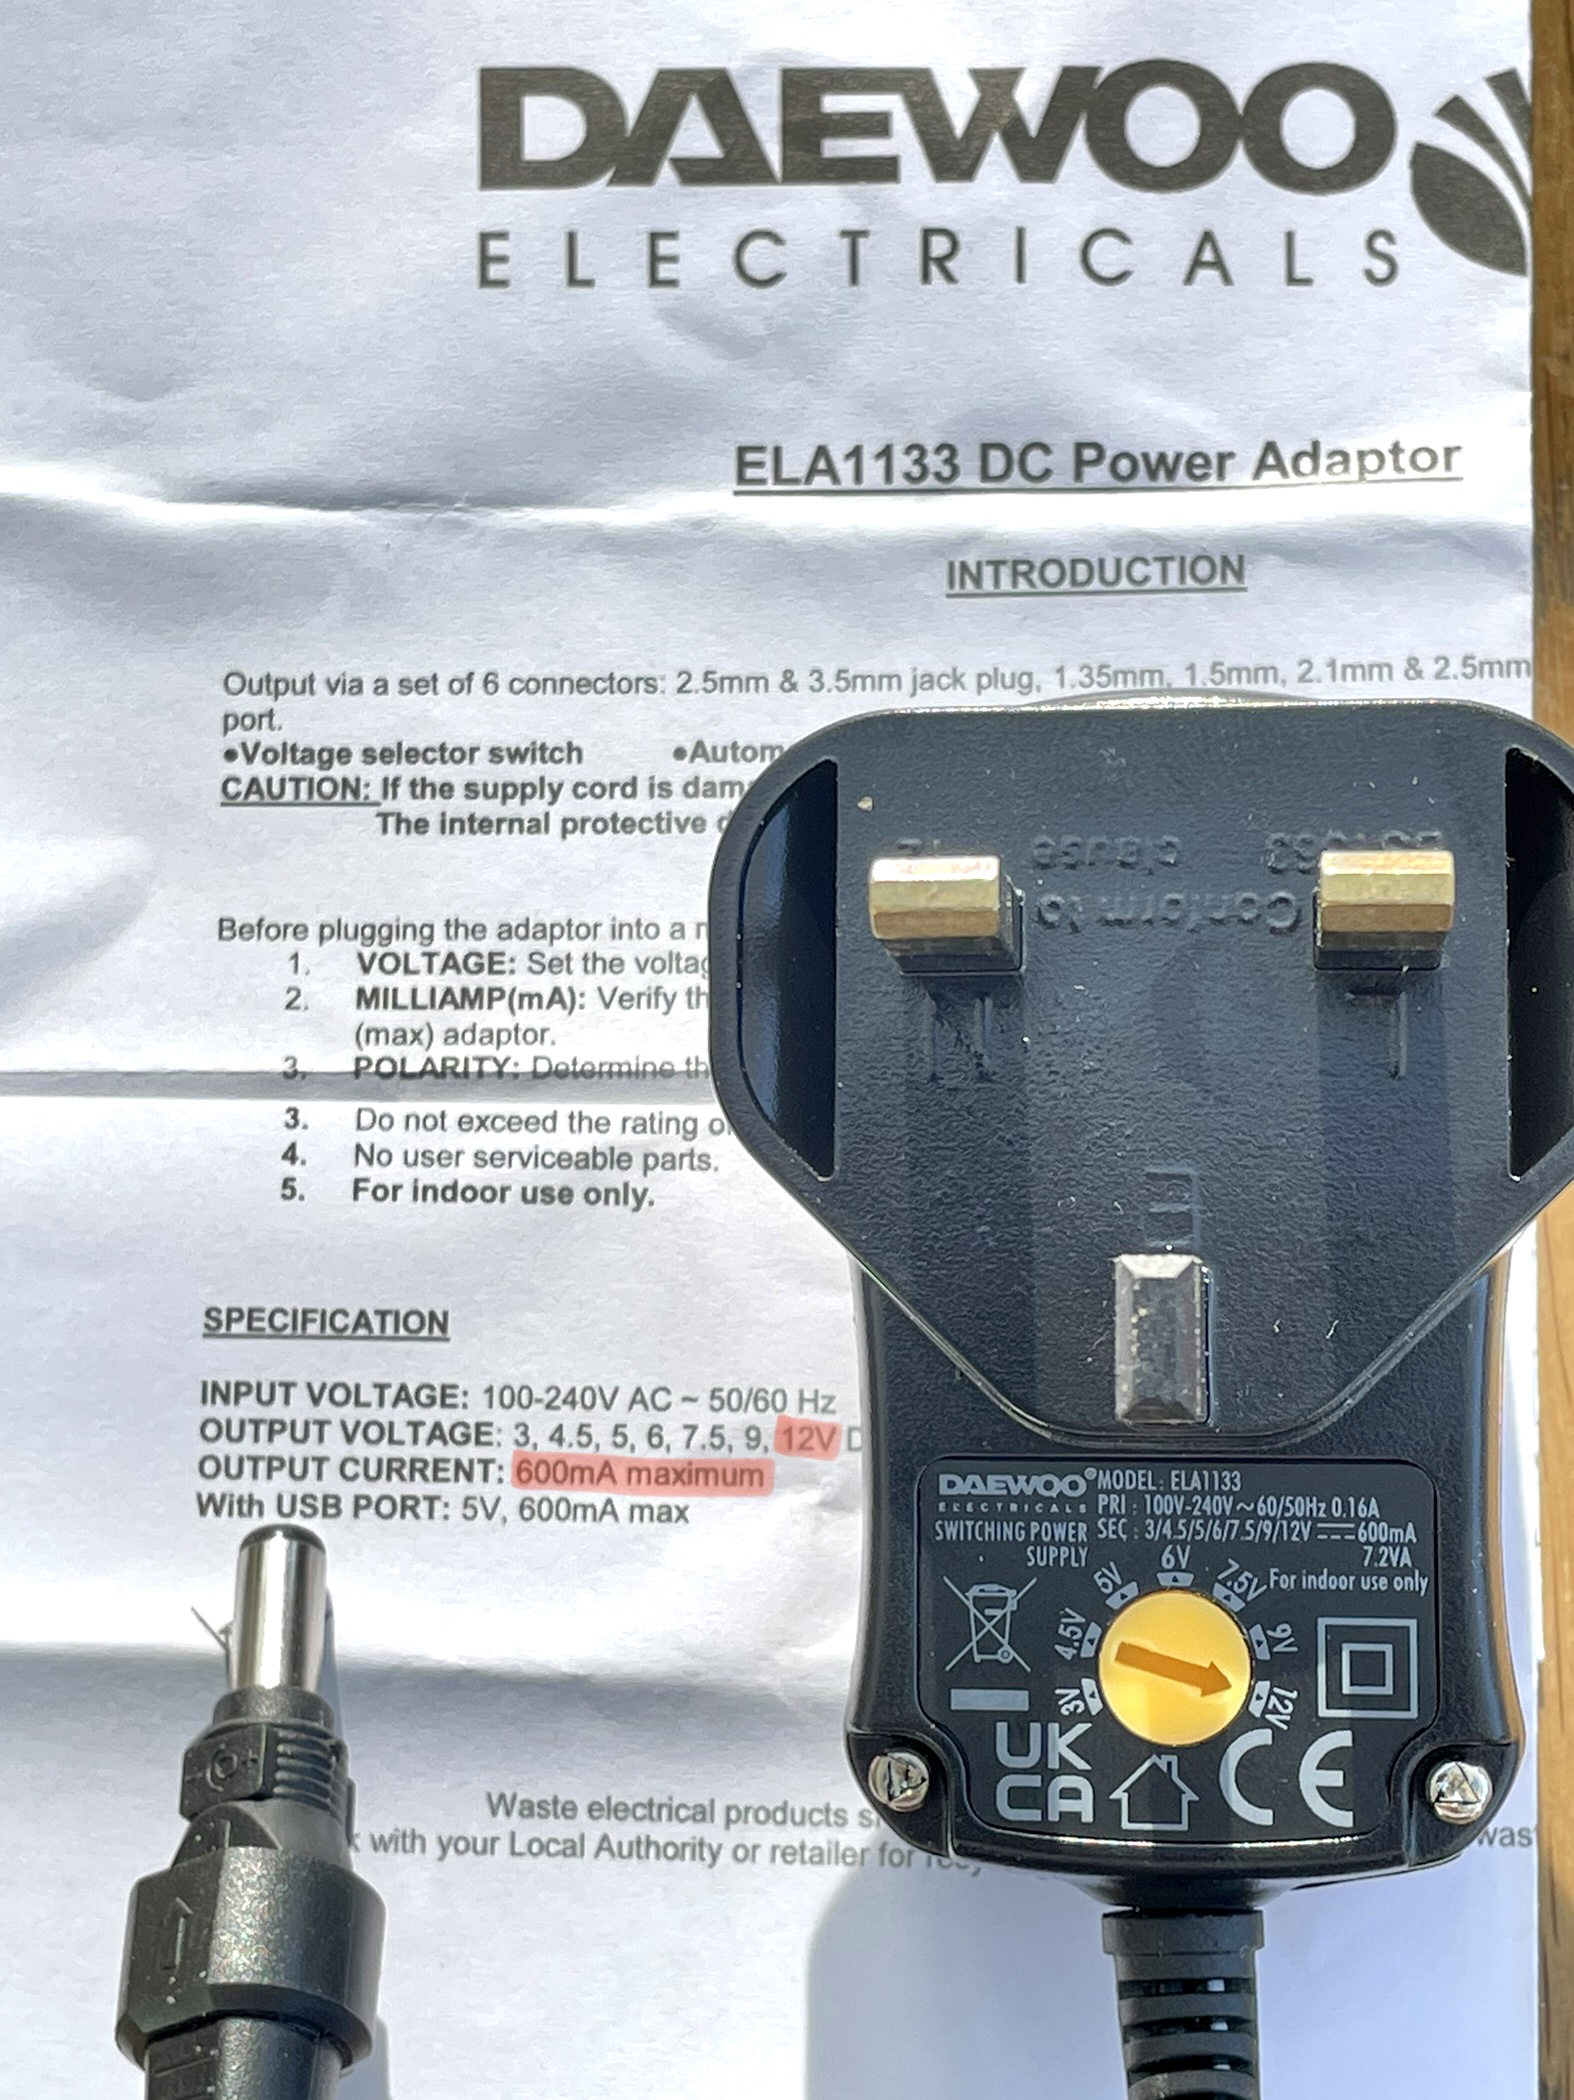
- A 12V 600mA power supply.
PreppComm recommend their own PowerBank, but any current-limiting power supply will do. The radio has no built-in protection, so in the event of an antenna short or very high swr, your radio could draw way too much current and cause damage requiring a workshop repair. Better safe than sorry.

- A Dummy Load.
You can install a small 5W SMA Dummy Load directly to the RF connector or use a patch lead to connect up to a bigger dummy load. This is essential while you are learning how to operate the radio.
- An SWR/WATT Meter.
Ideally choose a QRP Meter such as the MFJ 813. Something which is able to monitor swr and power output at low levels. - HeadPhones or Powered Speaker
The radio has no internal speaker, so you will always need to connect one.
- A Resonant Antenna
When you have learned how the MMX functions and are ready to go on-air, you should ideally use a resonant antenna. If your antenna is not resonant and you usually rely on a tuner, then I would suggest using an SWR Bridge to protect the radio's PA from any high SWR during the tuning cycle.

STANDALONE (QRP) MODE or EXTERNAL
When you're starting out, you need to make sure you're in External Mode - this turns off the receiver and transmitter, preventing accidental transmissions. While in this mode, you can practise all the operations detailed in the manual. Since the transmitter is disabled, you needn't fear rookie mistakes - it's your Safe Mode!
Once you feel that you understand your way around the MMX, it's time to remove the Dummy Load, connect an antenna (preferably a resonant one - check the SWR) and switch to Standalone Mode by selecting a band/frequency.
Standalone Mode (sometimes called Companion Mode) allows you to receive and transmit, so take your time and have the User Guide to hand. Pretty soon you'll be tuning in CW signals and will see the decoded message onscreen. The MMX is pretty amazing at decoding - even in noisy conditions and you'll soon have a smile on your face 😊
When someone calls CQ, the radio is usually able to detect the sender's CallSign and it's very easy to respond. You simply press the ANS button and your radio will begin to reply with your CallSign and let you type your message to the caller. Don’t forget to press ANS after you’ve finished typing, or you won’t receive anything back.
If your transmission is heard by the other station, you'll see his/her response and you can continue with your QSO. There are a number of Macro Memories for the messages which one sends routinely such as "Your report 599" or "Thx for QSO, 73 M7MCQ", etc, etc.
Rather than responding to someone else's CQ, why not call CQ yourself? Simply press the onscreen CALL button and the radio will start the sequence. It will repeat the call until you press CALL again or press ESC on your keyboard.
The PreppComm has no tuning dial, so you'll need to use the onscreen arrow-keys to navigate the band. It feels odd at first, but you soon get used to it. Just remember though, accurate decoding will not begin until you initialise it by pressing the spacebar on your keyboard. Do this every time you retune the receiver. (READ THE MANUAL).
Using the PreppComm as a standalone unit is the simplest method of operation and you'll have lots of fun with it at home or out in the field. It's small enough and light enough to throw in a go-bag with a wire antenna and take with you on a walk - just don't forget the keyboard (as I once did, lol).
TIP : When you start out experimenting in Standalone Mode with your new PreppComm, do yourself a favour and optimise the chances of success by operating on a day when the bands are buzzing with signals and operate from a location with a good take-off. Better still, find a good CW operator who is willing to send and receive with you while you learn the operating process - priceless!
And don't forget that when you think the radio isn't decoding properly, it may well be a poor operator who's simply not very good. They are out there 😆, so QSY.
Remember that you're operating at QRP levels here (3W) and if you're not used to that, you could get frustrated. Avoid trying to break through pileups - try calling CQ instead. Spot yourself on sites that allow it - that always helps.
CONNECTING TO ANOTHER TRANSCEIVER
(External Mode)

You can see in the photo above that I've used a 12V PowerBank and connected to it to the MMX using a USB 5V to 12V Lead which has built-in current limitation to protect the finals. A worthwhile optional purchase!

If you bought a single-band DMX or a 3-band MMX, then that will determine how many bands you can work on, but if you connect the PreppComm to an external radio , you can work on any band you like!! You also benefit from having extra power (if that's what you want), extra facilities such as bandscope and waterfall, etc, etc.


Okay, now this is where it gets a little more complicated - but very much worth the effort of reading through the REFERENCE MANUAL.
As shown in the previous diagram, setting up your radio is pretty simple and logical, but getting good decodes from your PreppComm is a little more tricky and confusing.
The confusion is pretty much down to the very odd 1300Hz tone which PreppComm use. Most CW tones (pitch) are set around 600, so why did Eric choose 1300Hz??
Well (for reasons beyond my understanding) it makes it easier for his machine to decode reliably - even in noisy parts of the bands.

LETS RECAP on what’s going on…

At this point though, the PreppComm CANNOT HEAR IT!
Your CW Pitch is set at 900Hz and the PreppComm is listening at 1300Hz, so you need to tune a little higher up (400Hz (the red line)) and boom, the PreppComm will start to decode!
But because you’ve moved your transceiver away from the actual signal, if you now transmit, you’ll be 400Hz away from the sender and he won’t hear you. That’s why we use the RIT feature.
RIT allows you to LISTEN on one frequency but TRANSMIT on another. So you’re tuning into 7.035MHz for transmitting but actually receiving on 7.039MHz.
I hope that helps to make it clear. Without an understanding of that, you could end up struggling and unfairly blaming the PreppComm for failing to decode as advertised.

So, back to the PreppComm’s performance...
After you have spent time reading the manual and getting a grip of the tuning and general operation, you will soon start to enjoy the device. It works well and is a very welcome addition to the shack (and rucksack).
I noticed something odd last night though - while tuned to 7.030MHz, I could hear feint foreign voices in the background which then changed to music - it was a broadcast station! I switched the antenna over to my IC-705 to see if I could still hear it but I couldn't - presumably because the 705 has much better filtering. I'm pleased to report that it didn't effect the MMX's ability to decode the cw signal - which in itself is a good indicator of the decoder's ability to ignore unwanted noise.
In Standalone Mode, I think the DMX/MMX receivers are probably better suited to outdoor operations than indoors. If you're doing a SOTA or POTA operation, with low ambient noise levels and a decent antenna the PreppComm will absolutely thrive! 3W is more than ample to get Transatlantic contacts.
Back home in urban or suburban areas, where conditions can be far more challenging, I believe it makes much more sense to use the PreppComm in External Mode connected to your Base Station - again it will thrive!
There's lots of fun to be had with this device and once you understand how to operate it, your previously 'cw-void' logbook is going to start to fill up with new contacts. Sure, there's a learning curve - not only the operation of the device but also the cw etiquette and procedures, but it's all worthwhile.
Would I recommend buying one? Yes! Absolutely!! Especially now that a UK Distributor will be available 👍
Which model should you buy? For those wishing to work with the PreppComm as a standalone, then I'd choose the MMX.
Who else might be suited to one? I am personally aware of at least two CW operators who have developed conditions as they've grown older that have left them with shaky hands. Having a PreppComm could potentially allow them to continue enjoying their beloved hobby.
POSITIVES :


1 comment:
Good morning Tom, as always a very good review. I am one of those CW purists....BUT having said that decoders are just fine. I have in the past used them and as long as the senders code is good the decoder has no issues. I still have issues decoding (by ear) some code that is sent. Letters run together and sometime wonky spacing.
Have a good week,
73
Mike
VE9KK
Post a Comment