Saturday, 15 January 2022

QRP-LABS QDX REV.2 REVIEW

 BUILDING THE QDX 'REV2' BOARD

I recently built the Original QRP-LABS QDX (Rev-1) and everything went very well. It was an enjoyable kit and so I thought I'd purchase the Rev.2 board so I could keep one in the shack and stick one in my 'go-bag'.

I'll state right now that this build did not go well initially - there were problems which drove me nuts and I later found out that it was nothing to do with anything that I'd done - it was a fault on the PCB.

I chose to record all the details of the build (and the struggle) so that anyone else who experiences similar problems may benefit. Bear in mind that this is written from the perspective of a BEGINNER with virtually no electronics knowledge. So here we go....
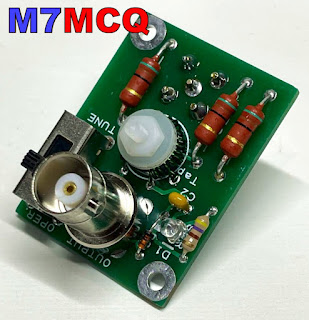
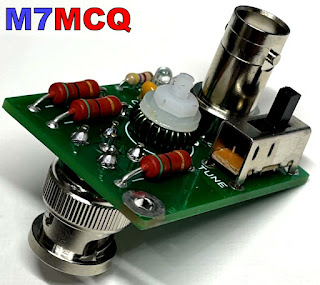
Part built


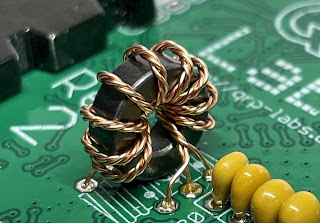
29 DEC 2021 The QRP-LABS QDX Rev-2 didn't take long to arrive and I was happily putting it together over the Xmas holiday break. Although 
I know nothing about electronics, I do have a good mechanical aptitude and I'm perfectly capable of soldering components together, whether they like it or not 😂

This updated kit thankfully didn't have any SMD parts to worry about and I found it extremely easy to build. If I say so myself, I did a great job of all the toroids and was especially proud of my L12 with its awkward taps. It was much neater than the first one I did.

It fitted onto the PCB like it was made to measure and I experienced no problems. Neither did I have any problems with the trifilar T2. I took my time with it and made doubly sure that I had the correct A-A, B-B and C-C. I even went to the trouble of colour-coding them with a touch of acrylic paints (my other hobby is painting) 😊


After a few hours, the kit was finished and ready to plug in. Everything had gone together really well and I wasn't expecting to have any operational problems with it. I had followed the newly revised Assembly Manual (V1.08) to the letter and had carried out all the prescribed checks along the way.
_________________________________________________

WINDOWS 11
FIRMWARE 1.03
BUILT FOR 9V OPS


Before I loaded WSJT-X, I decided to run the PuTTY app and try some tests. The first test I chose was the Transmitter test. Using a SotaBeams Dummy Load and an MFJ-813 meter, I could see that it was putting out a solid 5W.The main LED was flashing 3 times during tx, as it should.

TIP : If you can't make out how many times the LED is flashing, record a video of it on your phone and play it back in slow motion.
 
I then chose to run the Audio Filter sweep. The results were not good at all 😢...


Next up was the RF FILTER sweep and I wasn't expecting anything good from it. I was right to feel that way because ever time I ran it, it swept up to 100% and then completely locked up. Ctrl-Q didn't work and I had to force the whole app to terminate. This app works perfectly with my Rev.1 QDX.


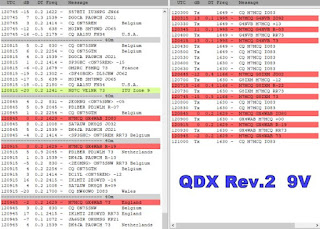
Feeling very dejected, I decided to do a Factory Reset but I knew it was a waste of time because I'd not actually altered anything in the first place that might cause an issue! Needless to say, it made no difference, so I decided to run WSJT-X. Well I wasn't really prepared for what I saw.....


Jeez!! What was going on????

I powered down and looked at the PCB again. Everything seemed perfect! I used a huge magnifier and a strong headlight to examine for stray solder traces, but there were none. I know this is not exactly a beginners-kit, but it's not rocket science to insert components into a PCB and solder them, is it??

I was puzzled and the ONLY thing that I could possibly have done wrong is the trifilar T2. Maybe after all that colour-coding I'd got it wrong??? No way! But it was the only component that had the potential to go wrong. So I got my multi-meter out again.

Doing the recommended A-A, B-B and C-C checks for continuity, showed no issues. Continuity was present in all three checks. BUT THEN I noticed that there was continuity between all the contact points 😱

I checked the manual to see if I'd missed any instructions to check for NO CONTINUITY between A-B-C. There wasn't any. So I was in a dilemma. Should there be continuity between all these points???

I had no choice now but to cut T2 off and desolder the bits left in the pcb. I then proceeded to carry out a continuity-check on the bare contact points on the pcb where T2 sits. I found that there were indeed some continuity between some of the contacts (see videos below). 

WHILE I HAD T2 ON THE BENCH, I tested it with the multi-meter to confirm that there was only continuity where there should be (A-A, B-B, C-C) and nowhere else. The test was all clear. So this gave me the comfort of knowing that I hadn't got it wrong.

Since there was nothing else I could do, I rewound T2 and after checking I'd matched up the correct pairs (over and over and over), I reinserted the toroid and tried it out using PuTTY and WSJT-X.

Same results 😡😭😡😭😡😭

I have no idea what's going on. I can only hope that Hans (or some of the other clever guys in the GROUPS.IO)  can offer some help. I'm totally cheesed off and puzzled.


Another test done (at the helpful suggestion of a GroupIO member) was to test R18 which came back as ZERO resistance. That was with T2 removed.


I'll update when there's something new to say. 😰

73, Tom, M7MCQ.


UPDATE 3 JAN 2022

Since Hans has not had time to respond with any suggestions or instructions to take measurements at specific points, the project has pretty much come to an end and I'll just have to forget about it for now and revisit it later - no point keep stressing over it when there's nothing further to be done at this time.

Thankfully, I have my original Rev1 QDX build to play with. That works superbly.

UPDATE 6 JAN 2022

I’ve had plenty of amazingly positive and helpful comments on GROUPS.IO trying to help me resolve the issues (along with the odd smartass remark), so I’ve decided to forge ahead with diagnostic and repair efforts. More later….

UPDATE 9 JAN 2022

At the suggestion of members of the GROUPS.IO,  I had measured the voltage on IC3 and IC4…

IC3 PIN9 = 2.5V
IC4 PIN7 = 0V
IC4 PIN9 = 0V

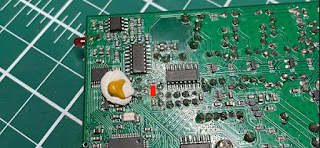
I was advised to remove C38 (which appeared to be shorted) and retest IC3 & IC4, so I did…

IC3 PIN9 = 2.5V
IC4 PIN7 = 2.5V
IC4 PIN9 = 2.5V

Since I don’t own an LC Meter, I couldn’t measure the value of the C38 cap, but it certainly displayed a short.

This thing has been a Major PITA and I have been so frustrated with it all compared to my Rev1 which is running superbly.

It turns out that the board I received from QRP-Labs had this dodgy cap right from the start, so I’ve ended up wasting lots of my precious leisure time. I can’t deny being a bit miffed about it all. I wish I could just start afresh with a new board!  I cannot even imagine soldering an SMD cap back in!

Anyway, I’ll just have to send a support ticket in and see what happens.

My next update will hopefully be my last one (and a positive one).

M7MCQ.


UPDATE 14th JAN 2022
The End Game!

After submitting a Support Ticket to Hans via the official website, I received a reply telling me that it would be extremely rare for a capacitor to fail, let alone as a short (even though I'd already said the cap WAS shorted out).  He said he could see four possible options....

1) Find someone (in UK) who can solder on a new C38 (SMD)

2) Return it to me in Turkey to solder on a new C38 (SMD)

3) We send you a whole new kit - NOT a preferred option!

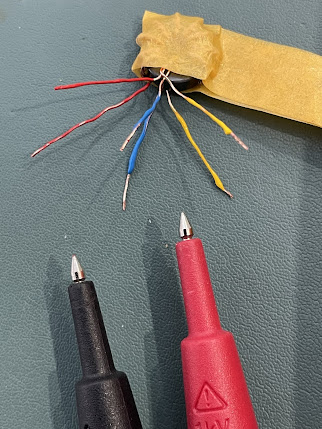
4) Find any similar capacitor, or higher value, which is an ordinary through-hole component, and solder one end of it to the appropriate wire of the trifilar transformer, and the other end to a convenient nearby ground point.

Well I was already feeling a bit miffed about all this trouble with the kit, so I wasn't really in the mood for Option 1 or 2.  

Option 3 might result in a wait of weeks or months for the next batch of pcb's so that wasn't an option either.

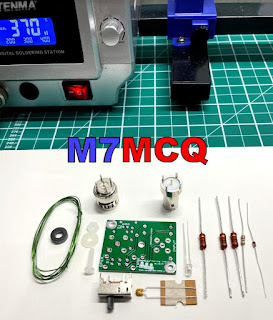
So Option 4 seemed like my only real option. So I ordered some through-hole caps and waited for them to arrive. It only cost me a couple of pounds but as usual, it's the waiting that cheeses you off, so I paid for express-delivery which cost me much more than the caps.

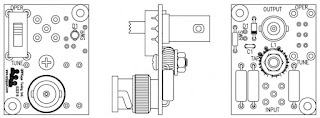
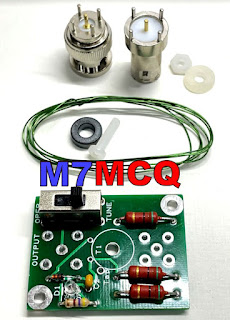
So when the caps arrived, I went to install one as advised by Hans. He said it should be fitted between the two top trifilar connections (images below). I found it quite tricky to do until I temporarily applied a blob of Blu-Tak to hold the cap in the right place until I'd soldered one leg successfully.


Once the cap was soldered, I checked the AA,BB,CC connections and all was well, so I laid down a small piece of tape to prevent the cap legs touching anything they shouldn't - just a precaution.

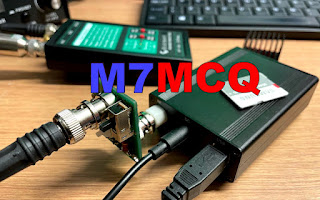
Now it was time to fit the pcb into its case and connect to a PC!

I first of all connected it to the PuTTY App and ran all the usual tests. Everything was looking pretty good apart from the 80M RF SWEEP  which looks odd and I don't know how to resolve it. I reflowed L12 contact points and even tried adjusting the spacing of the coils around the 80M section but nothing has made a difference and the receive is excellent anyway.


Next up was the AUDIO FILTER SWEEP which looked acceptable to my eyes...


POWER TESTS revealed a full 5W on 80, 40, and 30M but only 3W on 20M 😮

On WSJT-X  the receiver was pulling in signals NO PROBLEM!! All bands pulled in lots of signal reports, so it was now time to ENABLE TX and see if I could make a contact with someone.

To my sadness, I couldn't manage a single QSO. I tried many times but not a single operator responded to my calls. I tried pouncing on the end of other contacts and then just called CQ for AGES! No contacts.

With that poor result, I looked at PSK REPORTER to see if my 5W were actually reaching anywhere and I was pleased to see that I had got as far as TURKEY ( over 3,200Km @ -19dB) from my QTH here in England . So I was getting out!


I was puzzled!!  I switched over to my Tried & Tested QDX REV-1 and tried again using the same antenna, band, mode. I'm pleased to say that that too failed to make any contacts, so it was not necessarily the fault of the new build.

I will try again when conditions are better and see what happens.


73, Tom, M7MCQ


UPDATE 15th JAN 2022
FINALLY!

So, new day, new start. Plugged the QDX in and set it going on WSJT-X FT8 Mode. It wasn't long before I was making contacts. Not loads - but it confirmed that everything is working normally. You have to remember that this is a QRP transceiver and you have to work quite hard to get a contact from CQ to RR73.


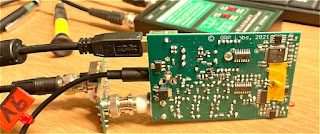
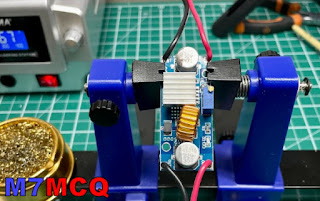
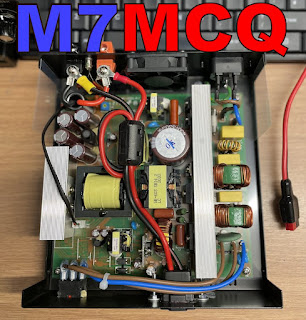
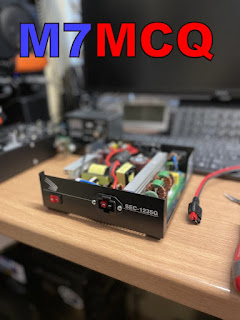
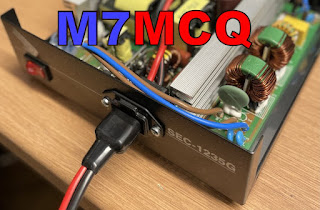
In between contacts I put together a DC-DC Voltage Step-Down unit that I'd bought on eBay. It was only £6 so I thought I'd take a chance on it. It allows me (with adjustment) to drop my Shack PSU's 13.8V to 9V. I was concerned that it might be noisy but everything seems fine and the contacts are coming in and the waterfall is showing no noise artifacts, so all good so far!

I put the little pcb into a hobby box that I'd got laying around and secured it in place with my beloved Hot Glue Gun, LOL. The specs (if you're interested) are....

Input voltage: 4-38V
Output voltage: 1.25-36V continuously adjustable
Output current:0-5A
Over 3A, attached the heat sink.(recommended for use within 4.5A for long time use)
Output power: recommended for use in below 75W
Working temperature:-40 to +85 degrees
Operating Frequency: 180KHz
Conversion efficiency: up to 96%
Load regulation: S (I)<0.8%
Voltage Regulation: S (u)< 0.8%
Short-circuit protection: Yes (the limited current is 8A)
Over-temperature protection: Yes (automatic shutdown when over-temperature)


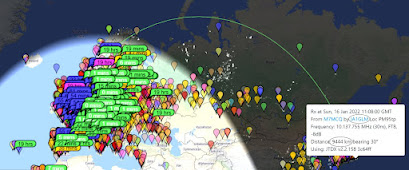
16 JAN - UK to JAPAN on 4W 😃


So, here we are at the end of what was a problematic build. At one point I was just going to abandon the kit because I value my time too much to waste it on things I can't seem to repair. It was only because of the encouragement of some of the members of GROUPS.IO that I persevered.

Lots of people tried to help me and most members were extremely kind and encouraging - THANK YOU!!!

I should give special mention though, to one particular individual who not only helped me, but who also helps everyone!! He must spend an enormous amount of his spare time helping people out. That person is Evan Hand (AC9TU). He helps and guides people without a hint of sarcasm or smartass remarks. THANKS EVAN!!!


If you have any comments or questions, please leave a message below. And thank you for visiting my Blog.

73, Tom, M7MCQ.

Sunday, 2 January 2022

ELECRAFT KX3 REVIEW

ROLLS ROYCE QRP?

January 2022

I’ve had a KX3 for a while now, so maybe it's time to talk about it. I’m going to be referencing a couple of other radios throughout.

When it comes to choosing a QRP Transceiver, there are basically 3 main dealerships you can visit -  DACIA, FORD or ROLLS ROYCE. Or in other words, Xiegu, Yaesu or Elecraft. 

Now please bear in mind that these are just my opinions and I'm not saying that my choices are right and yours are wrong. We all have very different requirements, desires and priorities.

At the budget end, Xiegu offer a nice range of QRP radios and I have the Xiegu G90 which is an absolutely stonking bit of HF kit for the money! It really does amaze considering that it costs so little and yet includes so much. Xiegu have other radios worthy of consideration too including the X6100 & 5105.

Somewhere in the middle is the YAESU FT-818  which not only does HF, but also 2M & 70cm. It's compact, tough as old boots, good looking and performs really well out on the field. It's probably the most popular portable qrp-transceiver ever built and has been selling for around 20yrs. Presumably, it'll be replaced soon by a newer model - probably an SDR.

At the top end, there's the stunningly good ELECRAFT KX3 and that's what we'll be focusing on today. It's by far the best radio of this little group, but it costs a small fortune if you spec it up to include all the desirable options.

I took this photo before removing and selling the 2M module!
 
The KX3 covers 160-6M straight from the box and at the time of writing, that will set you back £1600 plus another £50 'build fee' and then another £90 for a microphone! 😮

On top of that, I have the following optional extras...

* KX32M        2M Module       £300

* KXFL3        Roofing Filter  £190

* KXBC3        Charger           £100

* KXPD3       Iambic Keyer    £160

* KXAT3        Auto ATU          £295

I sold the KX32M (2M module) because I just never really used it. It could only put out 3W max and I rarely go outdoors to play anything other than HF. If I do decide to spend the day engaging in VHF activities, I'd take something dedicated to the task.

But anyway, if you bought the same spec KX3, at the time of writing, it would add up to a staggering £2645 ðŸ˜® That is an insane amount of money for a little portable QRP radio! But that's where this radio differs to the others - used with an amp, this radio could easily also be your main Base Station too.

The first thing I want to point out about the KX3 as an outdoor-radio is that although it's beautifully made, it is also (in my opinion) a little vulnerable to damage from knocks and scrapes. The only solution is to protect it (at even more cost) by adding side-rails and a cover. These are readily available on the internet for around £80. Without them, you'd be worrying about damaging that big beautiful screen (although in reality it's the perspex cover which would get scratched).

The other thing I'm not happy about is the KX3's 'clamshell' design. There is no hinge between the upper and lower parts of the case and when you open them up, you have to be extremely careful not to damage the delicate ribbon cable - you also have to be careful not to trap or kink it when closing the case. The supplied heatsink is also inadequate and should be replaced if you plan to transmit at 15W for any length of time. There is obviously zero waterproofing! Quite a poor design IMHO.

The KX3 has a very sensitive receiver and it's easy to demonstrate it's superiority over the other two radios when you put them side by side and tune into weaker stations. On the G90 and the FT818, there's many occasions where you just cannot pick up the signals that the KX3 hears.

It's important to use a good battery with the KX3 (or any other portable radio) in my opinion. Manufacturers incorporate internal Nicad battery trays but they very quickly run low on power which can cause issues such as the ATU being unable to find a match, etc.

If you invest in a good, LifePO 13.2V battery, you will pat yourself on the back every day!! Rely on nicads and expect disappointment somewhere along the line. If you're not going to be climbing hillsides, you can probably afford to get a heavier battery. Perfect for things like Parks On The Air!

All three radios can obviously pick up regular strength transmissions and many operators will be perfectly happy with the cheaper radios. It's worth mentioning though, the KX3's noise floor is supremely low and that's one of those things that just makes you smile every time you switch it on. It's one of the things that makes this radio special. I'll never forget the first time I took it out in the field and switched it on - I thought there was something wrong because it was deathly quiet - and then a signal came in - boom!


The Elecraft also benefits enormously from the KXFL3 Dual PassBand Roofing Filter. The G90 has some great filters built-in but they obviously don't compare to Elecraft's. This filter makes a huge difference and puts the receiver in a class above the rest.  I installed a Collins SSB filter to the FT-818, but to be honest, it didn't seem to make much of a difference - to the point where I might actually remove it and sell it!
 
The other massive advantage of the KX3 is that big, beautiful, crystal clear LCD display! It is just soooo nice to use and let's not forget also, all those lovely buttons and dials which are lacking on the 818 and 90. Many people don't realise that the KX3 screen is exactly the same size as the one used on the Elecraft  K3S Base Station! 

When I'm using the 818 outdoors, I always seem to struggle to find a good spot for the radio to sit so that I can see the display. The KX3 on the other hand always seems to be in just the right position and everything kinda falls to hand. The G90 (with the H1 cooler/stand) is much better than the 818 in this respect, but the (lovely) 2" colour screen is not always easy to see in strong sunlight.

The G90 has one thing that I truly wish the other two radios had - a panadapter and waterfall. Boy, that is such a great feature and I think the Elecraft should also have one - even if it's a simple affair. Needless to say, you can spend even more money on a PX3, but then the total price just goes into lunatic mode. 

One failing of the Elecraft KX3 is the audio! The speaker just sounds dreadful! And even though Elecraft try to ignore the issue by saying it's purely a backup and they expect people to use headphones, the fact is, they could easily have done much better! I have a £25 Baofeng which has a superb tiny speaker built in. I strongly recommend that you use an external powered speaker or a good quality pair of earphones. 

The advantage of wearing earphones with the KX3 include the ability to use the DUALWATCH feature where one VFO's audio is played through the left earphone and the other VFO's audio is played through the right earphone. Just bear in mind that A and B can only be a maximum of 15KHz apart, which is a bit poor.

You also get the option to switch on the DELAY feature in single-VFO mode. This adds a very slight amount of echo to the audio, making it sound quite pleasant. You can also use the built-in equaliser to fine tune the audio.

So what's it like to 'lug around'? Well I'd say it's similar to the other two radios. There's not a lot between any of them, but the Xiegu is a bit more awkward due to its length. The 818 is super-slim and if you've got the Yaesu matching leather case, then you can just chuck the 818 into your rucksack without a second thought.

LowePro Tahoe BP-150


The Elecraft fits neatly into my small rusksack and leaves loads of space for other stuff including a LifePO battery, connectors, antennas, phone, torch, whistle, notepad and even a handheld radio for a spot of DSTAR, FUSION, 2M, 4M and 70cm. I could actually use a much smaller rucksack instead, but I like having a few extra bits and bats with me. Inside that top section I also have rather nifty antennas from Hawkins for my 2/4/6M work, which simply hangs from the top of my telescopic mast.

 Compact 6M Antenna

If you're really pushed for space and are happy to operate on 20M and 17M only, you can carry your KX3 and battery in the smallest bag you can find and just take Elecraft's AX-1 telescopic antenna with you. It's a fabulous little thing and performs really well if you give it a good take-off point. I've managed amazing distances with it, even from my back garden!

 
I've tried this beaut of an antenna connected directly to the BNC socket of my FT-818 too and got from Manchester to Denmark on 2.5W. And I'm talking about a proper lengthy chinwag, not a fake report and 73. I sometimes use this antenna at the top of a portable mast so it's 20ft up in the air. I recently bought the 40M extension. Highly recommended bit of kit! Some people have even modified their AX1 to further enhance its capabilities - read this article from Rob Ramsey, AH6X

Anyway, back to the KX3 itself.  Amongst its other useful features, it has a built-in, on-screen decoder for CW, RTTY and PSK. Personally, I don't (can't) use CW but I do sometimes like to listen and watch the decoded messages. I also like to be able to SEND CW messages like "CQ TEST M7MCQ" to see how far my signal can be heard on the RBN.

Being an SDR radio, the Elecraft is, of course, able to have its firmware updated and Elecraft are not slow to give their customers what they ask for. The same applies to the Xiegu G90 too, but the FT-818 is obviously a superhet and frozen in time.

Highest power output places the Xiegu in first place with 20W. Elecraft is second at 15W and the Yaesu a lowly third with just 6W. The good thing about the KX3 is that its power can be reduced down to a few mW which can save battery usage and is a lot of fun.

Speaking of power, the KX3 is by far the most energy efficient of the bunch, consuming less than 150mW in receive mode. That is a very important consideration when working outdoors on battery power for hour after hour. To many field-operators it is the Number One consideration when choosing a radio.

Another important option is having an internal ATU. The Xiegu has one built-in and I'd say it's as good as the Elecraft's optional ATU. They're both just superb! Sadly, the Yaesu has no ATU and you have to resort to buying (and carrying around) an external unit. I'd recommend the LDG Z-817.

CONCLUSION

So in summary, I'd say again that the Elecraft KX3 is a magnificent radio and something that anyone would surely be proud to own. It's ridiculously expensive with all the optional extras and the Xiegu G90 almost laughs in its face when measured in terms of cost alone.

There's no denying that the Panadapter & Waterfall of the G90 is handy, but operators have been playing radio without them for many decades. It's certainly not worth buying a PX3 for the KX3 unless you find one super-cheap at a rally (unlikely).

As for the Yaesu FT-818, that too is a fab little rig. It does so much and is so incredibly dependable that it feels like sacrilege to discuss it in anything but positive terms. But the truth is, its design is showing its age. Then again, the KX3 could also benefit from an update - maybe a better battery pack & charging system, a soundcard and a USB-C connector?

If you wish to add computer control to your KX3 in the shack, then there's a few options out there which will not only give you control of the rig, but also a panadapter. Here's one such solution...


Win4K3Suite

Anyway, if you've worked your ass off and saved up some money, or if you just won a bet at the races and want to treat yourself to something REAL SPECIAL, then buy an Elecraft KX3 without any hesitation. They are very special and a joy to use.

CAN IT BE MY SHACK RADIO TOO??

Hell, yes! If you have an amplifier, the KX3 could be your everything radio! There's a wide range of amps out there to choose from and if you've got the money, Elecraft's KXPA-100 is the one to go for.... 

Pictured above is the matching 100W amplifier - mini review here... Elecraft KXPA100-AT.


HOW ABOUT SWL??

The KX3 would make a magnificent ShortWave Listeners radio, but it would obviously be a very expensive one unless you were lucky enough to find a reasonably priced used one. If you did manage to find one, I'd recommend using it with an antenna coupler or a manual tuner such as the Emtech ZM-2 or the Kanga TransMatch.


Have yourself a Rolls Royce parked on the drive 😂

Mounted on a stand in the shack

Connected to Sony amplified speaker


KX3 SPECIFICATIONS :

KX3 STANDARD FEATURES

•160 - 6 meter ham bands; general coverage receive from 1.5 - 32.0 MHz (also covers 0.31 - 1.5 MHz with reduced sensitivity)

•All modes: SSB, CW, Data (four sub-modes), AM, FM

•Ultra-compact size: 3.4"H x 7.4"W x 1.7"D; 18 oz. (less options)

•Rear tilt feet fold up for transport

•Custom high-contrast LCD with alphanumeric text display

•Internal 8 - AA battery holder

•Current drain as low as 150 mA in receive mode

•High-performance 32-bit floating-point DSP

•Built-in PSK/TTY decode/encode allows data mode operation without a PC; transmit in data modes using CW keyer paddle

•Low-noise synthesizer with 1-Hz tuning resolution

•Firmware updateable via provided application software


 RECEIVER

•Quadrature down-sampling mixer compatible with PC-based SDR (software defined radio) applications

•Receiver I/Q outputs for use with PC soundcard

•Dual roofing filter option for enhanced dynamic range.  (500/1500 Hz analog filters; effective IF b/w of 1000/3000 Hz) 

•Switchable preamp and attenuator 

•8-band receive audio equalizer

•Dual watch over +/- 15 kHz range; uses applicable roofing filter

•Easy-to-use PassBand Tuning (PBT) for shift/width/hicut/locut; roofing filters automatically track DSP filter settings

•Automatic and manual notch filtering; adjustable noise reduction and noise blanking; binaural audio effects for enhanced receive

•Center-tuning indicator for CW and data modes

•Built-in speaker; stereo jack for headphones/external speakers


 TRANSMITTER

•Adjustable output, 0.1 to 15 W (8 W 12, 10 & 6 M)

•(100 W with KXPA100 amp)

•Rugged, SWR and temperature-protected final amplifier stage

•Optional MH3 microphone with PTT and UP/DOWN functions

•Optional attached keyer paddle with spacing adjustment

•Switchable PA output impedance for efficient 5-W or 15-W use

•Fast, silent, PIN-diode T-R switching - no relays

•DSP RF speech processing for excellent 'punch'

•8 band equalizer tailors passband to your voice and microphone


OTHER FEATURES

•Built in digital voice recorder (DVR) with two message buffers

•Internal CW keyer with 8-50 WPM range

•Six CW/DATA message memories

•100 general-purpose memories store VFOs, modes, etc.

•Computer control via supplied USB cable or optional RS-232 cables

•Full remote-control command set works with most amateur radio software applications (emulates Elecraft K3)

•One-click firmware upgrades via the web (with free PC software)

•Tutorial-style manual ideal for new hams


OPTIONS and ACCESSORIES

KXFL3 Roofing Dual Bandwidth Filter for SSB/CW/DATA

KXAT3 Internal, Wide-Range 20-W Automatic Antenna Tuner

KXBC3 NiMH Charger

     (8 - AA NiMH batteries not supplied with KX3; non-rechargeables can also be used in KX3 internal battery holder)

KX3-2M Internal 2-Meter Module

H3 Hand Microphone with UP/DN Controls

KXPD3 Attached Precision Keyer Paddle

KXPA100 High-Performance 160-6 meter, External 100-W Amplifier

     also usable with most 5 to 10 W transceivers

KXAT100 Wide-Range 100-W ATU with Dual Antenna Jacks


Please leave any comments in the box below. And thanks for popping by.


Monday, 27 December 2021

SAMLEX SEC-1235G UPGRADE/MOD

BACK TO FRONT


As much as I like the SEC-1235G power supply, I do think it would benefit from having an outlet on the front of the case as well as the rear panel. So I decided to open it up to see if there was any room to fit an Anderson PowerPole socket. 
It's quite a large case, so I thought there'd be plenty of space.

Well it turns out there's not that much room after all, but with some careful measuring I found a spot where it would go and as it turned out, that spot looked pretty good. I got it so that the fixing screws would align perfectly with the white line on the front panel.

Cutting out the aperture for the power socket was, of course, the trickiest part of the job, but thankfully, it has a pretty large flange, so any 'sins' are easy to hide.  I used a Dremel and a metal-cutting-disc. I wasn't sure if the power cable would need it or not, but I fitted a ferrite bead anyway.

Once it was all back together, I applied a little black paint to the fixing screws so they didn't stand out so much (I had no black set-screws). This little job took just a few minutes to complete and was a really worthwhile upgrade - one I think Samlex should consider doing 😂

CAUTION!!!

Beware of the risk of electrocution
when working with high voltages
and be cautious with large capacitors!


Modifying your PSU will void your warranty!

73, Tom, M7MCQ.

Friday, 24 December 2021

QRPGUYS SWR BRIDGE KIT

A GREAT LITTLE KIT!

Super simple to build! It only consists of 16 parts and it literally takes a few minutes to put together. A great beginner project.

The QRPGUYS call this their "LED Tuning Indicator" but most other people would call it an SWR Bridge. I purchased it because I was just a little concerned that I might harm the finals in my QRP-Labs QDX while tuning-up.

I use an Elecraft AT1 tuner which is remarkably fast at finding a match, but for the sake of $20, it's just not worth the risk. With this bridge fitted inline, the QDX will never see more than a 2:1 mismatch. It's rated at 10W PEP or 5W CW which is perfect for the QDX.

All you need to do is fit it between your transceiver and ATU and flick the switch to the TUNE position before tuning up as normal. As the tuner gets closer to a good match, you'll see the onboard LED glow dimmer and dimmer. When your tuner finds a 1:1 match, the LED should extinguish (although it may actually stay on VERY dimly).

So once you've found your match, just flick the switch back to OPERate and away you go. Leaving the switch in the TUNE position will result in your transmitted power being reduced by a factor of 4 (approximately). This can be handy for when you wish to reduce the transmitted power of your QDX for WSPR tests.

When I'd built the little kit, I attached it to the QDX and gave it a go. It worked perfectly on all bands and had ZERO impact when in the bypassed mode for normal operation. Very pleased with this little device and I look forward to playing around with some more QRPGUYS kits in the future.


Kit available >> here <<

Here’s a video of the kit in action with my PreppComm MMX (which is notoriously easy to blow up 😂
SWR-BRIDGE IN ACTION


Just to clarify, this device (apart from being used in-between a radio and a tuner) can be used without an ATU to help you to determine how close to resonance your antenna is. You could adjust the length of your antenna and monitor the brightness of the led after each adjustment. When the led no longer lights up, you've reached the sweet spot.

Here’s a >LINK< to the manual.

Thanks for visiting the Blog. Feel free to leave a comment below.

73, Tom, M7MCQ.

#qrpguys #qrp-labs qdx #swr-bridge