
CW 40M TRANSCEIVER

>>>>UPDATE<<<<
After building this unit I hit a problem and needed to order a new chip. This post is the completion of my QCX story.
PREFACE : I was recently at a Radio Rally and was moaning all day at how poor it was - full of old junk. I was helping out on one of the stands and had to stay there all day, otherwise I'd have disappeared within minutes of arriving.
Anyway, a friend had seen a BHI speaker on a stand for £100 but he said they wouldn't haggle, so I went over to beat them into submission - and it worked - so my mate bought the speaker. While I was there, I spotted a cardboard box with special Turkish stamps on it.


It kinda looked familiar, so I took a closer look and discovered that it was a small parcel from QRP-LABS similar to the one that my QDX had arrived in. I picked it up and saw that it was actually a QCX. That's a singleband CW 5W transceiver in kit-form.
I was quite excited because I just love building these sort of kits and so I nonchalantly expressed interest in it. From experience, I knew that after Tax, Import Duties and Postage, a QCX will cost a UK buyer around £100. If you want the aluminium case to go with it, the figure goes up to £130.
Here was one with both items, boxed, unopened and even had a full colour printed spiral-bound manual (which you can't even buy) and I blagged it for £10!!!! How good is that??

The seller warned me that the kit came from a Silent Key and he had no idea if all the components were present, but I knew already that there was nothing missing. It was obvious that the packaging had never been opened and it was probably one of those things that people purchase and hope to get around to building one day in the future.

It looks like the purchaser had also gone to the trouble (and expense) of having the Manual colour printed on A4 paper with spiral binding. Very nice! I was so pleased with my little find.

My inquisitive nature led me to find out more about this Silent Key. I could see from the packaging that the name and address had been hidden with black marker pen, so I took a photo and then over-exposed it in software, which partially revealed the text.
I could just about make out the postcode, so I searched QRZ for amateurs in that immediate area and up popped Mark Raybould - G3XYS. He had lived in the High Peak district of Derbyshire, about 30 miles from me.

I learned from his bio that he was first licensed in 1968 and was very much a QRP man and greatly enjoyed SOTA activities. I discovered too that he was the very first person to activate Moel Eilio, GW/NW-022 in Snowdonia, back in 2002.

He also had an American callsign (NS1Q) and had family over there in Vermont, but that's as much as I know at this time. I was very pleased to find this connection to the QCX and it felt good to know that I'd be finishing off one of Mark's projects for him. Something which he was sadly unable to get around to doing himself - possibly due to ill health?
------ * -------
THE BUILD : Bear in mind that this is the original QCX and not the later QCX MINI. Now this kit represents a significant increase in complexity compared to the kits I've built before. Please bear in mind that I have no real knowledge of electronics and I'm writing this post to show how a beginner might cope with this kit.
There are a lot more parts than I'm used to (with almost 300 solder joints to complete) and I'll have to pay very close attention to the build-guide. Looking at the original packaging and post-mark, I can see that this was purchased in 2018 and thankfully it came with the REV.3 manual already printed out.
The last revision of the QCX is REV.5 but a quick glance at the website indicates that the Rev.3 can be brought up to date during the build with changes to components (or additions), but looking through the alterations I might not bother.
Rev 4: (31-Oct-2018)
1) Changed C21 and C22 to 1uF (previously 10uF) to reduce click on Tx/Rx switchover
2) Kits shipped after 12-Apr-2019 changed R41 from 470 to 150 ohms; R42 from 1K to 1.2K; C31 from 1uF to 2.2uF; to improve key-shaping.
3) Kits shipped after 12-Apr-2019 also changed R21 from 7.5K to 10K to allow phase compensation for larger range of component tolerances.
Rev 5: (06-Jan-2020)
1) Removed components R49, R50 and C39; R53 changed from 1K to 3.3K; the components were not needed since AUDIO2 DC bias is 2.5V already
2) Added R49 (1K), R50 (270-ohm) and D7 (1N4148) which are to implement a serial port for the CAT control interface
There is one mod which does look interesting and that's something which was designed by a 13yr old American operator called Maxwell Moran (W3LLA). This bright young man came up with a way of turning the QCX into a WSPR transceiver! It works by bypassing the CW Filter - and it's switchable, so you don't lose any of the QCX's original functionality.
THE FIRST JOB though is to layout and organise all the components. It’s quite a laborious task checking not only that you’ve got all the required bits and bobs, but also identifying the values. You need to know if anything is missing early on, so you can make arrangements to obtain a replacement. Nothing worse than getting to the end and finding you can’t complete your kit.
It turns out that there were a couple of 10uF electrolytics missing from my kit but thankfully, a friend from Bolton Wireless Club said he had some spare (thanks M0UFC).


There was still a bit of a puzzle to solve though, because I still had more components that were listed in the printed manual. What was going on??
I decided to examine the PCB and it was at that point I realised that this kit was actually a REV.4! It seems that the original buyer had mistakenly downloaded the wrong manual. I can fully understand why, because it's really quite complicated due to the number of manual-revisions and release dates.
Anyway, all the components now made sense and I wasn't short of anything, so I started the build.
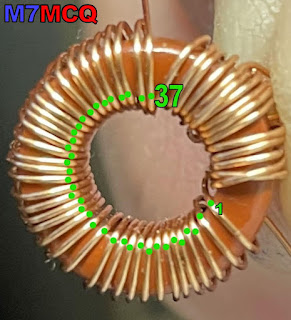
The very first job is to wind the T1 transformer which can be really tricky depending on the band you've chosen. The 20M version looks nice and easy, but I was doing the 40M version with an additional 14 turns to go on (38+5+5+5).
The T1 goes on first because it makes the job much easier without any other components on the PCB. The manual suggests that you wind the T1 in a single run and then cut loops to create the three 5-turn sections, but I found it easier to wind the 38T, then three separate 5T's.
Regardless of which way you wind it, you're in for some fiddly work. Make sure you leave long legs so that installation is less awkward. Don't worry - there's plenty of spare wire.
IMPORTANT!!! As per the manual - "the four windings on T1 must all be in the same “sense”. There are two ways to wind toroids. You might call them left-handed and right-handed; clockwise and counter-clockwise; whether the wire goes through the toroid from top to bottom, or from bottom to top. Whatever you call it, all the four windings have to be the same, to be sure to get the phasing to the quadrature sampling detector correct".
WINDING TIP : I was pretty sure I'd counted the 38 turns as I was doing it, but when I took a photo and saw it on a large PC screen, I could see that I'd only done 37, so I added another. Checking in this way allows you to easily make a correction instead of pulling your hair out after you've soldered it onto the PCB. At this stage you don't need to worry about neat spacing of the turns - you can sort that out as you're installing it.
 |
| Not my best work, lol |
Getting this toroid into the PCB is quite a job! There are eight straggly legs to control and it's easy to get into a mess and maybe even put the wrong wire into the wrong hole.
The ends of the 38T wire is pretty obvious to locate - the real problem is identifying the ends of the three 5T wires. To aid me with this, I put black Marker Pen on the legs of the middle 5T wire. That helped enormously. If I'd had different coloured enamelled wire, that would have been even easier!
I suggest that you start the installation by getting the innermost wires located first - 8, 4, 6. Once they're in, the rest of the job is much easier...

With all the legs in, check that all the turns are neatly spaced and do a continuity check on the 4 wires to make sure they're in the correct holes. Once that's done and you're 100% happy with the spacings and location, you could insert a small blob of HotGlue in the center of the T1 to keep it fixed to the board and to stop any of the windings from moving around while you're snipping the legs and soldering them in place.
The manual recommends that you cut the legs down so that they're about 2mm proud of the PCB and use the Soldering Iron's heat to burn off the enamel.
Personally, I prefer to carefully scrape most of the enamel off with a sharp scalpel from the underside of the PCB before snipping the wires and then solder the 2mm legs for the recommended 10 seconds to burn off any last remnants. This method worked very well for me on my QDX but I'm no expert, so do what works for you.
Once T1 is in place, you can revert to following the start of the manual and install components accordingly.
It's worth noting that Hans has every right to tell you to check your work once, twice and even three times! I made a mistake very early on by putting a ceramic capacitor in the wrong place. Luckily, I managed to desolder it and relocate it.

I got into the habit of placing the components in the pcb, then taking a photo of each stage and that process slows you down a little and prevents you from rushing ahead.
The rest of the build was very straightforward - there’s nothing especially tricky - there’s just lots of it! I simply followed the guide and before I knew it, the kit was built and ready to power-up and carry out the alignment/setup.

Sadly, when I powered up I discovered that there was a problem with the display - only the top row of text-blocks was illuminated, which (according to Hans’ trouble-shooting guide) means that IC2 is not communicating properly.
Needless to say, I checked, double-checked and triple-checked that the chip was seated properly and all pins were engaging with the socket. I also went onto IOGROUPS and got some more trouble-shooting guidance from the members there, but nothing has found the source of the problem so far.

It could be that the IC2 chip itself is faulty, so I've ordered another (£5). It’s disappointing, but the kit only cost me £10, so I can hardly complain!
Anyway, I will try to get it going and will update this page accordingly. If I manage to sort it out, the method will maybe help out someone else who has a similar problem with this lovely kit.
Bye for now!
Tom, M7MCQ.
>>>>UPDATE<<<

The new IC2 arrived (ages ago actually, but I've been so busy I actually forgot about it) and I'm pleased to say that it resolved the screen issue, so it was the chip after all. I was worried that it might be something elsewhere on the PCB that I'd done wrong, but everything's fine.

So it’s on with the alignment - something which is detailed in the manual - no point repeating it here. Suffice to say it was the least favourite part of the build for me and I wasn’t altogether sure I was doing it right.

After this, there’s a couple of other adjustments and then you’re good to go. Time for real world testing! To play safe, I put the QCX in practise mode and inserted a paddle key. Everything seemed to work well and I spent some time in the menus making adjustments to the standard settings and setting up some memory messages.
With an EFHW connected to the QCX I started to put out some test calls and with a small power-meter I could see that the radio was putting out around 4.2W which seems about right, so I'm very happy.
The radio includes a morse-decoder which is good for someone like me who's just setting out on the journey of learning cw. I can use the QCX not only as a transceiver, but also as a handy little practise keyer. In practise mode it will happily run on a small battery.
So why have I bought another CW Transceiver when I've not learned the code yet? Well the answer is - I love building these little kits! They're a huge source of enjoyment for me, whether I will use them or not. I guess it gives me a challenge and a sense of achievement when I complete them - if they work, lol.
I've actually ordered another one of these (secondhand) as a gift for a friend. They're excellent little units and like all the other QRP-Labs kits, a joy to build.


73, Tom, M7MCQ.
Features
- Easy to build, single-board design, 10 x 8cm, all controls are board-mounted
- Professional quality double-sided, through-hole plated, silk-screen printed PCB
- Choice of single band, 80, 60, 40, 30, 20 or 17m
- Approximately 3-5W CW output (depending on supply voltage)
- 7-16V recommended supply voltage
- Class E power amplifier, transistors are bolted to the PCB as a heatsink, though heat dissipation is minimal
- 7-element Low Pass Filter ensures regulatory compliance
- CW envelope shaping to remove key clicks
- High performance receiver with at least 50dB of unwanted sideband cancellation
- 200Hz CW filter with no ringing
- Si5351A Synthesized VFO with rotary encoder tuning
- 16 x 2 blue backlight LCD screen
- Iambic keyer or straight key option included in the firmware
- Simple Digital Signal Processing assisted CW decoder, displayed real-time on-screen
- On-screen S-meter
- Full or semi QSK operation using fast solid-state transmit/receive switching
- Frequency presets, VFO A/B Split operation, RIT, configurable CW Offset
- Configurable sidetone frequency and volume
- Connectors: Power, 3.5mm keyer jack, 3.5mm stereo earphone jack, BNC RF output
- Onboard microswitch can be used as a simple straight Morse key
- Built-in test signal generator and alignment tools to complete simple set-up adjustments
- Built-in test equipment: voltmeter, RF power meter, frequency counter, signal generator
- Beacon mode, supporting automatic CW or WSPR operation
- GPS interface for reference frequency calibration and time-keeping (for WSPR beacon)
- CAT control serial data interface

8 comments:
Great post Tom. I am sure you will get the display sorted. It doesn't look too dissimilar to the QCX Mini. Oddly, I have just posted about that kit on my blog! I look forward to seeing the update :)
73 Ian (G0VGS)
Good morning Tom, very nice run down on the kit build. I can remember the toroid winding fun. I will say I have never had 4 windings on one toroid, the most for me was two. I can remember doing my first one and it was done over and over and over again. That was a great idea if the windings were not the same colour wire, for sure it would had been better to identify them. As for removing the wire coating at first I tried fine sandpaper but then settled into using the soldering iron/solder method.
Keep with it as well as part of kit building is when things don't work out as planned. This gives you added trouble shooting skills. I have had in the past parts that were not good from the get go and had to order a new part. It's great you have an internet group you can go to for hints and help. Keep us posted on your progress.
73,
Mike
VE9KK
Thanks Ian, Mike. Much appreciate your words of encouragement. I’ll get it sorted one day :-)
Thanks for the visit 👍
Tom, M7MCQ.
Hello Tom, I think it is very brave to build a kit like this without much knowledge of electronics. So unfortunate you didn't get the display to work. Of course there is a solution you only have to find it. Have build a few kits myself and almost always didn't get it to work at first. Sometimes due to own faults but most times there was just a tiny fault in the design. Hopefully you will solve this. 73, Bas
Thanks Neil, I'm not going to give in - I'll reheat every single joint if I have to, LOL. Thanks for the LINK, I'll take a look.
73, Tom, M7MCQ.
Hi Bas, hope you're keeping well (and your family).
Yes, this was a big build for me in terms of quantity of components but not much more difficult than the QDX. I was absolutely confident that it was going to work, but hey, sometimes you hit hurdles, lol.
I will carry on trying.
Best regards to you.
Tom, M7MCQ.
A beautiful find, and good work with getting it built.
I found a built QCX PCB at a rally a few months ago, also from a Silent Key. Didn't know which band, but it turned out to be for 30m.
That made me extra happy, as I already have 2 (not yet built) QCXs for 20m and 60m. I had ordered the 60 and 30m, but decided to keep the 20m one.
It's good to see you doing the work, even if you say you don't know anything about electronics (Not quite true, you do know enough to try this)
Don't forget, learning is something you do all your life, as I am saying, if someone comes to tell me they can't learn any more, it might be better to go start digging ;)
Keep having fun, and I wish you all the luck.
Vy 73 de Jan, OZ9QV
@JAN-OZ9QV
Thank you for visiting the Blog Jan and thank you for your kind comments. Well done on finding that PCB - you're as lucky as me, LOL.
Hope to catch you on-air sometime.
73, Tom, M7MCQ.
Post a Comment