The (tr)uSDX is something of a marvel! Okay, so it's no KX3, but neither is it £1500. It's a supremely affordable QRP transceiver which can be purchased pre-built or (if you're into diy), can be ordered as a simple, easy to build kit. Because I'm tight-fisted 😂 I bought mine second-hand from YouTube's TechMinds.
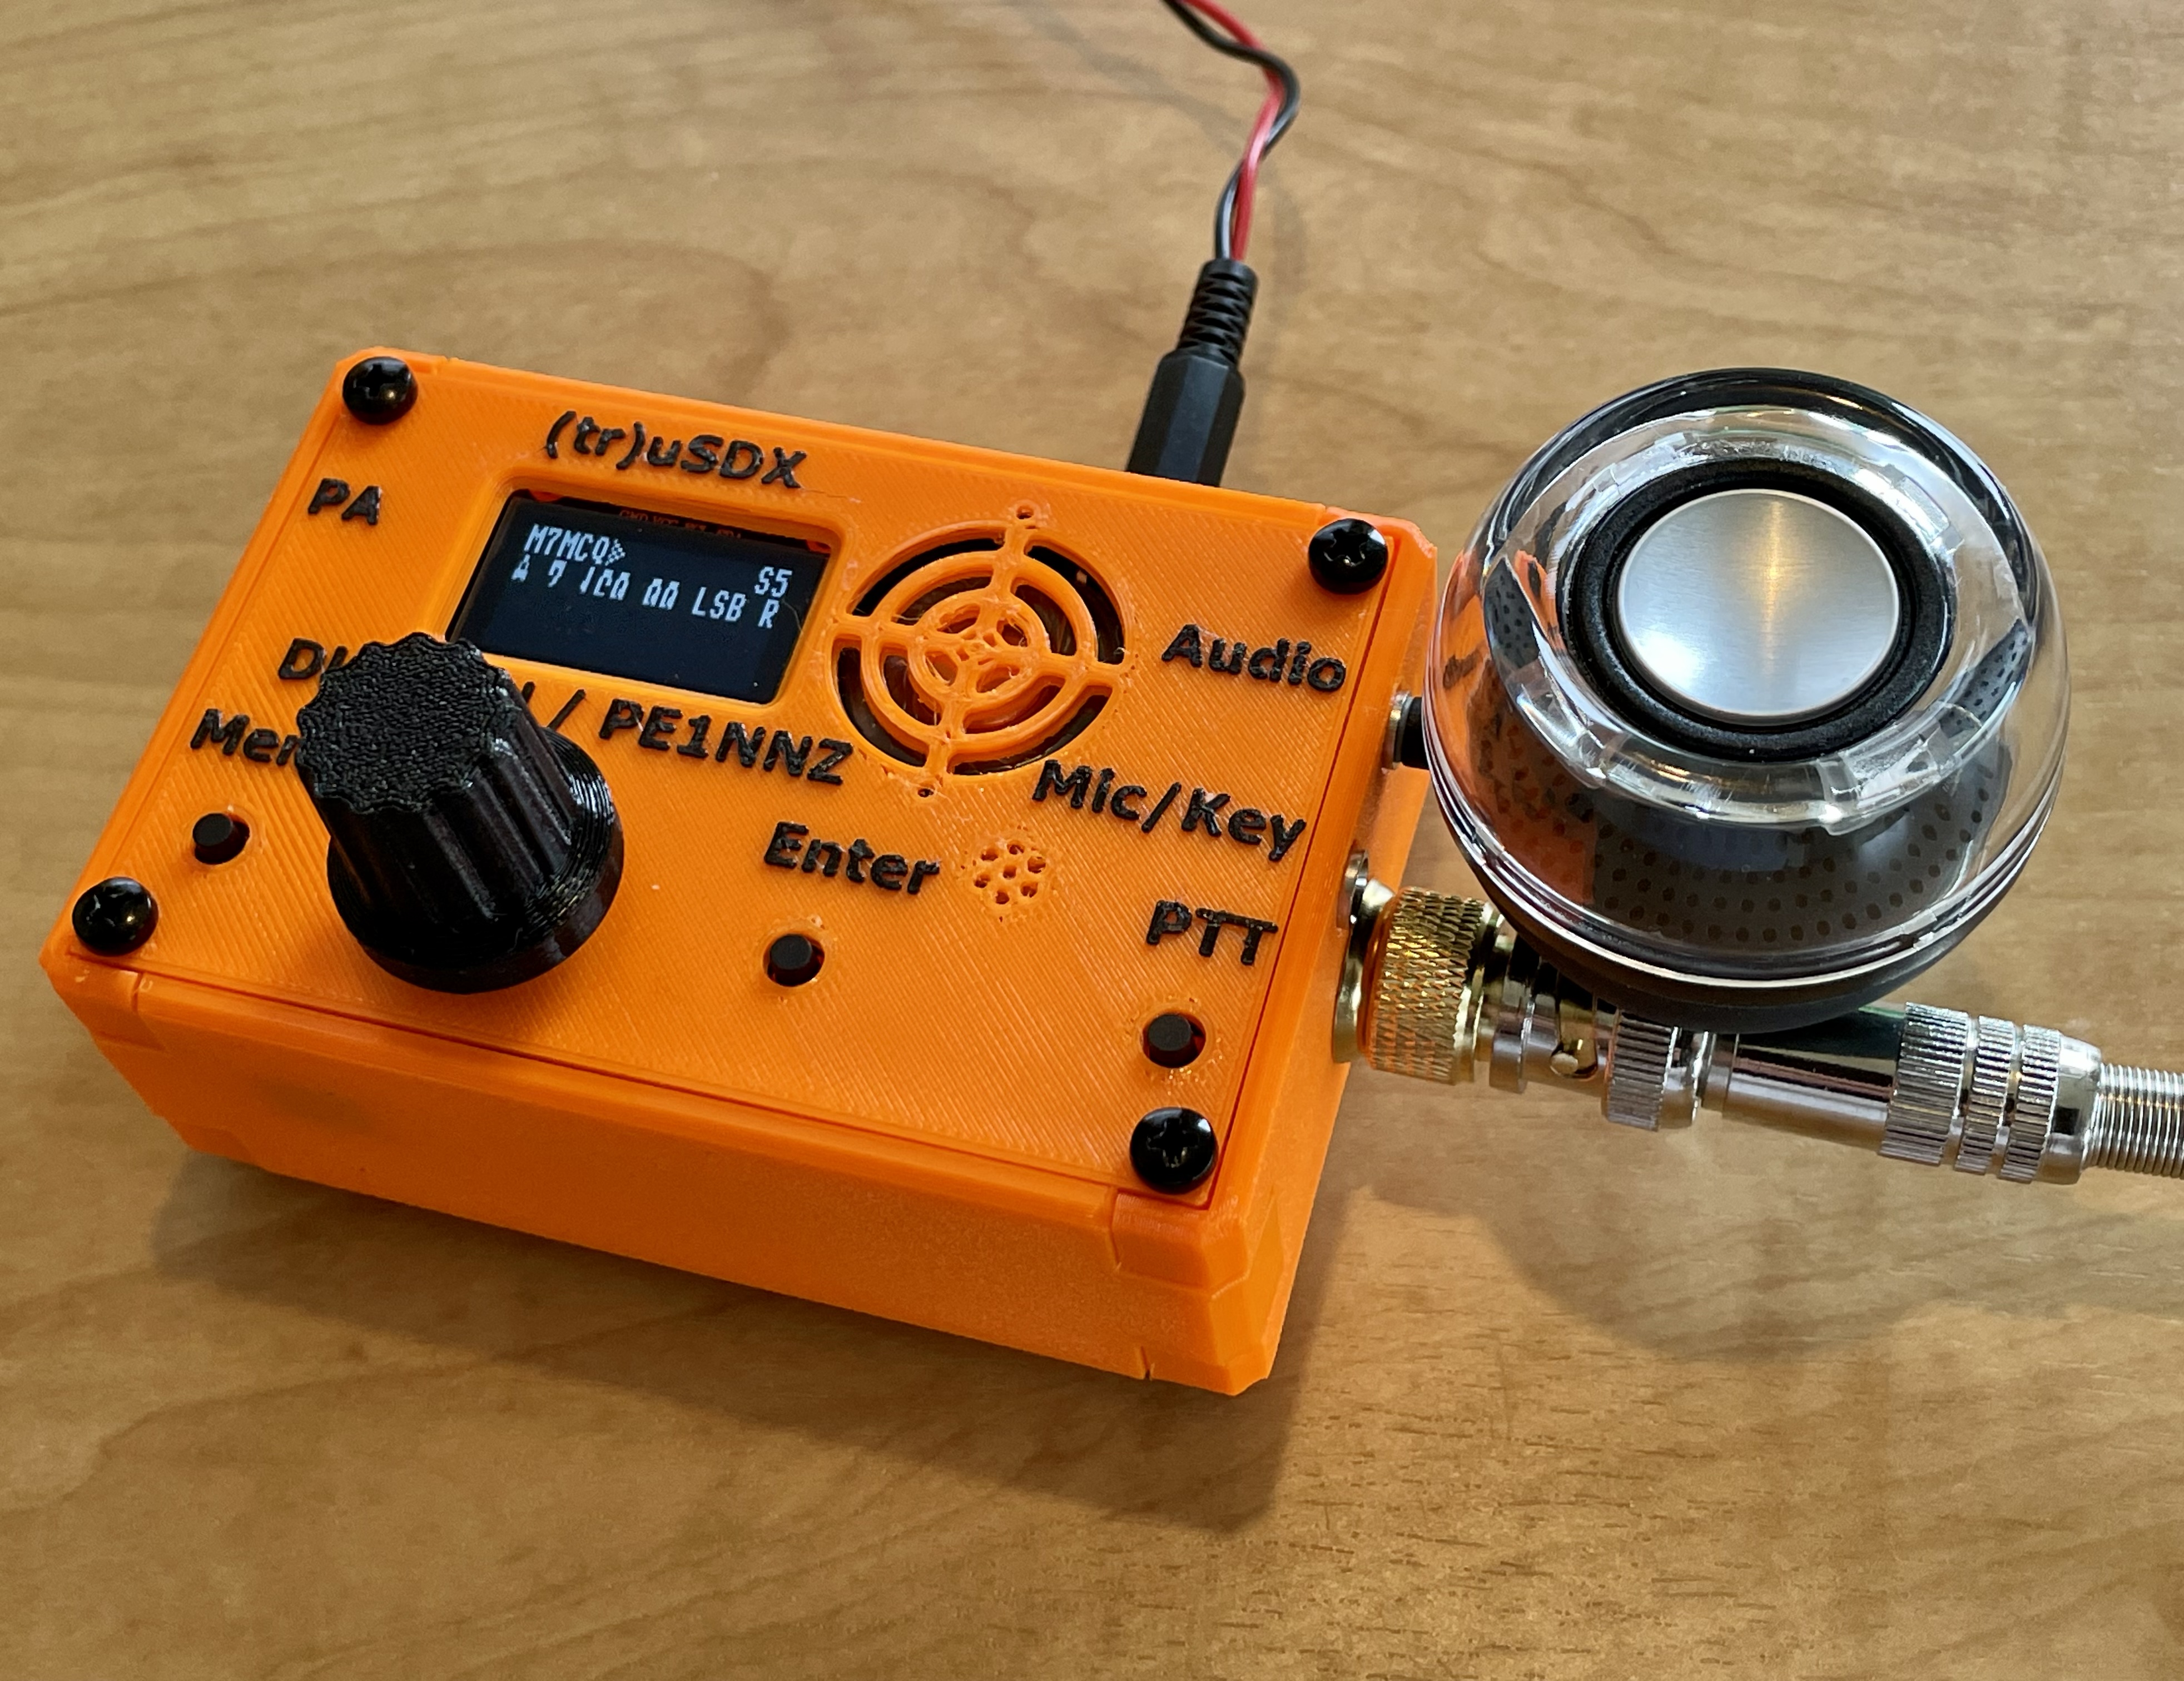
Everything about the (tr)uSDX looks cheap - it's encased in a 3D printed enclosure with all the associated crude detailing and tacky colours. The VFO encoder knob is also 3D printed. The case is held together with bulky screws and it has those stick-on rubber feet that you can buy from the £Shop.
The sound from the built-in speaker is pretty shocking and the audio is generally poor. The receiver isn't particularly sensitive and when sat next to my beautiful little BELKA DX receiver, you feel like maybe you've made a mistake purchasing the (tr)uSDX.
But that's where the negativity ends!DL2MAN's (tr)uSDX (usually pronounced True SDX) is a fabulously cheap little transceiver which is not much bigger than a pack of cigarettes and weighs next to nothing. It has a small but clear OLED screen which provides an amazing amount of information. The screen is not easy to read in direct sunlight, so be prepared to shade it with your hand.
This is a 5-Band radio (mine is configured for 80-60-40-30-20 (but other configurations are available)) providing around 5W output and CW/LSB/USB/AM/FM modes. There's a convenient built-in microphone and PTT-switch (which can even double up as an emergency CW key), making the radio pretty self-contained. Needless to say, you'd be better using an external mic and speaker, but at least they're there as a backup for those occasional days when you reach your SOTA Summit and realise you've left the mic at home! The radio has a socket for a CW Key (straight or paddles).
The receiver's noise floor is fairly high, but again, you have to remember the price point of this radio and accept the fact that it's not your DX base station - it's your "stick it in your pocket" radio, your "pop it in the glovebox" radio. And when you're sat on the beach or on top of a hillside with a bit of wire, you'll be pulling in plenty of signals strong and loud enough to be able to have some fantastic QSO's in any mode you like!
A couple of minutes Audio of my (tr)uSDX
As soon as my (tr)uSDX dropped through the letterbox, I quickly connected it to a 9V supply and an EFHW and tuned around 40M. On 7.144 I found PA0PIW and although he was in a mini-pileup, I thought I'd shout into the built-in mic and see if he could hear me. He almost instantly read back my callsign and gave me a good signal report! That was very pleasing and I look forward to taking this little beauty up to my local Sota point to see just how far I can get. My second attempt got me a 55 from F4HEC in France (he’s the one featured in the recording above).
Navigating around the (tr)uSDX's operating system is fairly straight-forward. The primary function of the rotary encoder is (as you'd expect) to control the frequency of the VFO, but if you push it down and turn, it controls the volume. Single pushes of the knob alters the tuning rate and a double-push changes bands. Single-clicking the Enter Key changes modes, while double-clicking changes filter width and a long push brings up the RIT function. Nice!
The rest of the radio's functions lay in the Menu and it's all surprisingly intuitive - no doubt thanks to the software skills of DL2MAN's partner - PE1NNZ who's done a fabulous job. When you first get hold of your (tr)uSDX you can put it into 'Practise Mode' so that the PA is shut down while you learn your way around the radio. Speaking of PA, there is a connector on the side of the radio to allow you to connect to an External Amplifier.
DL2MAN's website is a great place to learn more about the (tr)uSDX and its heritage; there's lot's of great tutorial videos there too. Manuel seems like a real nice character and his videos make for easy watching. His command of the English language is pretty good too. There's also a very useful FORUM.
The (tr)uSDX can be run on a wide range of voltages using the small DC connector port and can even be powered from a 5V USB power pack. At 5V the TX power is limited to 500mW but even that is a great feature for those wishing to play at the lower end of QRP levels. This USB port can also be used for CAT Control and Programming.
As I mentioned earlier, the OLED screen provides lots of info and can be tailored to suit your personal preferences. You have the frequency, the VFO indicator, S-Meter, Filter Width, Rx/Tx indicator, Mode, Tuning-Step and even your CallSign. Things like the S-Meter can be altered to show reflected power, forward power, swr, watts, efficiency and more, but the latter can only be done in CW mode.
Another great feature of the (tr)uSDX is the built-inCW Decoder! Again, just think about the price of this tiny transceiver and ask yourself would you really expect a CW Decoder to be included?? I wouldn't!
CW DECODER
And it works really well too. I usually set the CW Speed to 20wpm and it pretty much decodes everything I can hear as long as the signal is strong. Occasionally I have to drop the speed down when I know the sender is particularly slow, but otherwise, it does a great job. The radio can also SEND an automated CW Message from memory which can be a great assistance when calling CQ or running an RBN test.
Note that I fitted an SMA to BNC adapter but it leaves a gap, so I inserted a brass ‘Cup Washer’. Perfect fit! I also use a compact (but very clear) plug-in speaker from Amazon. Highly recommended!
Although I've got a SotaBeams EFHW and LINKED DIPOLE, I sent off for a QRP GUYS 'No Tune' End-Fed-Half-Wave antenna which covers 80-10M. This will be the perfect companion for the (tr)uSDX. It comes in Kit-Form and only take a few minutes to put together. All you then need to do is connect the appropriate length of wire to suit the band you wish to operate on. No counterpoise is required. Conveniently, all the wire-lengths are printed on the antenna former.
It was a simple task to cut the wires and trim them to attain the best SWR using my NanoVNA. I'm guessing that most of the time this antenna will be used in a Sloper configuration by throwing one end up into a tree, thereby allowing me to leave my telescopic mast at home.
Just bear in mind that although this antenna looks incredibly compact, you do have to carry around all the various lengths of wire for each band - and they range from 13ft to 125ft 😮
Super simple to build!
As I write this mini-review of the (tr)uSDX, I am reminded of the infinitely more expensive PreppComm MMX which I purchased a few months ago. The MMX is a small CW-ONLY 3-Band, Decoder/Encoder which has not only cost me a small fortune, but has caused me months of disappointment and anxiety. And even now when all the troubles are supposedly behind me, I am left wary and cautious about using it.
The (tr)uSDX kit on the other hand, has proved to be a product that just worked from the get-go. Not only does it do what it's supposed to do, it does it with ease and reliability. It has some amazing built-in tools to diagnose problems, has a built-in SWR Bridge and even a PA efficiency indicator to help you tweak the toroids, if you're so inclined.
The levels of support for such a cheap product are amazing and I'm very pleased to have it in my arsenal. I reckon I'm going to get more fun and enjoyment from this budget rig than some of my other much more expensive radios! We'll see 😊
During my 2 weeks holiday at our static caravan in Scorton, I went up to Bodie Hill which overlooks Morecambe Bay and set up station using the (tr)uSDX and my 20/40 linked dipole. I had a great take-off point and will definitely go again.
It was pretty early in the morning (because I had other things to do in the afternoon) and there wasn’t a great deal of action but I still managed to have some great chinwags with operators across the globe with my 4W. I was very happy!
The radio performed incredibly well and I was impressed with how sensitive it was at this price-point. You see questions on the internet like “How good is the (tr)uSDX” and “Can the (tr)uSDX REALLY perform as well as people say”? Well the answer is yes!! For the money, it cannot be beaten as long as you give it a helping hand by choosing a decent operating location. Having said that, I've been having SSB chinwags with Americans from my home qth with a compromised antenna.
Here’s some pix from my BIWOTA ACTIVATION TODAY…
I love this radio❤️ so I ordered another kit in green.
When the green one arrived, I did the same as I'd done with the orange one - just plugged it straight into an EFHW and tuned around 40M. I heard a signal coming in from what I thought was Russia, but it turned out to be a Ukranian operator chastising Russia and Putin for their "Special Operation". Then I had a QSO with GM0WRR in Scotland and MI3JXG in Ireland and DL5PIA in Germany.
Fitted a power lead directly to the PCB. Still kept the regular jack though, in case I need to power an accessory.
Quick PSKR Test - 3500 miles
Quick RBN Test - 3400 miles
Before I forget, DL2MAN has a great video on preparing the (tr)uSDX for Data HERE.
HANDHELD MICROPHONE
Although the built-in microphone really does work, it is not very convenient having to lean over and shout into the radio. There is a kit available in America for a small electret mic but apart from the fact that it looks pretty crumby, I don't want to pay the ridiculous international shipping fees. So looking on Amazon I found a Speaker Mic which was only £15 so I took a chance and bought it.
Being a lowly M7 licensee, I have no knowledge of electronics but I figured out from the (tr)uSDX details on the net that I could possibly get this TYT Mic working, so I tried to get it right in my head before giving it a go. I sketched this little schematic...
Well that was the theory, but it didn't quite work out 😢 The microphone part worked fine! And on receive, the audio from the radio did come through the speaker-mic (great!) but when I pressed the PTT I got a high pitched tone (it wasn't acoustic feedback).
I wondered if it was because I hadn't included a ground wire to the audio jack-plug but I didn't think I'd need to because the ground was already supplied in the other jack. Perhaps that's my ignorance showing - I'll have to try again by adding a ground wire. No harm done (so far). I'll keep experimenting and update later.
DL2MAN's Schematic
UPDATE 30 OCT 2022 : I WAS BEING DUMB!!! The Spkr/Mic wasworking after all. The noise that I could hear during transmit was due to the radio being in CW mode - which produces a tone. D’oh!!
UPDATE 8 OCT 2022 : Manuel has uploaded a video showing how to make a RETEVIS HK008 speaker-mic work with the radio. The HK008 actually has an amplified spkr which may be really useful when operating outdoors in noisy environments! There's a rechargeable battery inside the case too. I've ordered one to play with, but I'm still going to try and resolve the issue with the TYT spkr-mic when I have some free time.
Here’s the one I put together. I used the only 3.5mm jacks that were left in my “bits” box. I swap them for a neat connector later. It’s worth saying that the RETEVIS is much louder than the TYT due to the built-in amplifier. It’s also nice to have the volume control too…
Got connectors printed! 👍
Finished Product
Finally, I want to mention the fact that this radio can be an experimenter's dream and many people have carried out mods - even changing the screen to a larger unit. More on my level is the type of mod that requires little technical expertise, such as tuning the RF section to achieve better efficiency and power. DL2MANhas a great video showing how easily this can be achieved....
There are lots of videos of the (tr)uSDX on YouTube, so go there to discover answers to any questions you may have about the radio. I hope you enjoyed this little review of the (tr)uSDX and consider ordering one for yourself - I'm sure you'll love it!
UPDATE 23 APR 2023 : Found a compact PowerBank at a Radio Rally. It’s almost exactly the same size as the base of the (tr)uSDX and has a Micro USB connector which folds neatly away when not in use. It offers 5V, 1A output, 1500mAh. Perfect for brief, low power activations or a bit of RX.
UPDATE 5 JULY 2023 : Ordered a 3rd unit in blue. Just arrived.
Hi Tom, nice review. I am looking forward to receiving mine following a recent order. Did you manage to experiment anymore with the speaker / microphone? I think that is a cracking idea. All the best. Kev M7KWB
Hi Kev, Thanks for visiting the Blog - it's appreciated. I haven't got any further with the spkr-mic yet because I just haven't had time, but if I do get anywhere (good or bad) I'll be sure to post it on here mate.
Hey Kev, I edited the post to show that there was nothing wrong with the mic - it was working properly - I just had it in CW mode which obviously produces a tone on transmit :-)

uSDX-3Dview-M7MCQ.jpg)


uSDX-decode-M7MCQ.jpg)


uSDX-picnic1-M7MCQ.jpg)


uSDX-diy-7web-M7MCQ.jpg)

blue1-m7mcq.jpg)
5 comments:
Hi Tom, nice review. I am looking forward to receiving mine following a recent order. Did you manage to experiment anymore with the speaker / microphone? I think that is a cracking idea. All the best. Kev M7KWB
Hi Kev,
Thanks for visiting the Blog - it's appreciated. I haven't got any further with the spkr-mic yet because I just haven't had time, but if I do get anywhere (good or bad) I'll be sure to post it on here mate.
Best regards,
Tom, M7MCQ.
Hey Kev,
I edited the post to show that there was nothing wrong with the mic - it was working properly - I just had it in CW mode which obviously produces a tone on transmit :-)
Regards, Tom.
Да, отличный трансивер!
Работаю на 160м CW 1W Ant LW abt40m.
Очень доволен.
Красивая передняя панель!
Александр.
Hi Alex, thanks for visiting the blog.
73, Tom, M7MCQ
Post a Comment