Friday, 25 April 2025

YAESU FTM-200D MINI REVIEW


It's been a while since I last posted anything because there's just been so much going on in my personal life, that I've rarely had a minute to spare! Anyway, I  finally found an hour to install a mobile transceiver into my car and thought I'd briefly share my experiences.


The radio is a YAESU FTM-200D which covers VHF, UHF and C4FM. I bought this just because it was so cheap - a lovely secondhand item found on FaceBook. It was absolutely as new condition, complete in original box, with all the original accessories and manual. To make it even more of bargain, it also came with the BlueTooth Module.


Brand new, these radios cost circa £300, but I got this for £185. Originally, I was going to look for a 300D but then I remembered that as much as it's nice to have two receivers, the fact is, it's kinda wasted in a mobile environment, so this time I thought I'd keep things super simple and opt for the single receiver 200D.

Needless to say, with twin VFO's you can still easily monitor VHF and UHF and then switch to the active one. The radio's PMG function also makes it a breeze to monitor your favourite frequencies.

The FTM-200D is virtually identical in size to the FTM300D and shares the same screen, which is small, but more than big enough to work in a mobile situation. The front of the radio is detachable, so you can easily mount it somewhere really useful and tuck away the bulky bit elsewhere.


The built-in speaker is really quite loud, meaning that there's no need to have an external one as long as you're not tucking the main part of the radio too far away. For me, this wouldn't be a problem because after spending time considering it carefully, the best place would be between the two front seats. 

In my car there is an unusually large gap between the seats and by fixing some Velcro to the underside of the radio-bracket, I could very conveniently locate the radio with the speaker pointing up to me. It also meant that the microphone could be located just below the gear lever - easy to grab.

So, about the car itself - it's like one of those amazing Barn Finds that you hear about. It is 24 years old and until 18 months ago it had just 4,000 miles on the clock!!! 😲😲😲

I was sooooo lucky to find this thing because it's basically a new car for 24yr old car money! It cost me a couple of grand and has full service history. The original owner (an elderly gent) bought the car in 2001 and drove an astonishingly low 400 miles per year and despite that ultra-low mileage, he had it dealer-serviced every single year!😲


Looking through the receipts, I could see that last year the unworn tyres were replaced because rubber doesn't age well. The cam belt was also replaced for the same reason.

The engine ticks over like a purring kitten and the engine bay looks as good as the rest of the car. When I put it through an MOT last month, the examiner was chuckling as he handed over a Pass Certificate with no advisories. He said the car was amazing.

Well, in a short space of time, I've got the mileage up to 16,000 miles and I've collected a few scrapes and scratches and broken an armrest, lol. If the original owner saw it, he'd strangle me!

Quite apart from the condition of the car, I have to say that from a practical point of view it's the perfect car for me. It's got amazing amounts of storage, a super comfortable cabin and a great boot space for my dog, complete with overhead seatbelt to restrain her.

In retirement, this is very much my 'hobby-car'. I use it to get to local take-offs for radio and permanently store a lot of my bulky accessories in a box in the boot, such as antennas,  masts, tripod, etc. I also keep a painting set in there too.

A staggering 550 Ltrs of space 😮


If I'm doing HF and the weather's not too good, I can sit in the back of the car where there's masses of space to get properly comfortable and take advantage of the built-in trays on the back of the seats.

Anyway, back to the FTM-200 installation - I managed to locate the Yaesu's control-panel in the upper right hand corner of the windscreen, hiding the cable neatly behind the A-Post trim and under the carpet. In the image above it looks quite imposing but it's actually not. It feels like the perfect spot. And it's very secure, with no wobbling when you're pressing the buttons.

Another advantage of placing it up in the corner of the screen is that it's really out of sight from prying eyes and if you put the sunvisor down, it's completely hidden. 


Providing power to the radio was initially a bit of a head scratcher because it meant running a quite heavy power lead to the engine bay to reach the battery. Or that's what I thought!!

It turns out that the battery is actually located underneath the front passenger seat! How handy is that???😁

The antenna is currently on a mag-mount, but at some point in the near future I'll get around to fitting something more permanent. 

The FTM-200D is a great little radio, providing a full 50W on both bands with a handy 25W setting for us Foundation License holders and a QRP friendly 5W setting. The controls are incredibly easy to get to grips with - even programming repeaters 'on the fly' is an easy process.

The PGM feature provides means of scanning your favourite 5 frequencies and that's enough to monitor VHF/UHF calling channels plus another three local repeaters. There's also over 1000 memories available, all with alpha-tagging and you can quickly change scan modes between VHF frequencies, UHF frequencies, AirBand frequencies or ALL.

The colour display is nice and clear but it's not a touch-screen. Apart from the usual ability to show VFO A & B , it can also show a single VFO with an active bandscope below it. Alternatively, you may opt to have a display with time and date which is my personal preference.


There's a built-in voice recorder which can record both RX and TX on VFO-A, VFO-B or both! Very handy for when you're driving and can't write down callsigns which you want to log later.

Built-in GPS provides accurate time and position and APRS is very well implemented. There's a separate manual dedicated to APRS and it's very comprehensive. I'm not personally into APRS, but if you are, I'm sure you'll be happy with Yaesu's implementation.

I won't rattle on about every little detail because you can download the manual and read more about it yourself. What I can tell you is that the 200 is a cracking little radio which should fit into most vehicles with ease. The separation cable which is used to connect the detached front panel to the remote base is included in the package. What is not included is the SCU-58 cable data-cable, so I tried an SCU-20 that I already owned and it works perfectly well!

The radio is super easy to operate and I can't think of any function that I miss over the 300 in a mobile environment. Below are a few images showing various operational screenshots and some specs. I'll do a more thorough review in a couple of months time.

Thanks for visiting.


Wednesday, 12 February 2025

FORCED RETIREMENT!

The last few years at work have been pretty tough and sales have been in steady decline, but nonetheless, it came as quite a shock to hear that the company is officially no longer solvent and will be liquidated at the end of February!

At the tender age of 66, I realise that I am highly unlikely to find another job and certainly not at the rate of pay that I've enjoyed over the last few years. 

I've had to face the fact that all of a sudden I have no job, no income, no car and no house!! Yes that's right - the house I lived in was owned by my employer and that too has to go 😲. Although I'm worried about the future and all the changes that are coming, I'm also well aware that there are many people far worse off than me, so I'm doing my best to stay positive and try to make the best of a grim situation - I still have my health and a wonderful wife, so onwards and upwards!

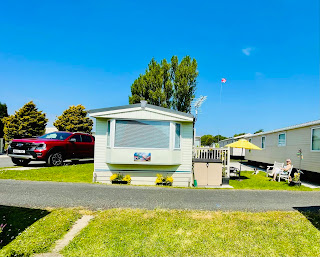
Thankfully, we have a holiday home on the edge of the Forest Of Bowland in a tiny village called SCORTON, so for now, we'll move there and I'll start to look for a part-time job that befits a man of my maturity 😁

To be honest though, I am wholly ready for retirement and I very much look forward to enjoying my new found leisure time playing radio, walking, photography, painting and many days out on my motorbike.

One big change I'm going to have to make is the size of my shack. I have to massively scale things down because my "holiday home" is, in fact, a static caravan and space is always at a premium. I've already started to sell off excess radios and accessories and a friend has offered to store some other radio stuff that is just too good to throw away and yet not valuable enough to try to sell.

A spare room in the caravan is already setup to incorporate my "radio shack" but now that things have changed, I need to rethink it. I can't really afford to have a full-sized radio on the small desk, so I've been looking for something that is very compact which can be tucked away out of sight.

That requirement narrows things down enormously. Another consideration is that my main PC from home (a large tower) has to fit in there at the side of the table with a monitor against the window. All this means that I need a proper computer-controlled SDR (as opposed to a standalone radio with screen and buttons). 

I also wanted something which didn't need an external amplifier to get me to my permitted 25W and something that I didn't feel like I was pushing hard. If I have an FT8-day, I don't want to sit there worrying that the finals are ready to burst into flames.

Almost instantly, I knew which model to go for - the SunSDR2 DX from Expert Electronics. It fits the bill perfectly and from my previous ownership of their MB1 Prime, I know that the control-software is just fantastic!! I considered buying a SunSDR PRO which is the 20W version, but that would mean I'd be stretching the radio all the time instead of just coasting along as the DX will.
 
 
Needless to say, I had no intention of paying £2,300 for a new one, so I searched around for a great deal on a used one. I actually ended up in a situation where I bought two!!! This was because I thought I'd found a good deal from a guy in Scotland, only to find an even better deal the day after. So I advertised the one from Scotland before it even arrived and sold it on for an extra £100 😂

So here I am with a mint condition SunSDR2 DX with accessories for just £1100. I call it my retirement gift! 😁 And very nice it is too!

And since I'm going to have lots of time on my hands, I also decided to upgrade my aging Sony A6000 to the new A6700 so that I can continue to enjoy my photography hobby for a few more years (before the zimmer-frame arrives) 😂


So there you go! A new life begins and although it's not what I expected, I'm sure there's lots of opportunities ahead to make the most out of the final furlong!

Some pics of our caravan life....


RETIREMENT FUN!
😁

Monday, 6 January 2025

MX-P50 INTERFACE LEADS

Having got my IC-705 working with the MX-P50 amplifier, I thought it was time to do the same with my Elecraft KX3 and my ELAD FDM DUO. In theory, there should be no problems interfacing them, but I did of course have to sort out connecting leads.

The MX-P50 has a rather odd connector for the PTT signal and because I want the option of using a few different radios with the amp, I decided to cut it off and replace it with Anderson PowerPoles for the sake of uniformity (plus I've got loads spare). With that job done, it was easy to start making up interface cables. To remove the risk of me connecting power to the amp’s signal lead by mistake, I fitted blue heatshrink tubing to the amp’s signal lead and the interface cables.


I already had a generic KX3 amp-lead which was terminated with a male phono connector (RCA). At first I was going to snip off the phono and fit powerpoles, but I thought the phono connector might come in handy at some point in the future with another amp, so instead I kept it and made up a short patch lead to convert it from phono to powerpoles (as seen in the photo above).

At the other end, the KX3 lead has a 2.5mm TRS jack-plug which connects to the phono-plug thus...

TIP : not used

RING : Centre-Pin (PTT)

SLEEVE: Shield


Once the lead was made up, it was time to connect the amp and radio together and test it. I set the KX3 to a power output less than 2W and switched to DATA mode for a constant carrier.

I attached a power-meter fitted with a dummy load, set the band selector to match the radio and transmitted. With 1.5W in, the amp put out around 25W. Perfect for Foundation License holders!


Brief video showing it in action


The next job was to test the lead I’d made up for my ELAD FDM DUO. This went slightly different to the other radios in that the output was around 23W no matter what the output power of the Elad was! Still, pretty much on the money for a Foundation Licensee.


TIP : PTT

RING : Not Used

SLEEVE: Ground


73, Tom, M7MCQ.