Wednesday, 23 March 2022

BUILD-A-PI by KM4ACK

RASPBERRY PI ZERO 2W

Today I put together a tiny computer for use with my portable radio gear. It's in the form of a Pi Zero 2W and I used KM4ACK's Build-A-Pi utility to put it together instead of using an image from the internet.

It took a long time to complete and no disrespect to KM4ACK, but in the end, I wished I'd just downloaded an image 😏

I already have the HAM-PI software collection which I built into my Pi400, but I was curious about seeing what could be done with the smallest Pi out there - the Zero. It's amazing how compact it is! After completing this Build-A-Pi project, I've decided that I'm going to write another HAM-PI image onto a spare card and keep it with the Zero as an optional boot up.

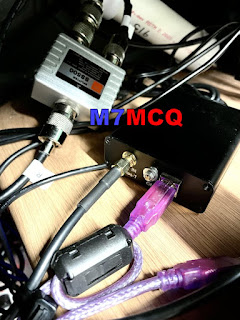
To keep the Zero safe from knocks and drops, to avoid static damage and to provide some RF protection, I put it into a small metal case. It also looks pretty darned cool too. I got both off eBay for paltry amounts.

Because I was opting to install all the software included in the Build-A-Pi option list, I needed to use a 16Gb card, but I only had a 32Gb SDcard from Kingston which results in around 23Gb spare (wasted) space.

The case by FLIRC measures around 70x35mm and is really nicely made. A heat-transfer pad is included for the processor and all the connector holes line up perfectly. You even get a little wrist-strap with it.

The Pi Zero 2W uses a Quad Core 64-bit ARM Cortex-A53 processor running at 1GHz which is around 5 times faster than the original Pi Zero. 512Mb of ram is included.

On the PCB is a power-in and a USB connector (both Micro USB), alongside a Mini-HDMI socket. At the bottom edge is your Micro SDcard holder. 

The built-in Wi-Fi module is encased in a metal enclosure to avoid stray RF effecting it - always good when using radios close by! This mini-marvel even has Bluetooth 4.2. What it doesn't have, is a built-in soundcard.

When buying a Pi Zero 2W, you must factor in a decent little 5V PSU. One of the problems that people come across with PI's is lock-ups and black screens and it's almost invariably because they're using a cheap little usb charger from the £1 shop. The official mains supply has a 2.5A output which will allow your Pi to power other devices like a HDMI monitor and a wireless keyboard and mouse, etc.


Outdoors, you'll probably want to use a 5V battery pack or Power Bank. Depending on the capacity of it, it should last a good few hours in the field. I have a couple of Power Banks but the best one is a Baseus PD 20W which can power/recharge up to three devices at once. It has variable voltages which makes it useful for powering other devices such as QRP Labs QDX.


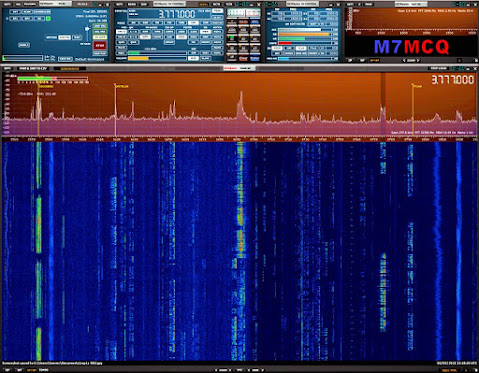
Once all the "building" of the Pi is complete (which is automated but can take hours), the device is ready to run all your favourite radio software. JS8CALL and WSJT-X work a treat. There's also GPS software which runs perfectly with my cheap GPS Dongle. This is essential for accurate time-keeping.

The Zero doesn't have the GPIO pin-out block, but it has all the connections to add one. Personally, I won't ever use that, so its absence is of no consequence to me. Also of no use to me is the camera-connector at one end of the pcb.

So, what's it like?? Well it works fine. There's no apparent problems with any of the software, but yes, it seems a tad sluggish compared to say the Pi400 - but then it would! In practical terms though, it works well and is certainly a lot smaller! 


MANUFACTURER'S SPEC....

1GHz quad-core 64-bit Arm Cortex-A53 CPU

512MB SDRAM

2.4GHz 802.11 b/g/n wireless LAN

Bluetooth 4.2, Bluetooth Low Energy (BLE), onboard antenna

Mini HDMI port and micro USB On-The-Go (OTG) port

microSD card slot

CSI-2 camera connector

HAT-compatible 40-pin header footprint (unpopulated)

H.264, MPEG-4 decode (1080p30); H.264 encode (1080p30)

OpenGL ES 1.1, 2.0 graphics

Micro USB power

Composite video and reset pins via solder test points

65mm x 30mm


Saturday, 5 March 2022

YAESU FTM-7250DE REVIEW

MOBILE SOLUTION

When I got my truck, I bought a radio for it but then hesitated because I didn't want to start drilling holes in it. But recently I changed my mind and have decided to fit a tiny Dual-Band Fusion rig in the form of a Yaesu FTM-7250D.


This is a very compact VHF/UHF/C4FM transceiver which will fit neatly in the centre-console of my Amorak. Despite its diminutive size, the FTM-7250 is capable of outputting 50W and a tiny fan at the rear is supposedly capable of keeping it cool. It doesn't matter to me, since I won't ever be using that much power anyway.

The receiver has an extended range of 108-580MHz so that means it's good for listening to the AirBand as well as 2M and 70cm.  AMS ensures that the radio automatically recognises the operating mode of an incoming signal and switches between AM/FM/C4FM without any input from the operator.

The radio's speaker is (thankfully) forward-facing on the front panel and is really quite loud (I think it's around 3W output). It's not the deepest, richest sound in the world, but it's perfectly adequate for what it's designed for.

Over 200 memories (with alpha-tagging)  makes it easy to store your favourite frequencies and then scan between them. You can also search between programmed band edges (ten of them). 


Because the truck is on a PCP, you have to be careful not to drill holes which the leasing company can pull you up about when the vehicle is due to go back. Needless to say, they take great delight in charging you a fortune for a new centre-console just because you drilled a hole in it!  With that in mind, I opted for a Velcro solution and to be fair, it worked out well.

I did have to drill a secret hole to reach a power source, but the hole cannot be seen. If I had to remove the radio, it's a simple affair but the likelihood is that it'll just stay in-situ. With the mic unplugged you can barely notice it and it's easy to chuck a dark cloth over it when parked up.

Programming the radio was achieved by using CHIRP and a programming lead purchased from TechnoFixUK which has an FTDI chipset in it. This USB lead creates a COM port in Windows. Just in case you're thinking this lead will work with RT SYSTEMS software - IT WON'T!! I'm getting a bit sick of RTS. Previously, I've used their software with my own leads but they're building in code which stops the software from even being installed until it detects their own unique cable, forcing you to spend even more! No thanks RT!

 
Anyway, it's real easy to program memories by hand at the front panel. You'd only need to use Chirp if you wanted to program loads of frequencies. 

SPEC :

  • VHF and UHF Operations
  • 50 W transmit power in FM and C4FM
  • Automatic Mode Selection FM/C4FM
  • Digitale GM (Group Monitor) function
  • Large LC-Display, backlit
  • 220 memories
  • Automatic Repeater Shift
  • Transmitter from 144 to 146 MHz and 430 to 440 MHz
  • Receiver continously from 108 to 580 MHz
  • AM Reception in the airband (108-136 MHz), 8.33 kHz step width provided
  • DTMF Microphone with backlit keys
  • Direct frequency entry with microphone
  • DSQ, CTCSS, DCS Squelch functions and signalling
  • Firmware updates via USB interface
UPDATE
Just got back from Winter Hill after completing some tests to make sure my programming was okay. I'm pleased to say that all was well. 

At first, I thought GB7WM (our radio-club's Fusion Repeater) wasn't working because when I put out a call on it, there was no response whatsoever - not even a beep to confirm I'd reached it and opened it. So I rang a mate Carl (G0UXF) to ask him if he could hear my calls on the repeater's output.

He confirmed that he could hear me and that my CallSign was displaying correctly. Strangely though, I could not hear him when he tried to open it (although I could hear him on the input frequency directly). He just cannot open the repeater even on 50W from his QTH.

I tried a few other repeaters and all were fine. Then I tuned into my local Gateway MB6HW which is operated by my friend Bill (G4CFP). That was working superbly although I got a gentle reminder from Ian Maude (G0VGS) about leaving adequate pauses between overs in order to give the repeaters time to reset and prevent them from timing out. Ian also discussed the potential problems with simplex gateways and recommended watching a video on YouTube called THE SIMPLEX CONUNDRUM

So overall I am VERY happy with the FTM-7250 and I like its simplicity. Very few bells and whistles, cheap and cheerful. I'm glad I managed to get hold of one before Yaesu bring out something that does the same thing but for more money and with more features that I don't need.

Thanks again for the help from G0UXF, G4CFP and G0VGS.


Thanks for visiting - please take a minute to leave a comment below 

73, Tom, M7MCQ.


Tuesday, 1 March 2022

Virpil VPC Mongoos T-50 CM3 REVIEW (Not Radio)

RELUCTANT UPGRADE!

I recently moved my FlightSim PC from my Radio Shack to our Hobby Room. It would make both hobbies so much more pleasant due to spacing. Unfortunately, it ended in a bit of a disaster too. My beloved Thrustmaster Warthog Hotas Throttle decided to transform itself into a  very expensive paperweight.

 
No amount of fettling would bring the old girl (well only two year old actually) back to life, so it meant I'd have to order a replacement PCB at a cost of around £60 but they're not currently available due to the global Silicon Chip shortage.  So I dug out my CH PRO USB throttle in its place and then immediately remembered why I'd put it away in the first place. 
Windows cannot recognise your device 😰

The CH PRO throttle and FighterStick cost around £250, so they're not exactly budget items, but after using a Warthog Hotas, they certainly feel cheap! It was no use - I just couldn't live with the CH kit any more and so I looked for a new throttle  (I'll still repair the broken one when PCB's become available again and then sell it to recoup some money).

Needless to say, I could buy a new Warthog Throttle replacement, but looking on the internet I could see that plenty of people had suffered the same premature failure I had. Not good at these prices. 

So after some research, I discovered that the 'next level up' was the VIRPIL products. They looked magnificent and had rave reviews, but my God, they are expensive 😰

Top of the range is the Virpil VPC Mongoos T-50 CM3. It's their latest model and provides the user with over 140 programmable buttons, dials, switches and sliders. Some may think that's overkill, but believe me, FlightSims soon gobble up those assignments!

The Virpil £Ouch!

The unit costs a staggering £450. Yeh, that's outrageous! That's more than I paid for my Warthog Thottle & Stick combined! Well if you spend a lot of time on your hobbies and want the best, then you have to pay for it - or don't - your choice.


Just like everything else, the Virpil products are on back-order and it was just a stroke of luck that I stumbled upon one for sale on eBay - couldn't believe it! I ordered it on a Sunday night and it arrived on the following Tuesday.

As soon as you pick this baby up, you just know that it's something very, very special. It OOZES quality and all those switches and rotaries feel oh so smooth. The big throttle levers slide backwards and forwards with almost no lateral movement at all. The supplied detents allow you to choose where and when the idle/off and afterburner starts and stops. The finger-levers at the front just fall into your grip, allowing you to move past the detents with ease.

Most of the rotaries and hats also have a push-button to add to their usefulness. The six large square buttons are illuminated and each one can be altered to display its own colour. Additionally, you can flick off the covers of the switches and insert a description label - there's a pack of useful icons supplied in the box, but I prefer to make my own.

 
In addition to the supplied configuration software, you can also open up the throttle and make physical adjustments to the way the levers work. It's just another way that Virpil provide the ultimate levels of customisation. That's cool!


The connections for the USB leads are proprietary and at first I couldn't see the value in them, but then I realised that the option would be to have a fixed cable or a USB socket, neither of which is great afaik. Virpil's connector is very strong and stable and they provide a pass-thru socket for attaching other Virpil products to - that's a big plus!


The configuration software that I mention earlier is errr, just like most other hotas software - complex!!! I guess there's now way to dumb these things down and you just have to get your head stuck into a book or a few videos. That's where I'm up to right now - figuring out by trial and error how to assign all the functions of my sim to this throttle.


This is where I'm up to right now. It takes a lot of time to get through it all and even more to refine things. And remember, assignments usually relate to a specific aircraft, like the F-16C in DCS WORLD. If I switch to a HARRIER or an A-10, then I have to use different assignments (although some will obviously be common to all). 

Thankfully, the VPC T-50 CM3 has a 5-position selector switch which I'm hoping will permit me to program five different aircraft into the device and switch from one to another quickly and easily. I'll report back on that 😂 Wish me luck! 

Finally, I managed to replicate the ICP from the F-16 on my StreamDeck. This will be really handy, since it means you don't have to scramble around for your mouse to make adjustments. I've not assigned keystrokes to it yet, because some of the ICP buttons don't have keys assigned by default.


Here's some VPC pix...


Specification from manufacturer:

VPC MongoosT-50CM3 - Throttle Control System

The VPC MongoosT-50CM3 Throttle is the newest generation of our popular VPC MongoosT-50 Throttle design. Designed to integrate into every VPCockpit control set, it can also be used as a stand alone throttle unit.

As with our flightstick base units, the internal mechanics are constructed from high precision aircraft-grade duralumin which offer tension adjustment (accessed internally) and use our high precision, digital contactless VPC sensors.

The MongoosT-50CM3 Throttle now includes our brand new detent system. Controlled via all-metal finger-lift levers, the detent system can be adjusted via quickly interchangable detent plates to create the perfect setup no matter what you're flying!

Included Detent Sets:

★ “Classic” Detents - Lift to pass detents, push return.
★ “Classic Plus” Detents - Lift to pass detents, push return but with an additional tactile bump immediately after crossing the detent range.
★ “Warthog-Type” Detents - Lift to pass and lift to return detents.
★ “Aerobatic” Detents - Push through and push return detents.
★ “CosmoSim” Detents - Push through central detent.

Featuring 6 x LED momentary buttons with a transparent cap which can be removed to insert your own button inlays - perfect for labelling your controls!

There is now our detachable USB and AUX connection points which will allow daisy chaining with other VPC devices such as our VPC Control Panels for simplifying your setup.

The full feature set includes a huge number of controls surfaces and configuration possibilities that will surely satisfy even the most avid of virtual pilots!

Throttle Base Panel:

★ 6 x Customisable Momentary Buttons
★ 3 x Momentary Toggle Switches (ON-OFF-ON) 
★ 4 x Latched Toggle Switches (ON-ON) 
★ 1 x 5-Way Mode Dial
★ 2 x Encoder Dials (+ Push)
★ 2 x Throttle Axes (VPC Contactless Sensors)
★ 1 x Auxiliary Axis (VPC Contactless Sensor)

Throttle Handles:

 1 x 8-Way Hat (+ Push)
 3 x 4-Way Hat (+ Push)
 1 x 2-Way Hat (+ Push)
 1 x Encoder Dial
 1 x Encoder Dial (+ Push)
 4 x Momentary Push Buttons
 1 x Slider Axis
 1 x Analogue Ministick (+ Push)


.

Saturday, 19 February 2022

LDG MC-7610 REVIEW

EXTERNAL ANALOGUE METERS

Who doesn't like big analogue meters?? No one! There's just something a little magical about them and when I am using the Icom IC-7610, I love to switch to the big VU-style meters on the display but then I lose my expanded scope and waterfall.

The answer of course, is to use an external meter and thankfully, LDG have made a unit containing two analogue meters in a single steel case. There's one meter for each receiver in the IC-7610 and they can be set to indicate Signal Strength, Power, SWR, ALC, Compression, Current or Voltage.


Straight from the box, the LDG MC-7610 looks pretty impressive. It looks and feels like a quality bit of kit, unlike some of the MFJ meters I've seen (and owned). Each meter measures around 75mm wide by 35mm tall and the case itself is 220mm x 85mm x 85mm (WxHxD). There are four feet which add another 5mm to the height.

The meters are illuminated and have adjustment on the rear panel for individual brightness and colour. Also at the back is a Power Button, a Power Connector (12V+/- 15%) and a Radio Interface socket. The supplied interface lead is a simple 3.5mm stereo jack-plug to jack-plug. It's rather short, so unless you're planning to sit the meters right on top of the radio, you'll want to buy a longer lead.

Strangely enough, the meters don't work unless you supply the unit with power. I thought that the power connector was for illumination purposes alone, but it's not.

I strongly suspect that these meters will work perfectly well with the IC-7600 and maybe even with some other dual-receiver Icoms that have the external-meter connect. You can see on a close-up of the meter itself, the word M-7600.


So apart from looking fabulous, what do these meters offer ? They give you a nice easy to read meter for each receiver and permit you to place them in a location which suits you. They cost around £190 new I believe.


Am I happy with the purchase? Yes, for sure! They look so cool and are really easy to read from my operating position without the need to reach for my glasses. 

Thanks for visiting the blog!

73, Tom, M7MCQ.

Friday, 18 February 2022

KENWOOD TH-F7E Mini-Review

GOLDEN OLDIE
A 'USED' HT BARGAIN!


If you're on the hunt for a very cheap, value-for-money handheld transceiver, you'd do well to consider the discontinued  KENWOOD TH-F7E. Of course there's lots of HT's out there on the second hand market, but the feature which makes the F7 stand out from the crowd (apart from its low price) is its wideband rx and its ability to receive HF SSB!

The radio is an FM DualBand 2M/70cm transceiver with a 5W output. It's capable of listening to two separate frequencies at the same time (even on the same band). The ultra-wideband receiver has a wide range of modes including AM/FM/FM-N/FM-W/SSB and even CW!

There's also a wide range of tuning-steps including a very fine step for accurate SSB tuning. Inside the unit is a ferrite-bar for AM Broadcast listening - something which is often omitted in other handheld radios of this type. The only other HT I've owned with a built-in ferrite antenna was the Kenwood D74 (which cost me an arm and a leg).

With two bands available (Main-A and Sub-B), you can monitor any two frequencies of your choice, or if you prefer, you can de-clutter the screen and just have one band active. The Main-A band provides full TX/RX on VHF and UHF, while Sub-B provides RX only from 0.1~1300MHz in any mode.

In addition to the 'rubber duck' and ferrite antennas, Kenwood have made provision for an external antenna to be fitted which makes it very convenient to throw a long wire into a tree and massively improve your SWL capabilities.

Needless to say, this old-timer does not offer any digital modes, so if you're looking for some action in the DSTAR/C4FM/DMR fields, dig deeper into your wallet!

The real beauty of this radio to me is its size and durability. It's tiny and it's tough! And that means it's going to go with you much more often than a bigger radio - especially because it's got such a wideband RX. Okay, so it won't win any awards for selectivity or sensitivity, but if you're out and about up in the hills, it's perfectly adequate and more so with a simple wire connected to it. The radio also suffers from some birdies and these are actually mentioned in the manual. But all in all, it's a great little receiver - especially for this amount of money.

I walked the dog the other day and slipped the F7 into my pocket. I also took a small retractable wire antenna. I knew there was a competition going on and once on top of Winter Hill (just a couple of miles from my home), I threw out my wire into a nearby bush and heard scores of loud, clear stations from all over Europe, Asia and even America on SSB. I could also detect weaker signals but it was much harder work deciphering what they were saying, especially with their accents and the pileups and qsb.

The radio benefits from really good construction methods and it feels incredibly tough (MIL-STD 810 C/D/E) - you certainly don't fuss over it like you might do with other radios. It's also showerproof which is a great thing when you're out and about walking. All the buttons have a very positive feel to them and the Multi-Scroll key makes easy work of the menu system. The only negative here is that there's no illumination for the buttons. The internals of this little marvel are regularly applauded by technicians for the very high quality design and manufacture.  "This ain't no Baofeng" 😂

As usual from a Kenwood radio, the audio from the small speaker is pretty darned amazing. I just wish that other manufacturers would learn from Kenwood in this respect. My Elecraft KX3 for example has terrible audio from the loudspeaker and they simply advise you to use a headset instead and to treat the speaker as an emergency backup! That's ridiculous when you see how well Kenwoods sound - even at this diminutive size.

Battery life (1500mAh)?? Well it's pretty good actually. Even though it's not like the modern batteries of today, it really does surprise you how long it lasts, so much so that I'm not even thinking about searching for battery options.

Finally, this radio has over 400 Memories available for programming and with its fast scan-speed and wide coverage, it makes an excellent Scanner too! Scanning the AirBand produced good results but I would say not quite as good as a dedicated AirBand receiver. Still, most people would be using an AirBand scanner at and Air Show or close to an airport and in those circumstances, it performs flawlessly.

I bought my first TH-F7E from eBay for the princely sum of £75 including carriage. It came with all the original bits and bats, manual and even the original box. 

So there you have it. An excellent little radio for the Radio Ham or the SWL.


Specifications

* 144 - 146MHz Tx/Rx: FM 

* 430 - 440MHz Tx/Rx: FM

* 0.1-1300MHz Rx: FM-N, FM-W, CW, SSB, AM

* Memories 434 

* Large Frequency Display

* 5W HI, LOW, EL 

* Internal VOX

* Automatic simplex checker 

* Memory shift

* Time-out Timer & APO

* 16 button key pad plus multi-scroll key

* Internal bar antenna for MW AM broadcasts

* Special charging/operating circuit

* Lithium-ion battery pack 7.4V/1550mAh

* 58 x 87 x 30mm * 250g


UPDATE FEB 2023

I have since sent this transceiver to a special Overseas Appeal 💗

73, Tom, M7MCQ.

Leave a comment below if you have experience of the F7...


Thursday, 10 February 2022

IC-7610 WATCH

APPLE WATCH & IC-7610

Wouldn't it be nice if you could control your ICOM IC-7610 from your watch? Well that's unlikely to happen for quite some years, lol, but in the meantime you can kid you mates and have this fabulous animated watch face on your Apple Watch!

It has a swinging s-meter and an animated waterfall. How cool's that??

It comes from an app called CLOCKOLOGY which provides amazing watch faces and allows a high degree of customisation too. Costs £1.79pm. I'm not advertising - I'm just putting the info here that I know I'll be asked for.

73, Tom, M7MCQ.


Thursday, 3 February 2022

DIAMOND SS-500 & RSP1A

Connecting your SDRPLAY to your IC-7610

With previous radios, I have shared the antenna with my SDRPLAY device via an MFJ-1708B which has certainly worked, but it's messy and you never feel 100% convinced that it's going to protect the front-end of your external receiver. The best way to protect it is to not put it in harms way in the first place and you can do that if your radio has a suitable connector. Some transceivers (like the FT-DX3000) have a very simple RF-OUT connector which means that you just plug your external receiver into that connector and hey presto, it works.

The Icom IC-7610 has a different arrangement. It has RX-IN/RX-OUT BNC sockets on the back which form an RX loop, allowing you to insert a receiver inline. This means that you are never putting your SDRPLAY (or whichever receiver you use) at risk. I thought originally that I could just plug my SDRPLAY into the 7610's RX out, but when I did, I got nothing!  Apparently, you need to place the external receiver into the loop using a splitter (see the diagram that I sketched above).

Why Icom chose this method over the simpler one employed by Yaesu on the FT-DX3000, I have no idea. Presumably there's a benefit or it's due to the fact that the IC-7610 has Dual Receivers and very comprehensive antenna switching capabilities - I don't know.

By using a high quality splitter such as a Mini-Circuits ZCS-2-2+ or a Diamond SS-500, you can be assured that you are also providing a good degree of isolation between your transceiver's receiver(s) and the external receiver. Typically, you're talking about more than 30dB isolation, so there's very little chance of interference from one receiver to another.

At the time of purchase, the Mini-Circuits splitter wasn't available anywhere in the UK - fresh stock wasn't expected for another 3 months, so I turned to the Diamond SS-500 which is beautifully made but at £80 is horribly expensive. The Mini-Circuits device cost around £60.  As usual in these Covid times, stock shortages pushes prices up to ridiculous levels, and you have to choose between stumping up the cash or waiting months. I chose the former.

Although the price was higher than those retailers who had no stock 😲 RadioWorld were quick to deliver - it arrived the very next morning and was well packaged. 

The Diamond SS-500 is good from 0.5MHz up to 500MHz which falls way short of the SDRPLAY's frequency range, but that's of no consequence to me, since I'm only interested in HF coverage. 

Before I could install the splitter, I needed to make up some BNC-PL259 coax leads and a PL259-SMA lead. Once that was done, I somehow managed to connect them all up without pulling out the IC-7610 from its tight-fitting place on the shelf - miracle!!

I then loaded the latest version of SDRuno along with all the various add-ons and also made sure that OmniRig was running and configured for the IC-7610. 

With everything setup correctly I switched on the radio and ran RSDRuno. The two interfaced perfectly and it was good to see the full layout and tools of SDRuno instead of the very limited EXTIO version which I'd tried previously with limited success.

Version 1.4.1.1 is the latest version of SDRuno at the time of writing and is incredibly rich in features. There are a couple of bugs, but the software writers are fully aware of them and are working hard to sort them out. One of them relates to an issue which I personally experienced when trying to use the IF Output of the 7610 through the USB3 connector. It meant that you were unable to click on SDRuno's Scope to tune - you had to use your mousewheel or direct frequency input. That, ultimately, led me to go down the RF path. Hopefully, the patch isn't too far off for those who want to use SDRuno with the 7610's IF Out without an external receiver.

Anyway, the software ran perfectly and it feels good to have SDRuno back on screen, especially this latest version. Things have changed significantly since the last time I connected an RSP to the radio and I'm looking forward to exploring and experimenting.

Below are a couple of images showing the Diamond SS-500 and RSP1A hidden away under the radio shelf and then there's a screenshot of the software up and running. Conditions are poor at the time of testing, so there's not a great deal going on in terms of signals. I’ll post more when conditions (and activity) improves.


If you don't have an external receiver such as the RSP1A and don't want one, you can, of course, use HDSDR as instructed in the IC-7610 Manual. It provides you with a simple panadapter which works very well.  You don't need anything other than a USB3 lead.


HDSDR
 
Needless to say, SDRuno through an RSP provides you with a staggering range of functions and features to explore and experiment with. You pays your money and make your choice.

I'd be interested to know what you have opted for!

If you have any comments or questions, leave them below. Thanks for visiting the blog. 73, Tom, M7MCQ.

icom ic-7610, sdrplay, sdruno, rsp1a, rspdx, rspduo, diamond ss-500