Tuesday, 9 May 2023

YAESU FTM500DE Mini Review

YAESU'S FLAGSHIP FUSION MOBILE

Yaesu's new FlagShip C4FM Mobile is a 50W C4FM/FM 144/430MHz Dual Band Digital Transceiver. 


I'll be honest - I had no intention of buying this radio when it was announced in February 2023 - I was perfectly happy with my FTM300. The 300 is a superb Fusion radio and has more C4FM capabilities than the discontinued 400 and even the "Flagship Fusion" 991A.

But in my little shack I had two Fusion rigs - the 300 and the FTM7250 (the latter was removed from my truck because I just never used it mobile) and it bothered me that it was one too many. I decided I needed to sell the 7250 but then I figured "If you're going down to a single radio, it might as well be the very latest - the 500". So I sold the older rigs and ordered the new one.

PRICE ðŸ˜® Everyone seems to be obsessed with the price of the 500 as though it’s the only expensive radio in the world! Well let me tell you - they’re all expensive!! Here in the UK they’re just over £600 which is no different to the cost of the aging ID-5100. The big difference is the FTM-500 has the very latest and greatest technology inside it. 

It doesn't offer a massive amount more than the FTM300, because as I've said previously, the 300 really is a very good radio and it offers superb value for money at less than £400.


The first thing that grabs you about the 500 is the "big" VFO which I do quite like. In all the marketing images, you are led to believe that this new radio is bigger all over, but the truth is - the main body is virtually the same. The screen is bigger on the 500 and is a "touch" screen and the (detachable) front panel is taller and much deeper to accommodate the piped speaker output. And it's a really good output too - no need for an external speaker with this baby! Click HERE to review what's new from Yaesu.


The screen is a joy! It’s hi-res and has accurate touch functionality. I'm aware that some people think you need a huge screen to be able to use a radio, but then the same people whip out text messages on their phones with absolute ease!


Thankfully, some bright spark came up with the idea of providing a TILT function which allows you to tilt the head unit (and therefore the screen) upwards for easy viewing. Brilliant!


Someone said to me that the 500 has lots more physical buttons than the 300, but in reality, the 500 only has 1 extra button. Pressing the FUNC button brings up a quick-menu which can be altered to suit your own personal preferences. I altered mine so that I have quick access to the Clock/Timer display, as seen below…


The user-interface (as far as I'm concerned) has become very Icom-like and that's a great thing! There's a lot of "Press what you want to change". So if you want to input a new frequency, hold your finger on the displayed frequency and a keypad will open up to allow you to type in the figure you want. Simple and effective. You can also press the VFO dial to do the same and you can even do it from the DTMF Mic too.

Want to change Mode? Just press the Mode icon onscreen! Want to change from VFO to MEM? Yeh, you guessed it - just press VFO onscreen. You get the picture.

On the left you have two small dials which control the Volume and Squelch of the receivers. On the opposite side you have another two dials - the top one is the main FUNCtion dial for controlling menus, etc and the bottom one is for controlling the sub-vfo. Obviously, the great big dial controls the main VFO.

Having two independent receivers means that you can, of course, monitor and listen to two independent signals. That's VHF/VHF, VHF/UHF, VHF/C4FM, UHF/UHF, UHF/C4FM, AM/VHF. AM/UHF, AM/C4FM, AM/AM, C4FM/C4FM.

That's a lot of options! And one thing that I particularly like is the ability to force AM mode! What do I mean?? Well some radios have AM mode purely for the AirBand and as soon as you move away from that specific band, it switches over to FM.

With the FTM-500 you can force it to switch to AM receive. An example of when you might want to do this is the Marine Band. Normally, you'd choose say 156MHz and be stuck in FM mode, but with this radio you can go to the RX MODE menu and change it to AM, then save the frequency/mode to a Memory Slot and it will store that configuration, which is great if you want to include it in a Scan. Needless to say, AM is RX only!

Note : there is no Crossband Repeat function in C4FM! Analogue yes, but not digital - the C4FM protocol prohibits it.

PGM is another great facility. With it, you can choose up to 5 frequencies and it will present a screen with a 5-section BandScope. You rotate the dial to choose one of these frequencies to actually use and then watch the bandscope for any signs of activities on the other four frequencies.

So you could be listening to an interesting C4FM QSO on CQ-UK through your HotSpot(1), while you wait for your buddy to come onto the local C4FM NWFG repeater(2), while keeping an eye out for activity on 2M(3) and 70cm(4) whilst watching for Marine life 😂 on 156MHz(5).

Additionally, you can press the SCAN button to make the radio SCAN all five frequencies and stop on any one of them when there's activity. There's all sorts of ways of using it I guess.

MAG Memory Auto Grouping - a feature which allows you to scan through all the memories by frequency group - scan all the VHF or the UHF or the AIR or C4FM stored memories.  There are 1104 memories available!

All these things are real easy to figure out - it all feels quite intuitive, like an Icom. I think it's what Yaesu refer to as their latest E2O (Easy To Operate) system. Up to now, I haven't had to refer to the Manual at all. It's intuitive enough to figure out by simply "having a go".

Sadly, there is no software available for programming the memories at the time of writing. This is a bit disappointing but I've heard that Yaesu may be releasing one soon. In the meantime, RT SYSTEMS have been a little more pro-active and have got their software ready and available for download.

Personally, I don't feel the urge to buy any software for the FTM-500 because it's pretty darned easy to input memories by hand. You simply set the frequency, the mode, the repeater shift and tone (where required) and then press the MW button. Done! If I had hundreds of frequencies to store, I'd consider the RTS software, but I don't.

Even if I was to store all the local Repeaters and local AirBand channels, it would still only amount about 30 memories, so it's not worth bothering with software for me.

AESS - Acoustic Enhanced Speaker System that's Yaesu's method of controlling the way that the FTM500 sounds. The radio has a 6W speaker in the front panel and a 3W speaker in the base unit. You can play with the volume and tone balance between the front and rear to reach a ‘sound’ which best suits your hearing and audio preferences. At factory settings I'd say that overall, the audio is a little "thin".

Using the AESS system, you can adjust the equalizer so that one (or both) speakers have more bass (other options are available including phase adjustment) but you need to be aware that using this system will effectively mute the sub-vfo's audio. Yes, you heard right - the AESS feature gives you something but also takes something away! The fact is, there are only two audio paths and the AESS system wants to use both of them to allow you to tailor the sound of the Main VFO.

Now some people might start kicking off about that and I know of one guy who actually sent his radio back to the store because he actually thought his radio was broken 😂.  It doesn't bother me too much. The fact is, you cannot realistically listen to two signals at the same time. I'd prefer to have a more comfortable and pleasing audio than being able to listen to dual conversations.

Having said that, some might think it quite ridiculous that a Dual Receiver can't dual-receive. I get that. But this little alleged "flaw" only effects you if you seriously want to listen to the audio of both receivers at the same time. Both receivers obviously continue to function with AESS active, but you have to switch between VFO-A and VFO-B to hear them.

I'm guessing that in a mobile situation, no one's going to give a rat's ass about audio fidelity when you're blasting down the highway at 70mph. You'll not need AESS and will be perfectly happy with the FTM500's clear, bright and punchy sound (not to mention the 9W output). AESS is an option at the end of the day - switch it on when it suits you, switch it off when it doesn't.

POWER OUTPUT of the FTM-500D is 50W/25W/5W which I find quite annoying. As a UK Foundation License holder, I am limited to 10W which means that on this radio I am actually limited to 5W - no more, no less. This isn't unique to the 500 of course - it's the same on many other Yaesu radios.

I did once write to Yaesu UK about it and they told me that I could send the radio to their workshops and they would probably be able to adjust the lowest setting to 10W. I didn't bother because I didn't want to lose the 5W setting too 😡

Is it really so difficult to make these radios with more output settings such as 50/25/10/5/1W?? Or even variable from 1 to 50 on a dial?? 

Luckily, I'm strictly a QRP man and 5W is fine by me 90% of the time. In fact, this radio will spend the vast majority of its life in my shack running Wires-X in Direct Mode with 0W output. Only a few times a year will I take it out in the field and want to use my 10W limit.

SDCARD - Like the FTM300, the 500 can accommodate a 32Gb micro sdcard and on there you can back up all your settings and memories. The radio's built-in QSO RECORDER uses the sdcard to store all your recordings. You can record both RX and TX which is a fabulous feature that I've enjoyed on my Icoms for a few years now. 

C4FM has reached a very mature stage now and it's well implemented in the FTM500 with the ability to monitor two C4FM signals in Dual Receive. When it comes to Wires-X though, I was initially very annoyed to see that the 500 uses a new computer interface cable called the SCU-58 at a cost of £70 😡😡😡

Before buying one, I decided to try my SCU-20 and boom, it worked fine 😃. I think the SCU-58 might only be marginally different in that it's guaranteed to be compatible with Windows11. Well I use Win10 so that doesn't matter to me. I have heard rumours that the SCU-20 will also work with Windows 11, so it's worth trying your old SCU-20 before forking out £70.  To me, these C4FM radios should all come with computer leads included, like they used to years ago with the FTM400!

The only bugbear that I have with using Wires-X with a Yaesu radio is that you are locked into digital mode and cannot use the radio for anything else. For example, right now I'm connected to Wires-X on my PC using PDN DIRECT mode and there's no way for me to also monitor eg the 2M Call frequency 😩 Yes, I can switch back to analogue, but that's not the same.

BLUETOOTH is built into the 500 and it works very well. I was able to connect the Yaesu BT-10 headset without any issues at all and even my Apple AirPod Pros worked. RX and TX.

APRS is available on the FTM500 and the built-in 66-ch GPS provides the positional data. You are also able to connect an external GPS. I have not really experimented with APRS yet, so I cannot provide any useful information on how well it's implemented here. What I can tell you is that APRS occupies the biggest part of the radio's menu system by far! 

A point of interest is that the Yaesu's built-in TNC's are not accessible externally - not on this radio, nor on the 300 or even the 400. I don't know why Yaesu lock down their TNC when others like Kenwood (my D74 for example) provide external access via cable and bluetooth.

SSM-85D The FTM500D is supplied with the latest programmable DTMF microphone which fits really well in the hand and has a host of useful features which make the radio even easier to operate. I think this is my favourite mic of all time. It looks good and functions well. Audio reports have been very complimentary so far. 

Is some of this sounding a tad negative??

It's certainly not meant to be! I absolutely love this new radio and I'm so very pleased that I upgraded from the already fabulous 300 (which IMHO was an upgrade from my old 400).

So what are the actual differences between the 500, 400 and 300? Let's take a look.

Bear in mind that the 400 design is now about 10 years old and the main reason for its popularity is its screen size. It has the largest screen of all Yaesu's fusion mobiles (about an inch bigger than the 500) and suit's those people who's eyesight is perhaps not what it used to be. The 300 is relatively new and offers the biggest bang for the buck but it has a much smaller non-touch screen.

FTM500 benefits over 300...

  1. AESS
  2. Two Mic-input locations
  3. Tilting Head
  4. Larger knobs with click-detents
  5. Customisable Favourite List
  6. Larger, Higher-Res Screen
  7. Touch Screen
  8. Touch & Go function
  9. Search & Go Function
  10. Onscreen Function-Select

FTM500 benefits over 400...

  1. C4FM available on both VFOs
  2. AESS
  3. E2OV4
  4. Built-in BlueTooth
  5. QSO Recorder
  6. Two Mic-input locations
  7. Latest programmable DTMF Mic
  8. Two Speaker Output Jacks (A&B) on Body
  9. Headphone Socket on Head Unit
  10. Speakers in both head and body
  11. Tilting Head
  12. Head can be mounted to body
  13. Larger knobs with click-detents
  14. Customisable Favourite List
  15. 16-Character Long Alpha-Tags
  16. Ability to store more parameters into memories
  17. MAG Function
  18. PMG Function
  19. Touch & Go function
  20. Search & Go Function
 

So should you sell your 300/400 and upgrade to a 500? Not if you're happy with what you've got. If your current radio does everything you want, then it's a bit daft to change it, but if you are buying your first Fusion mobile and want the absolute best available, then you're going to need the FTM-500D.

Yes it's expensive, but so too is every other brand new top-of-the-range radio. The launch-price will probably drop in a few months, so it might make more sense to upgrade then - especially if you've got one of the first 400's which is 'knocking on a bit'.

If my FTM300 had been my only Fusion radio, I would definitely have kept it, but I also had a redundant FTM7250, so selling them both meant that I didn't have much to pay in order to move up to the 500.

I'm very pleased with my purchase and look forward to many years of service from it. The Advanced Manual has only just been posted by Yaesu USA (there's absolutely nothing on the UK site at the time of writing), so there's a lot more to learn about this radio, so please consider this review as a "First Look". I will post updates soon.


Please leave a comment at the bottom of the page.

73, Tom, M7MCQ                                                                                                        ==============

>>FTM-500 VIDEOS ON YOUTUBE<<


UPDATE 11 May 2023

Ian (G0GVS) asked if the large VFO dial might interfere with the view of controls when mounted in a car over to one side. Here's some images showing that all dials remain visible, but one button would be hidden by the VFO (but still easy to reach).


Yaesu offer a rotating RAM-BALL style mount
to make it easy to adjust the view of the FTM500
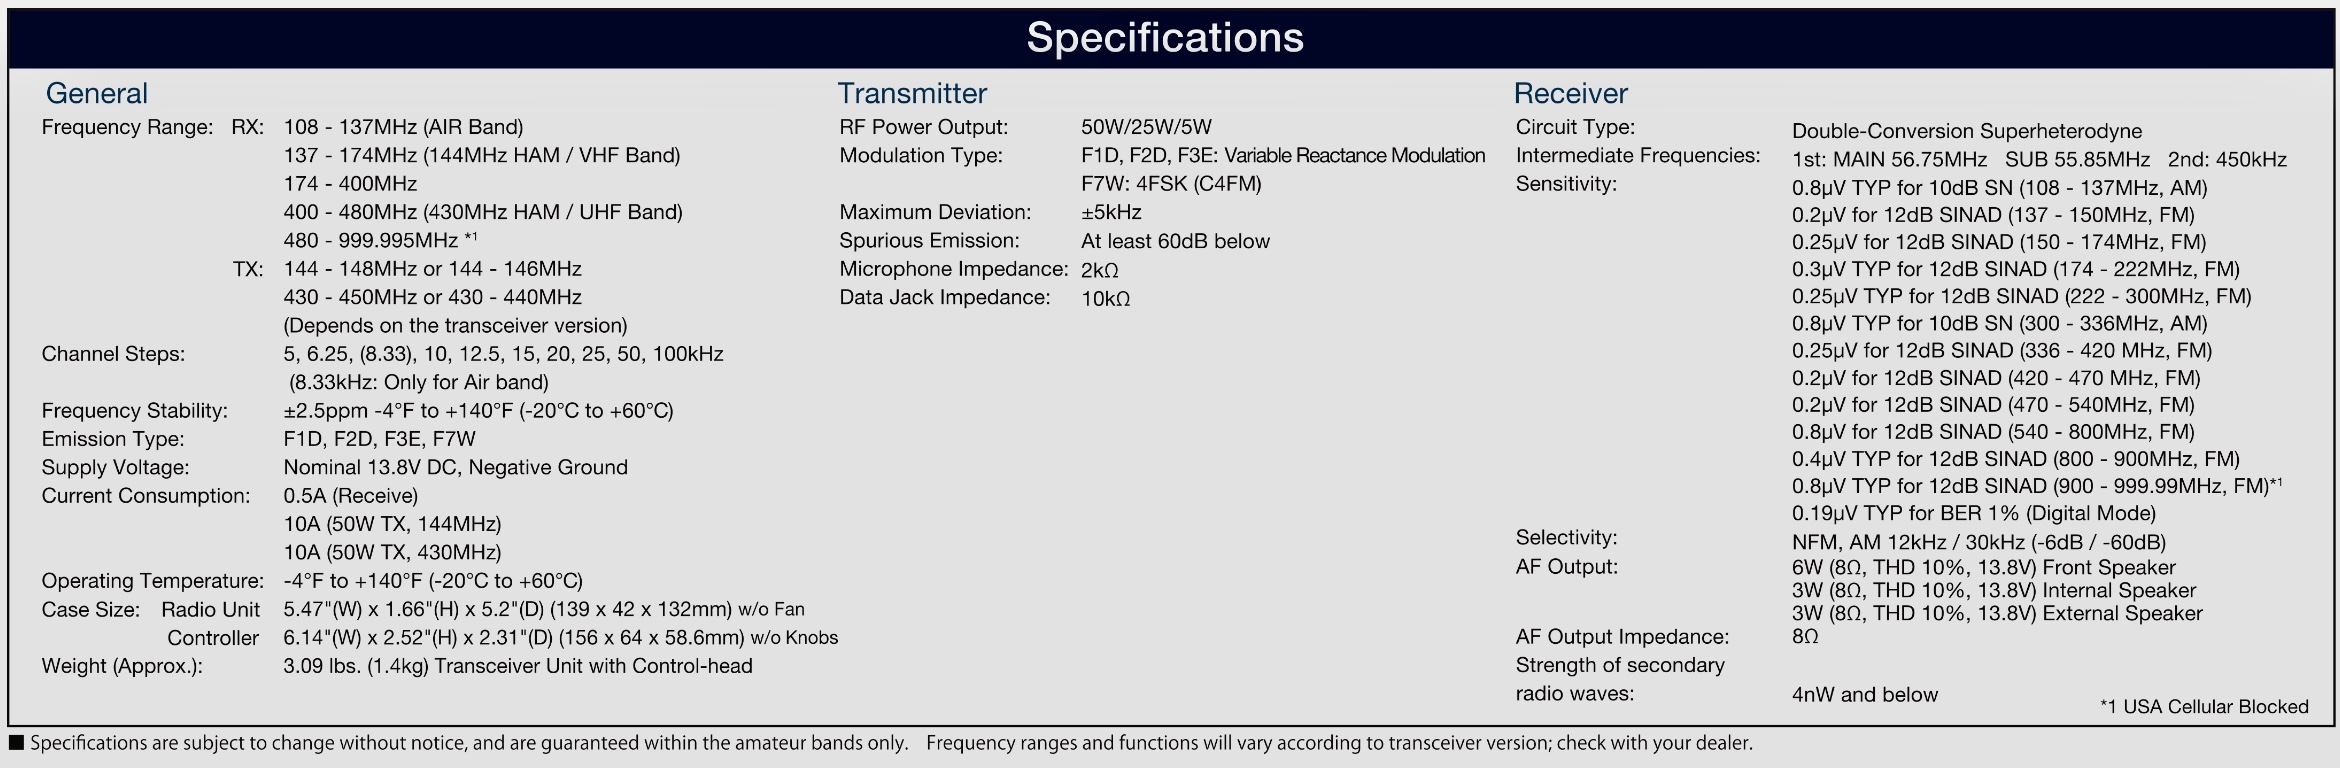
SPECIFICATION

<Main Features>
- Equipped with front speaker, clear sound quality and expansive volume, AESS dual speaker system
- Overall output 9W (3W: main unit, 6W: front panel) High sound quality - Loud speaker
- New dual mobile operation The latest operating system E2O-IV (Easy to Operate-IV) with touch & go/search & go functions
・Supports C4FM digital, analog FM communication, and AM (airband reception) with excellent communication quality
・Simultaneous reception of 2 waves , C4FM/C4FM digital dual reception (digital D/D) supported
・AMS (Automatic Mode Select): FM-friendly digital with communication mode automatic selection function
・Easy and comfortable group operation with digital group ID (DG-ID)
・2.4 Inch high-definition full-color touch panel display
・Swing head mechanism that can change the angle of the control head upward by 20 degrees
・Optional spherical joint type mount kit that can change the angle of the control head up and down / left and right (SJMK-500)
・Frequently used CFL (customized function list) for easy function checking, setting changes, and customization -
Memory auto grouping (MAG) function that automatically groups memory channels by band -
VFO band skip function that displays only the bands to be used
・Memory channel VFO transfer function to move memory channel information to VFO with one touch
・One-touch scope function that instantly switches between scope operation and dual reception operation
・High-speed spectrum scope function
・16 characters (8 full-width characters) kanji supported, large capacity 1104 channel memory with tags installed
・Built-in high-precision GPS receiver, real-time GPS data Communication APRS compatible
Bluetooth wireless operation (optional headset SSM-BT10 required)
WIRES-X portable digital node function compatible
Equipped with a microSD card slot that can save voice data and memory backup
Stable 50W high output Guaranteed FACC (Funnel Air-Convection Conductor) cooling system Control
head separate operation supported


<Main specifications>
・Transmission frequency range: 144-146MHz, 430-440MHz (C4FM digital / analog FM)
・Reception frequency range:
 108-137MHz (Air Band)
 137-174MHz (144MHz HAM/VHF Band)
 174-400MHz
 400 to 480MHz (430MHz HAM/UHF Band)
 480 to 999.995MHz
Reception method: Double conversion superheterodyne method
Radio wave type: F1D, F2D, F3E, F7W
Transmission power:
 FTM-500D (50W type) 50W/25W/5W
 FTM-500DS (20W type) 20W/10W/1W
External dimensions (W x H x D):
 Body 139 x 42 x 132 mm (excluding protrusions and fans)
 Control head 156 x 64 x 58.6 mm (excluding protrusions) )
・Weight: Approx. 1.4 kg (body, control head)

E2O V4

108-999.995MHz

AM Reception

6W spkr front 3W main unit

PMG func

MAG 


Wednesday, 26 April 2023

DSO SHELL OSCILLOSCOPE

HAND-HELD OSCILLOSCOPE DSO-150

I recently bought a QRP-LABS QCX kit and while I was watching a Trouble-Shooting Video by Hans G0UPL, I noticed that he was using a hand-held oscilloscope. It looked like a very useful little tool and would be an ideal addition to the shack - especially considering my enjoyment of (simple) kit-building.

I thought they might be too expensive but they are, in fact, quite cheap. You can buy them as a kit or fully assembled - I chose the latter and it cost me £40 on eBay. If you go down the route of buying it in kit-form, you can expect to pay around £20 but you will have to do some SMD component soldering 😲  I also got a DC 5V to DC 9V USB power lead - another handy shack accessory.

The oscilloscope arrived the very next day in a useful box for storage. I'll probably find an alternative storage solution, but for now it's fine. The unit seems pretty well constructed and the controls work smoothly.


The 2.4" screen is full colour and while not the highest resolution, it's good enough for light use. The instructions are sparse, so I'm guessing the manufacturer is assuming the operator will have a basic knowledge of oscilloscopes. No matter anyway, since there are numerous videos on YouTube to help you out. One such video can be found >>>here<<< An excellent manual can be found >>>here<<<

In the case of building or trouble-shooting the QCX, Hans' video makes light work of testing with the DSO-150.  I'm one of those "in at the deep end" kind of guys, so I'm expecting to learn as I go along. I'll probably blow something up within seconds of using it 😂

Anyway, the main point of posting this is to make more people aware of the DSO-150's existence! I personally had no idea that you could buy such a compact oscilloscope and certainly not for as little as £20. I'm sure it's very basic in its functionality compared to a 'proper' scope and not even 100% accurate in its measurements, but for such a low asking price, it's gotta be worth having around the shack.

I've been building up my test gear and I've got a DVM, a VNA, a Signal Generator and now an Oscilloscope in my toolbox.


I'll update this page as I learn more about the usefulness (or otherwise) of this device.

Please leave a comment below. 

73, Tom, M7MCQ

K7RAW NOODLE-TENNA

SOMETHING FOR THE WEEKEND SIR?

One of the reasons I like Ham Radio so much is the experimentation side - in particular, antennas. I'm only an M7 Foundation License holder with very limited knowledge of antenna theory, so it's always nice when you find someone who's come up with a nice little project that is simple and easy to construct and play with.

One such person is Rudi (K7RAW), who came up with a super simple weekend project based on those light foam Pool Noodles. Very simple to make and lots of scope to make variants. Watch the video and give it a go - it's fun!

This is a BRAND NEW type of HF antenna for those with extremely limited space to setup a conventional antenna. It is derived from the Slinky Antenna but with a few upgrades. It is less than 1/5th the length of a normal dipole, yet performs similarly. No ground, radials, counterpoise, tuner or BalUn required. Just a coax feedline with a Mix 31 common-mode ferrite choke at the antenna end.

It uses widely available ordinary parts which cost less than $25. It is easily scalable for other HF bands and can be used in vertical or horizontal mounting, including with other NoodleTennas on the same mast, acting like a fan dipole.

On 10m the bandwidth is about 600 KHz below 1.5 and about 1 MHz below 2.0 I've made many contacts with it, getting good signal reports. You can build one in about 2-3 hours. MATERIALS: (scale the lengths for other HF bands) 3" diameter (large type) 50" long pool noodle 40" of 3/4" schedule 1120 (thin-wall) PVC pipe 3/4" PVC "T" 3/4" PVC elbow 3/4" flat-top plug (smooth) 2" long 3/4" PVC stub ("T" to elbow) 6" long 3/4" PVC stub (for mast) 2' of coax (RG-8X, LMR240 or RFC240) with female BNC or UHF connector https://www.ebay.com/itm/133481890997... 28' of 18 gauge stranded hookup wire 4 10" cable ties (2 at center, 2 at ends, 1 at bottom of the noodle) TOOLS: 1/8" drill bit for center hole in PVC pipe 1/2" drill bit for BNC connector threads thru flat cap 7/8" wood bit (spade blade type) for hollowing out inside of cap OPTIONS: 6 Snap-on ferrite beads (Mix 31) for common mode suppression on antenna end of coax https://www.jpmsupply.com/Snap-It-Cor... 3/4-5 TPI tap for threading 1/2" x 3/8" PVC reducer to fit painter poles https://www.ebay.com/itm/254642664421 Telescopic camlock mast (up to 31 feet high) https://docadone.com/products/docapol... Tripod that fits up to 2" diameter mast https://www.ebay.com/itm/363482179344 Guy wire ring, tie-downs, adjusters & ground spikes https://www.ebay.com/itm/114891585326 ASSEMBLY: 1) Mark the pool noodle every 1 inch with a Sharpie 2) Cut pool noodle into 2 sections, each 20" long 3) Drill 1/8" diameter hole at center of PVC pipe thru one side only 4) Slide both noodle sections onto PVC pipe leaving a 1" gap at hole 5) Divide the hookup wire into 2 pieces, each one 14' long 6) Thread both wires into hole and pull both to one end of PVC pipe 7) Strip coax back 1", solder each to coax and cover core and braid each with heat shrink 8) Drill PVC plug to fit coax connector (1/2" thru hole and 7/8" counterbore inside of cap to make thru hole wall about 1/8" thick) 9) Thread coax connector into one end of PVC "T" and out the side port 10) Insert 6" PVC stub to other end of PVC "T" 11) Attach 2" stub to elbow 12) Thread coax connector thru stub/elbow combination and attach to PVC "T" side port 13) Insert connector from inside of PVC plug and secure with its ring nut to flat outside 14) Insert PVC cap with connector onto PVC elbow facing away from noodle 15) Pull wires so that coax pulls all the PVC fittings can be joined together snugly 16) Slide both noodle sections together at hole in pipe 17) Pull wires perpendicular to noodle in opposite directions 18) Bring the up each wire onto the inner end of each noodle 19) Attach cable tie to each at inner ends of noodles to hold wire in place while winding helix 20) Wind one noodle with wire so that helix has even twist with 1" spacing between each turn 21) Wind other noodle with helix in the SAME WINDING DIRECTION as the other noodle 22) Tie off each wire at the outer ends of the noodles with cable ties 23) Adjust cable ties for for wire support at each end of each noodle with snugness 24) Trim off excess tails of cable ties 25) Connect to rig with good quality coax with at least 6 snap-on mix 43 ferrites at BNC-M end 26) Attach to mast at the 6" PVC stub 27) Raise the antenna and test with antenna analyzer 28) Trim both wires to the EXACT SAME # of turns until in resonance at the desired center frequency

Monday, 24 April 2023

RADIO RALLIES

THE END


Last weekend I attended a RADIO RALLY. I wish I hadn't bothered!  It was quite poor.  I'm sorry if this upsets some people, but I'm just saying it how I see it. Of course this is just my opinion and others may think it was fabulous - but it wasn't.

Considering that Covid has denied us so many Radio Events, you'd think that this one would have been a little special - that it would be attended by all the main retailers and maybe even by Yaesu/Icom UK. But no, that's just wishful thinking.

Maybe I'm expecting too much. Maybe my visits to non-radio events at the NEC and other venues are clouding my judgement. 

 
I look at Radio Rallies subjectively and positively by default  because I'm a radio enthusiast and I want it to be good. But looking at it objectively, they remind me of "Jumble Sales" from the 1970s.

The vast majority of stands (tables) are filled with absolute junk from years gone by. I'm not talking about sought-after classic radios - I'm talking about bric-a-brac! There were even things there that had nothing to do with amateur radio such as piano keyboards, cassette tapes and even a Haynes Ford Mondeo Manual. Good God, if you set up a committee to try and make a show as bad as it could be, this is what you'd include.

I could have gone around taking photos of all the dreadful stands, just to make my point, but it would have identified people sitting behind the tables which I didn't want to do.

I keep hearing stories about amateur radio being a dying hobby, full of old blokes using their walking sticks to beat up any unsuspecting FT8 fans - and you know what - that's how it feels at these rallies. There's hardly any feelings of excitement or vigour generated by them. Just mountains of old junk from some silent-key's shed.

I'm probably sounding disrespectful but I'm not trying to be. I just think that Rallies are a great opportunity to get people together and promote the growth of the hobby instead of clearing out your old crap. There is nothing modern and exciting about a Radio Rally anymore. Even some of the (local) Radio Clubs who had stands seemed more interested in displaying their past than their future. 

I hung around the RSGB stand and got nothing from them. There was no engagement and it seemed to me that they were their to sell their books and memberships. Very little meaningful interaction with people. 

The venue itself was big enough and bright enough, but OMG the men's toilets were horrific! It smelled like a cesspit in there! Jeez, this isn't the 1970's!!

On a more positive note, there were the traditional component stands brimming with useful connectors, adapters, ferrites, electronics, etc. There were also two decent retailer stands - one was CANNY COMPONENTS from Newcastle and the other was LAMCO from Barnsley. 

The staff at Canny Components always work very hard at these shows and bring along a vast array of stuff. It's a great stand and they are usually flexible on price. I bought a battery for a good price. This is why people go to these rallies - to hopefully grab a bargain and come away feeling good.

LAMCO had a smaller stand in the corner of the hall and had no bargains to offer the visitors.I looked through their selection of antennas and was about to buy a whip. I asked the owner for the price of it and using his phone he looked up the price on his own website and told me they were listed at £110. Obviously, I asked him what was the best price he could do (it was almost closing time) and he told me £110.

I didn't buy the antenna. I couldn't believe that they would drag all this stuff from Barnsley to exhibit at a Radio Rally and not offer a penny discount off their regular prices. If he'd had given me a sob story and said "All I can do is knock a fiver off" I'd have bought it. But to be so utterly inflexible lost him a sale.

Thankfully, another trader showed great flexibility and I bagged an absolute bargain! It was a QRP-LABS QCX 5W CW TRANSCEIVER. I cannot work CW at all, but I have built a few QRP-LABS kits and just love them. 


After Tax, Import Duties and Postage, a QCX will cost a UK buyer around £100. If you want the aluminium case to go with it, the figure goes up to £130. Here was one with both items, boxed, unopened and even had a full colour printed spiral-bound manual (which you can't even buy) and I blagged it for £10!!!!  How good is that??  I also managed to buy a couple of decent books for a bargain price (both new) from the Bolton Wireless Club stand.


So although I was extremely lucky to come away with a lovely radio-kit at a bargain price, I drove away from the venue deciding that it would probably be the last Radio Rally that I'd ever attend.  My days on this Earth are getting limited and I don't feel inclined to waste them on another radio-archaeology event.

If the format changes and if some genius finds a way to inject new life into a Radio Rally, then I'll be the first to queue at the door offering any help I can to support it.


73, Tom, M7MCQ.


Thursday, 20 April 2023

SHARK-RF OPENSPOT4 PRO

OPENSPOT4 PRO - THE BEST HOTSPOT?

This isn't a technical review - it's just a Foundation License holder looking at a product from a low-level users point of view. There are lots of people who are pretty new to the hobby and want to know about a product without being bombarded with tech-talk. They just want to know what something does and how it might benefit them in their hobby. If you want something more detailed, don't worry, there's plenty of other reviews online.

My OpenSpot2 has been super reliable over the last three years and I've enjoyed many a great QSO that would have been otherwise unavailable to me. Recently though, it started to disconnect from my radio over and over, so I decided to think about a new hotspot.

For those who don't know, a HotSpot allows you to connect with Repeaters and Gateways across the globe. You basically transmit from your radio into your hotspot which then relays the signal to a physical repeater of your choice, via the internet. 


This is great for me because I'm not within reach of many physical repeaters using RF. Sure, I'd prefer to be able to use my radio alone to get into the repeaters, but that's just not an option from my two most often inhabited locations (Home & Caravan).

My very first HotSpot was a DVAP DONGLE for my Kenwood D74, which had to be tethered to a computer in order for it to work, but nowadays things have got much better and some HotSpots now work independently. There's a wide variety on the market and many of them use a Raspberry Pi as their engine, which can make them quite chunky in some cases.

Looking around on the market, I could see that the Shark-RF offerings still had no real competition in terms of size, convenience and capability, so I considered their latest and greatest - the OpenSpot4PRO.

The unit arrives in a very flimsy, thin cardboard box. Inside is the unit itself and a USB lead. That's it!! There's no stylish Apple-esque packaging to be found here, despite the high cost - you are left feeling a little underwhelmed.


I always add my phone number to portable devices
because I'm notoriously good at losing them 😂

If you pay the full retail price for an OpenSpot4PRO, you're probably looking at £300+ with shipping and import duties, so the initial unboxing disappointment might be more strongly felt than it was for me - because I managed to find a used one on eBay for just £175. I saw it with no bids and just a few minutes left to go in the auction. I was fully expecting there to be a swarm of last-second bids, but no. I won at £175 and then felt worried that everyone else knew something that I didn't 😂

The main reason for me considering the OpenSpot4PRO (apart from my OS2 going rogue) was the ability to Cross Mode with DSTAR. As far as I'm aware, the OpenSpot4PRO is the only hotspot that can do this!

With onboard transcoding hardware, the OpenSpot4PRO voice quality is exceptionally good and you can even use it without a radio by using the Shark-RF App which provides you with the ability to operate with nothing more than your iPad or PC, etc. I've tried it with my iPad and it worked flawlessly. That's a real boon for when you're on a break at work and just want to monitor (or even join in a QSO using your iPad's mic).

My OpenSpot2 allowed me to use my Kenwood D74 or my ICOM ID-52 for DSTAR and it also allowed me to use my YAESU FT3 for C4FM. Great!

The OpenSpot4PRO let's you use a DSTAR, a C4FM or a DMR radio and work in any of the modes, not just its native mode. So if you have say an Icom IC-705 DSTAR radio, you can engage in DSTAR, DMR or FUSION activities. Perfect!

Visually, the OS4 is not a lot different to the OS2 - maybe a little bigger (slightly) and it has a couple of convenient buttons on the face to switch the device on/off and to activate the wi-fi. The buttons are nicely recessed to avoid being accidentally activated in your pocket.

The device has a built-in battery which has a (claimed) battery life of 30 hours - that's 3 times better than the OpenSpot3. I seriously doubt that it would last 30 hours in continuous use, but then I can't even think of a situation where I'd need it to. It is, however, likely to last long enough for 2 or 3 hours solid chatting - and that's fine with me.


Setting up the OpenSpot4PRO is a breeze once you understand the procedure...

1. Switch it on and put it in AP mode. When you first buy an OpenSpot, it should do this by default, but mine was secondhand so I had to force it by holding the Wi-Fi button for 3-4 seconds.
 

2. Using a PC, mobile phone or tablet, go to your Wi-Fi settings and search for a connection called OpenSpot4. Connect to it.
 

3.It should automatically open a browser to allow you to alter the HotSpots settings. If it doesn't, simply type http://openspot4.local in the URL bar and that will bring it up.
 

4. If your OpenSpot is brand new, you'll be taken through a number of steps to get your device setup including the Country you live in, the frequency you wish to transmit on (check your bandplan),  the default mode of operation (C4FM, DSTAR, DMR), your preferred room or talkgroup and a few other settings. Once it's setup and running, you can start using it with your radio. 

The OpenSpot4PRO has  performed really well and hasn't given me any headaches at all - even during Cross-Mode operation. I'm very pleased indeed with it. I can switch from using my home wi-fi to my phone's hotspot when outdoors, switch between modes, switch rooms and all done very easily.

Would I recommend it?? At £300+ I’d have to think long and hard about it. If it was only for occasional use, I’d look for a secondhand OS2 because £300 is a LOT of money for me. But if you save a search on eBay and find a bargain, yes! Apart from its capabilities with a radio, I also love the fact that you can use it without one! Plus of course, it is self powered. That's a very nice feature. And then there’s the simple cross-moding.

If you read through the comments at the bottom of the page, there's sure to be people who have different requirements than me and find the OpenSpot4PRO lacking something that they need. That's always going to be the case, but for me personally, it does everything I need and lots more.


And finally.....

It turned out that my OpenSpot2 wasn't faulty after all. The problem was the USB power-supply that it was plugged into 😲 Out of frustration, I tried a new USB-PSU, not expecting it to be that and it worked superbly. Lesson learned.

TECH-SPEC

openSPOT4 Pro

The openSPOT4 Pro extends the feature set of the openSPOT4 with onboard transcoding hardware:

  • The openSPOT4 Pro has the best voice quality in cross mode operation
  • Supports D-STAR® cross modes: use your D-STAR® transceiver to access DMR, C4FM, NXDN® networks, or your DMR, C4FM, NXDN® transceiver to access D-STAR® networks
  • You don’t need a transceiver for the Pro! Use the free SharkRF Link app on your computer or phone to talk.
  • Supports call audio playback on the web interface
  • Supports 10 configuration profiles

Compatible digital radio protocols and networks

  • DMR (BrandMeister, DMRplus, DMR-MARC, Phoenix, XLX, TGIF and others)
  • D-STAR® (DCS, REF/DPlus, XRF/DExtra, XLX)
  • System Fusion®/C4FM (FCS, YSFReflector, XLX)
  • NXDN® (NXDNReflector)
  • P25 (P25Reflector)
  • POCSAG (DAPNET)
  • APRS® messaging and location data forwarding (APRS-IS)

Supports cross modes* (example: talk with your D-STAR® transceiver on DMR, and with your DMR transceiver on D-STAR® networks).


Key features

  • Built-in Li-ion battery with up to 30 hours of operation**
  • Built-in transcoding hardware* for the best voice quality in cross mode operation
  • Built-in Wi-Fi and radio antenna
  • Built-in beeper with audible status tones
  • Free SharkRF Link app for computers and phones for easy web interface access. You can use the app as a transceiver with the Pro version!
  • Web-based easy and fast Quick Setup
  • Call audio playback on the web interface*
  • No additional hardware required, works out of the box without a computer
  • USB-C charge cable included in the box
  • Use even in your vehicle with extreme fast bootup and USB power supply tolerance
  • User manual available online
  • 2 year warranty
  • Web interface for configuration and monitoring
  • Create your own private radio network using our open source server application

State of the art hardware and software design

  • The openSPOT4 and the openSPOT4 Pro are the only complete hotspot on the market which is:

    • customly designed as a fully dedicated device for standalone operation (no Raspberry Pi® or anything like that is used or needed)
    • has a built-in battery
    • has built-in transcoding hardware, and supports D-STAR® cross mode operation*
    • using fully embedded software written in pure C, running on a custom-tailored embedded real time operating system. This means no Linux, no bulky Windows software, no failing SD cards – but extreme durability, reliable operation and fast bootup.
  • No desktop PC software or drivers to install
  • Supports fast battery charging with USB charger detection
  • 20mW UHF RF output, see the specifications
  • Extreme fast bootup: under 5 seconds**** from powerup to connected to a server and ready to use
  • Supports scheduling an automatic daily wakeup and powerdown
  • Built-in Wi-Fi access point mode for quick and easy connecting to Wi-Fi networks
  • Multiple Wi-Fi network support with automatic connect and reconnect
  • Fully automatic over the air firmware upgrades for new features
  • Bright multicolor LED with brightness control for easy real time state and battery LED for charge status monitoring

**** Depends on the speed of the Wi-Fi router, Wi-Fi network and internet connection conditions.

Very easy to use

  • Built-in voice announcements
  • BrandMeister Manager and Quick Call on the web interface for DMR TG/reflector linking/unlinking
  • DMR SMS chat
  • DMR ID database lookup
  • Controllable with calls from your radio to preconfigured IDs/callsigns
  • Built-in echo service for testing

Frequently asked questions

What are the openSPOT4 and openSPOT4 Pro good for?
Let’s say you live in Budapest, and talk to your friends on the local DMR repeater HG5RUC, which is linked to talkgroup ID 216 (TG216) on the BrandMeister network.

If you travel around the world, where you can’t reach the repeater HG5RUC directly, you can still talk with your friends by using an openSPOT4 or openSPOT4 Pro and a DMR (or cross mode compatible) transceiver by connecting it to the same network and talkgroup which HG5RUC uses (TG216, BM). If you speak with your transceiver on the openSPOT4 or openSPOT4 Pro’s frequency, it will route your call to TG216, and HG5RUC will transmit your signals all around Budapest, so your friends will be able to hear and talk to you.

If you don’t have local repeater coverage, the openSPOT4 and openSPOT4 Pro can link you to supported digital networks all around the world. You can talk to people living on the other side of the world very easily.

If you have the openSPOT4 Pro, then you don’t even need a digital transceiver! You can use the free SharkRF Link app to talk.

What if I already have local repeater coverage?
If you do have local repeater coverage, you can still make use of an openSPOT4 or openSPOT4 Pro to avoid interrupting local repeater traffic. You can reach any reflector or talkgroup with it, so you don’t have to disconnect the local repeater and disturb other local users.
What makes the openSPOT4 and the openSPOT4 Pro way better than any hotspot currently on the market?
Currently the openSPOT4 and the openSPOT4 Pro are the only hotspots on the market which are customly designed as a dedicated hardware unit for standalone operation. They do not need a computer, a Raspberry Pi®, an Arduino® board, SD card or any other hardware to operate. They don’t need slow desktop PC software or drivers to install. No Linux knowledge is needed at all. They have a built-in battery and the OpenSPOT4 Pro supports hardware audio transcoding for the best voice quality.