Saturday, 3 July 2021

EXPERT ELECTRONICS MB1 PRIME

FIRST APPEARANCES!


After receiving a bit of a windfall, I was all but ready to buy a 1970's Honda classic bike, but then I realised that I already have a great bike in the garage and adding another would simply double my ongoing motoring costs and I don't really have that much riding-time anyway.

Of course I could save the money for a rainy day, but that didn't sound like much fun and having seen quite a few people around my age pass away over the last couple of years, I decided to make hay while the sun shines. Reckless? Maybe.

So I looked at investing in a radio that would normally be well outside my financial reach - the Expert Electronics MB1 PRIME 2021.  


I bit the bullet and got one - It's the very latest 2021 spec with the built-in ATU, manufactured in March this year.

The MB1 is a 160-2M transceiver and a PC in a single package. It has a classic design, developed over several decades, with the most advanced DUC/DDC SDR technologies available today.

The computer within the radio chassis is a fully loaded Windows 10 PC with 16Gb DDR4 RAM, a superfast Samsung EVO970 SSD and an Intel i7-9700 CPU (same processor as my gaming pc).

The radio uses  EESDR V2  which is a fabulous and incredibly configurable piece of software. Apparently, V3 is in development and early reports show that it makes far better use of the CPU which results in very significant speed improvements for those who only have an i5 cpu (as well as a host of great new features). The developers are unbelievably keen on striving for constant improvement and it's great to see that they listen to their customers and involve them heavily in deciding what's next. 

Expert SDR V2 Single VFO Screen
 
Expert SDR V2 Quad VFO Screen

The latest 2021 MB1 PRIME is designed to be used as a PC every bit as much as being a radio, so having much faster components means that you can operate the radio while running demanding software in the background at the same time. Being relatively new to Ham Radio, I'm obviously keen to dabble in all aspects of it, which includes a lot of Digital work such as FT8, etc. Being able to run WSJT-X and Logging Programs directly from the radio itself will be a big plus to me.

This is not a radio for those people who don't like technical challenges. If you already struggle with your old superhet, then forget this thing altogether! Using a high-end SDR like this requires a user who is willing to read manuals and enjoys configuring software. Basically someone who loves tinkering and experimenting.

Having said that, the MB1 is probably the best SDR radio in the world when it comes to integration with third-party software on a computer - everything is so simple because of the TCI support. I remember having an ELAD FDM DUO which was a fabulous SDR radio and the SW2 software was really, really good, but my God, that radio was annoyingly fiddly to connect up to a PC - it required THREE usb connections which is just plain ridiculous!!

On the back of the MB1 are two display ports allowing you to run multiple monitors at FullHD and even 4K. This is great for when you have all four VFO's displayed, each with their own scope and waterfall, on an external monitor. Or you might just want to operate the radio in the traditional way, but have a couple of monitors showing QRZ, WSJT-X, PSK Reporter, SwissLog, Google, etc, etc.

 
The screen built into the radio itself is a 7" high-res unit which is pin-sharp and it is, of course, a touch-screen. And virtually everything on-screen can be clicked, altered, moved and stretched by hand or with a wireless mouse! It's all incredibly intuitive and it's the first non-Icom system that I've really enjoyed. BUT BEWARE - you'll have to have good eyesight to use this screen - you could almost call it too high-res. 

I've heard Flex owners say similar things about the 6400M/6600M screens. It helps massively if you're able to locate the radio on a shelf at eye-level. Needless to say, most owners will take advantage of the external monitor options.

 
The 2021 MB1 PRIME transceiver covers HF, 6M and 2M (all modes) with 100W available on HF, 80W on 6M and 50W on 2M. Apparently, there's a mod to get 4M Tx/Rx.  Only UHF is missing. That pretty much makes it a high-end Shack-In-A-Box!

When the radio first arrived, I was a little surprised at how compact it was and soon discovered it could benefit from being about 1 inch wider just to provide better spacing between the four concentric rotary encoders in the top right corner. Build quality is superb!! The whole thing just oozes quality and all the buttons and rotaries feel great. The only concern I might have for the future is how well the screen printing on the buttons can stand up to thousands of key-presses 😕

Initial setup was pretty straightforward but you need to be aware that any radio which depends on a computer needs to be protected from unexpected changes. If you update a Windows Driver for example, it might have an impact on the radio software and cause a problem. This is nothing unique to the MB1 of course - it's the same for any computer-driven SDR like a Flex, Elad or Apache, etc. As soon as a problem appears, the SDR manufacturers always release a patch to sort out the issue. It's really quite rare anyway.

I strongly suggest that you create a Restore-Point EVERY time that you are about to add new software to your PC.

Once the radio was running, I had a quick play around (without reading the two spiral bound manuals) and soon ran into trouble. This is a rig that demands you RTFM, so don't be like me!

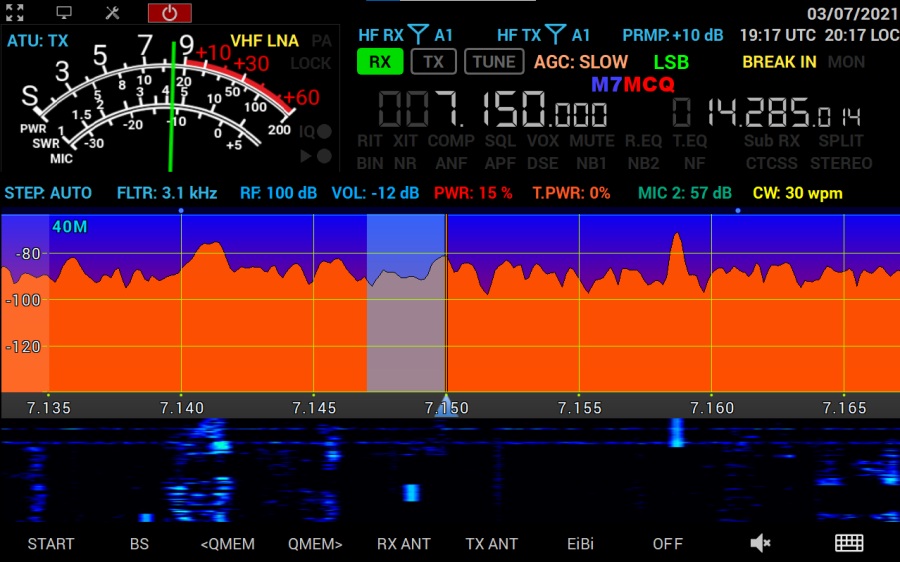
Connecting an external monitor to the HDMI connector permitted a much more comfortable view of the software. And it's very attractive software too! There's a version designed specifically for the MB1 7" screen which limits the amount of clutter and gives you a gorgeous swinging-needle S-Meter. 

MB1 GUI for 7" screen

With the click of a button, you can use the more comprehensive DESKTOP layout shown below, which provides a lot more onscreen-control but requires an external monitor. Trying to use this GUI on a 7" screen will make your eyes bleed 👀

DESKTOP GUI for external monitors

If you're going to use an external monitor (or multiple monitors) then you need to go into the Windows10 Display settings and change them so that the screens are "EXTENDED" instead of the default "MIRROR" setting. 

The colours of the scope and waterfall can be altered to suit the individual operator - there's virtually no limit to the combinations or colours, shades, gradients, etc.

The MB1 has 6 x USB sockets, making it very easy to setup a wireless keyboard and mouse and any other accessories that you may wish to use. And unlike most other radios, your mouse will work ALL OVER THE SCREEN, allowing you to quickly change settings with the click of a mouse-button. 

My MB1 is currently (but not permanently) setup in the corner of the lounge and it is connected to a half-size G5RV which is very poorly sited. The N-Type VHF sockets are connected to a high quality Discone which allows TX on 2M and to an AOR SA7000 receive-only antenna. You can also connect receive-only antennas to the RX-IN ports.

A great feature for those operators with multiple antennas is the ability to choose from a software matrix which antenna to listen on and which to transmit on. These choices can be programmed specifically to different bands. So you may listen to one band on say the SA7000 antenna and listen to another band on your Magnetic Loop, and then transmit to a different antenna altogether.

I'm going to connect the radio to my wonderful EFHW which is very well located and performs amazingly well with my 7300. If only I could get more metal in the air at my home QTH 😢


Customised Screen
  
When I first played with 2M on this radio, I was very disappointed and stupidly complained on the EE Forum. Needless to say, there was nothing wrong other than the settings were incorrect. Being an ex-demo, someone must have been messing around with all the different knobs, buttons, sliders and dials, resulting in a dreadful VHF response. It's all fine now. Great even!

20M and 40M work pretty well on the G5RV and I managed to make quite a few contacts within minutes of powering up the MB1 using low power. With a decent signal, the RX audio from this rig is ASTONISHING! It sounds awesome and I received some very complimentary audio reports. I can't wait to learn more about the radio and set it up properly.

The built-in recorder is really easy to use and you can re-transmit your recording over the air with the press of a button. Nice!  Below is a short video of a chat I had on 40M SSB with a Welsh operator.


SAMPLE OF MB1 AUDIO QUALITY
If video doesn't play, CLICK HERE

Another nice feature is the built-in ATU which has a pretty good matching range, but nowhere near as good as a decent tuner like the MFJ-993B, so 160/80M on the G5RV is a no-no, but most other bands can be tuned.

Well that's as much as I can say about the MB1 at this point. When I learn more about it, I'll write more about it, but in the meantime, take a look at some of the videos available on YouTube...

If video doesn't play, click HERE


For a more in-depth walk-through of the radio, take a look at Pascal's (VA2PV) video...

If video doesn't play, click HERE

UPDATE >>>

I experienced some problems with the MB1 and ended up returning it. I went back to the Icom IC-7610.


SPECIFICATIONS :

  • Independent RX path based on DDC (Direct Down-Conversion) architecture
  • Independent TX path based on DUC (Direct Up-Conversion) architecture
  • 2 software RXs + SubRX for each of them (4 slices total) + independent wideband Bandscope up to 80 MHz
  • ExpertSDR2 software in two styles: Desktop style and MB1 display (for integrated GUI)
  • Remote control operation, using it, you connect PTT and CW-key to the E-Coder panel. Microphone and E-Coder are connected to the remotely set up PC
  • TCI interface for seamless connection with third-party software like SDC (with its own Skimmer), LogHXSWISSLOG and RUMlog, more are coming
  • Professional TX processing module provides the most advanced tuning capability for voice operation
  • High-quality IPS 7″ touchscreen display with a 1280×800 resolution
  • Supports any software applicable for Windows 10 OS
  • ExtCtrl connector to control external devices with 8 powerful keys with open collector
  • COM-port for connection of external devices, like PA, antenna switches etc.
  • ALC connector for external power amplifiers*
  • Has a special XVTR connector for VHF transverters** (SMA connector)
  • 4 separate programmable PTT outputs for external power amplifiers
  • An opportunity to use the transceiver as a signal generator via DAC OUT connector (SMA connector)
  • An opportunity to use external filters in the middle of the RF path, using RX IN and RX OUT (SMA connector)
  • Input for external 10 MHz reference oscillator
  • An opportunity to use the transceiver in SO2V mode
  • Full duplex or half duplex modes***
  • 4 HF (UHF (SO-239) connector) and 2 VHF (N-type connector) antenna connectors
  • Internal power-meter for HF and VHF bands and SWR-meter for HF band
  • Record and play on air fragments (IQ files) with a bandwidth of up to 312 kHz
  • Internal ATU (Automatic Tuner Unit)
  • The embedded power supply unit
     

MB1 PC capabilities 

  • Installation of digital modes software
  • Installation of HAM and Contest logs
  • Two CW Skimmers may be used on different bands
  • The transceiver can connect to the LAN and the Internet
  • Use of Internet applications (e.g. e-mail, Skype, ICQ, TV, etc.)
  • Play video and audio files
  • Watch TV via USB-receivers
  • An opportunity to connect two external displays, keyboard, mouse
  • An opportunity to connect external speakers to the PHONES jack on the front panel

MB1 Applications

  • Full-function radio amateur transceiver
  • Mobile contest-station
  • Remote receipt point for the contests and other applications
  • Spectrum analyser with the bandwidth up to 80MHz
  • Work with the external programs of digital connection types, CW Skimmer, etc.

MB1 Block Diagram

ExpertSDR2 Software

A version of ExpertSDR2 software with adapted GUI for 7″ display was specially developed for the MB1 transceiver. At the present time software works in RX/TX mode and supports two independent receiving channels with the bandwidth up to 312 kHz. A DSP library developed by company Expert Electronics allowed improvement of receiving quality and higher the stability of the software.

MB1 PRIME Specifications

RF ADC, bit @ MHz16 @ 160
ADC typeLTC2209
RX Frequency range, MHz0.1…65; 95…155
Independent software receivers2 + 2 SubRX
Sample rate, kHz @ bit39; 78; 156; 312 @ 24
Bandscope, MHz80
RX HF filters, MHzLPF: 65 or 9 x BPF
RX VHF filters, MHzWideRX: 95-155 or SAW filter for 2M: 144-148
BDR on HF, dB130
BDR on VHF, dB114
Sensitivity, uV0.2
DR IMD3, not less dB98
RMDR, dB110
ATT/Preamp, dB-20; -10; 0; +10
VHF LNA, dB+22
RF DAC, bit @ MHz14 @ 640
TX Frequency range, MAll amateur bands 160-6; 2
Output power on HF, W100
Output power on 6M, W80
Output power on VHF, W50
TX IMD3, dB25-37 on HF/VHF
Local oscillator TCXO, MHz +/- ppm20 +/- 0.5
External 10 MHz oscillator input+
Built-in audio codec, bit24
RF input/output4HF (SO 239)
2VHF (N-type)
1XVTR, ADC IN, DAC OUT (SMA)
Built-in PC (Prime 2021 version)Windows 10 OS
Motherboard – GA-IMB310TN
CPU: i7-9700T
RAM: 16 GB DDR4
SSD: Samsung 970 EVO 500 GB
IPS 7″ 1280×800 touchscreen display
AC voltage range, V, Hz~100…240; 50…60
Power consumption RX/TX, W320
Operating temperature, °C/°F0…+50/ +32…+122
Dimensions L x W x H, cm/inches32.5 x 28.5 x 15.0/ 12.6 x 9.84 x 5.51
Weight, kg/lbs9.3/ 22


In the Box

  • PTT-microphone MD15
  • Power Supply Cable to connect the transceiver to an AC mains network
  • Backup fuse 5A

Optional Accessories


MORE SOON........

Thanks for visiting - please take a minute to leave a comment below 

73, Tom, M7MCQ.

Monday, 24 May 2021

IC-705 & FT8 TIME-SYNCING

TIME IN THE GREAT OUTDOORS

When you fancy playing FT8 outdoors on the top of a big hill in the middle of nowhere, just bear in mind that you often find yourself in a location which has no access to wi-fi or even mobile phone signal.

In these circumstances, you might as well switch to some SSB Voice activities because without a perfectly synced clock on your computer, FT4/FT8 just isn't going to function well. But don't worry, because your amazing little IC-705 has built-in GPS which can output its data in NMEA format and your computer (with an app) can make use of that data, extracting the time component from it.

So how do you go about setting it up? It's easy!

First of all, go into the radio's MENU....

  • Make sure you're on Pg 1
  • Click SETTINGS
  • Click CONNECTORS
  • Click USB (B) FUNCTION
  • Click GPS OUT to ON
  • Go back to the MENU and go to Pg 2
  • Click GPS
  • Click GPS TX Mode
  • Select NMEA
Now check that your GPS Icon at the top of the screen is steady (not flashing). That means it's locked onto satellites and is ready to use. You can double-check by going back into the GPS menu and looking at GPS INFORMATION to make sure your Lon/Lat coordinates are correct. That's your work completed on the radio.

On your computer (Laptop, Notebook, Tablet), download a program called BktTimSync from HERE.

Install the software and complete the setup.....

  • Click "ENABLE GPS" 
  • Enter correct COM #
  • Select BAUD 9600
  • BITS = 8
  • BITSTOP = 1
  • PARITY = N
  • PROTOCOL = NMEA
  • Click SYNC ON SYSTRAY
  • Click SYNC ON STARTUP
Check that the GPS Coordinates look correct. All other settings seem to be okay at their default readings. Please note that if you wish to use this software at home where wi-fi is available, untick the ENABLE GPS and tick the NTP instead.

If you don't know which COM port number is the right one, remove the IC-705 USB Lead from the computer, open up DEVICE MANAGER and look down the list at Ports (COM & LPT). When you plug your IC-705 in, you will see a new COM number appear - that's the one! 

When you run your FT8 software, you should find that your DT Timings are super accurate. Don't forget to make a small donation to the author - anything helps :-) 


Here's a video on how to use your IC-705 to correct the time on your Laptop....


Thanks for visiting - please take a minute to leave a comment below 

73, Tom, M7MCQ.


Sunday, 23 May 2021

DVMEGA CAST REVIEW

THE DARK SIDE I HAVE BEEN

I started my digital affair with a girl named DSTAR and then later flirted with C4FM, swapping between the two for a couple of years. But I never went to the DARK SIDE (aka DMR).

I've tried DSTAR on Kenwood's D74, Icom's ID-527300, 7610, 9700 and more recently the lovely IC-705. Due to accessibility issues with local repeaters, I've almost exclusively used a HotSpot to make contacts. Once the initial learning period was over, I found DSTAR easy to use and very reliable.

For C4FM I've used Yaesu's FT3, FTM400 and the FT991A. Again, due to a lack of access to repeaters, I've depended on my OpenSpot2. More recently, I've started to use my mate's Gateway (MB6HW/G4CFP). I also enjoy accessing Wires-X through my PC and FTM300. Access to Fusion repeaters has been much simpler when mobile in my truck using an FTM7250.

DMR I've purposely avoided because A) I'm already overloaded with stuff that I need to learn more about and B) I don't want another radio to pay for, charge, and worry about. Additionally, I believed DMR can be quite tricky to setup due to something called CodePlugs 😵 

The DVMEGA CAST is basically an IP Radio which connects to your broadband router wirelessly or via an ethernet cable. It's based on the DVMEGA AMBE3000 utilising a Raspberry Pi-Nano. It has a built-in audio amplifier providing 3W to the internal speaker, which produces a good clean sound.

The unit has a 2.5inch touch-screen on the front panel, along with a rotary encoder for adjustments and an RJ-45 socket for a microphone. It's worth noting that a microphone (eg MH-48 or similar) is NOT provided, nor is a power-supply.

 
It will receive and transmit on DMR, DSTAR and FUSION  using networks such as BrandMeister, DMR+, YSF, FSC, REF, XRF, XLX, DSC etc. Wow, that spiked my interest!

Further reading revealed that the DVMEGA CAST is around the same portable size as an IC-705 and thanks to its wireless connectivity can be used anywhere - obviously without any need for antennas, which is great for when you're on holiday or working away from home. It's also great for those who live in antenna-restricted accommodation.


The rear panel provides a socket for an external speaker, two USB-A sockets, an ethernet socket and a power socket.

Inside my DVMC you can see the PCBs which make up the Pi-Nano and amp. At the back you can see I added the optional DVSTICK30 which permits remote operation of the device.


To operate remotely, one needs to download the (free) BLUEDV app for Windows. With this (and the optional DVSTICK30 installed) you can leave the DVMC switched on and access it from anywhere in the world.


Setting up the DVMC must be a simple operation - because I did it and I'm a newbie!! 😂 It's just a case of connecting it to your router with a network cable (RJ-45 to RJ-45) and then running the Pi config screen in a browser on your PC laptop/tablet (type http://pi-star).

You can update the firmware by downloading the latest version from the DVMEGA website. You'll need the Serial # and Service # from the rear panel of your radio - I've never done it because everything works, so why bother spoiling things huh? Once you're in the config screen, it's fairly obvious which settings you need to alter to get you on the air.


With the main configuration completed and network connection established, you need to make changes to the mode settings....


I already had a DMR-ID but I still couldn't get the DMR part of the radio configured because I didn't have a BRANDMEISTER ID. I registered for one but it didn't arrive for around 24hrs, so until that arrived I had to change the settings from Brandmeister network to TGIF. I wouldn't have had a clue about that change but for the help of Ian, a club-friend. Now that my Brandmeister ID has arrived, I'll switch the setting back.


Anyway, I was now able to successfully receive and transmit on DMR, DSTAR & C4FM - happy days.


The radio is pretty simple to operate but I believe it's not always been like that. Recent updates have added much more functionality. In DMR and DSTAR modes, you can change TalkGroups/Reflectors straight from the screen and by using the buttons on the microphone, but Fusion Rooms need changing through your Pi-Star config screen. This may change in the next update. For me, it's no big deal because 90% of the time I want to tune into North West Fusion Group.


When receiving a signal, the speaker panel turns a green colour and when transmitting it turns red. Otherwise it displays a blue colour. These colour changes are also shown in the top right corner of the display screen.

The radio is a lot of fun! It's small, portable and simple to operate. Having the 3 main digital  modes in a single package is a first (for me) and I'm liking it - a lot. The audio quality on any of the modes is excellent and the only negative I can come up with is the fact that the screen is a bit on the small side. I don't know if there's a way to connect a larger external screen (I have a 7" HDMI hanging around somewhere), but I'll do some research to find out.

I've been using my DVMC in the corner of the lounge next to my IC-705 as opposed to being the Shack and so I've normally got my PC tablet in my hand. This allows me to have the Pi-Star browser open, giving me convenient access to any changes that I want to make... 


The radio doesn't come with a mic as standard, but a cheap Yaesu mic only costs around £25 anyway. The DV USB STICK is a nice accessory but only if you want to do remote. 

Filling an ML&S Basket with the same goods would result in a bill of £460 😦😦😦


There are people out there who hate NON-RF radios. People who mock them. People who would rather not play radio unless their signal comes down an antenna. But I'm not one of them. I see them as true rag-chewing devices. I enjoy listening to ham operators and engaging with them via any means, be it an RF Radio, a Hotspot, a PC or a combination. I enjoy experimenting with anything that comes under the umbrella of  Ham Radio. 

If you happen to have an MH-48 mic hanging around and don't mind connecting the radio to your existing power-supply, then a standalone DVMEGA CAST will only cost you £320 new. That's pretty good value for money - I can certainly think of a few things that cost me more which gave me less entertainment. It's got me onto DMR without all the (apparent) hassle of codeplugs and programming. Result!

To give you an idea of the quality of voice transmission, below is a video of Gregg (K6EGG) talking to me on Reflector 1C in December 2021. The video should start at the point where I'm (M7MCQ) about to respond to Gregg's call, but if it doesn't, just skip to 13mins.


UPDATE : UPDATE!! 

I recently updated the firmware and WOW!!!

Click here for details<<<<<<<<<<<<<<<<<<<


Specifications : 

- Cabled (RJ45) or Wi-fi to internet connected. 

- No RF connection or repeater needed! 

- Webinterface based configuration option. 

- 2.4" touch screen for setup and control. 

- Support Yaesu MH-48 with keypad for control. 

- Rotary encoder for volume and multi-functionality. 

- Embedded high-end CPU on dedicated mainboard. 

- Support D-Star, DMR, and C4FM mode. 

- Integrated Original DVSI AMBE3000. 

- Easy to use web-based upgrade utility. 

- Support a DVMEGA-pi radio for Hotspot functionality. 

- Supports an internal DVStick30 for AMBE-server. 

- Low power consumption 12VDC (2.1 mm Barrel Connector). 

- Colourful speaker indicator for status. 

- 3.5mm external speaker connection. 

- High performance 3 watt speaker 

- Extra USB-connections available for future use. 

- Solid full-metal powder coated housing 

- Lifetime free Software updates.


Thanks for visiting. Leave a comment.

73, Tom, M7MCQ.