OFCOM have recently announced a proposed update to the Amateur Radio Licensing Framework. What's brought this on I'm not too sure, but there's parts of it which effects Foundation License holders such as me.
The main change which FLs are focusing on is the proposed increase in permitted power levels. OFCOM are suggesting a move from 10W to 20W and I'm guessing that they won't find too much resistance to that proposal.
For me though, I couldn't really care less about the doubling of power - well not at HF anyway. I am perfectly happy with my 10W and do my utmost to use much less when able.
What I would like to see however is an increase at the VHF/UHF frequencies. Currently, my 10W limitation means that I cannot reach most repeaters in my region and I can only reach a limited number of local operators! This means that my activity on 2M and 70cm is virtually nil. As a result, I find myself turning to internet-based solutions. And that can't be good for the hobby.
I believe that FL's should be allowed to use up to 25W on VHF/UHF. That would make a huge difference to my ability to use 2M and 70cm repeater network. 20W is quite a silly figure to propose, because the vast majority of radios from the big 3 manufacturers don't even have a 20W setting in the Power Menu, but they all have a 25W setting.
The next proposal which interested me personally was the decision to permit FLs to use equipment that they have built themselves. To me, that makes perfect sense because I've been building kits for years and it's a really important and interesting part of the hobby. Building a kit and then not being able to use it on-air is very annoying.
Experimentation and self education is surely what Amateur Radio is all about - and building and testing simple kits or projects is a fabulous way to improve your skills and knowledge.
There's also a proposal to allow FLs to give non-amateurs the opportunity to use their equipment under their supervision. Who better to promote Amateur Radio than a Foundation License operator whose still got a fire in his/her belly? I can think of many times where I could have got someone interested in the hobby, had I had the authority to let them actually get "hands on" under my supervision (and staying within the terms of my license). Well done OFCOM for proposing this change.
Next up is the proposal to allow FLs to use the 2.4GHz and 5GHz bands. Great idea! Look forward to it.
There are quite a few other proposed changes but they're the main one's for FLs. Don't forget to download your form and email back your response.
UPDATE : In response to a comment made by my DX-Friend VE9KK, I decided to add a little more to this post.
Last night I went to a nearby Radio Club and was surprised by the number of people who weren't even aware of this OFCOM Consultation. It indicates to me that many operators make little or no effort to stay abreast of legislation relating to their hobby.
One guy at the club was astounded to hear that he might have to swap his 2E0 callsign for an M8 callsign - in fact he said he'd refuse (as if he has a choice, lol).
During the conversations going around the tables, I learned that there were a lot of operators who routinely (and quite openly) run around 1000W ABOVE their legal limit - and I'm not just talking about Full License holders 😲
These operators were quite glib about it, waving off my protestations about working outside the terms and conditions of their license, but the same people chastise OFCOM for not Policing the bands when they have a local rogue-operator causing them issues.
I’ve said it before - we are not allowed to erect any antennas at our Holiday Park, but you can erect a flag pole 😳🤷♂️, so originally I put up a 10M vertical, but wasn’t very happy with it, so I bought a Sigma HF-X80 and fitted it with a neat little Union Jack to keep the Park officials happy 😂.
When neighbours haven’t got their bloody LED lights and cheap phone chargers plugged in, the noise floor is pretty good and the Sigma performs quite well. I installed the antenna quite low down to the ground (I had no choice), securing it to a heavy wooden post which forms part of the caravan’s decking. It’s surprisingly secure.
According to the manufacturer, there’s no need for radials but I thought I’d discreetly attach one anyway (the thin yellow wire in the close-up image). I didn’t take any before/after measurements so I’ve no idea if it’s helped.
Taking readings from my Antenna Analyser, I got the following results…
BAND SWR / OHMS
160M - 4.4 / 90
80M - 3.5 / 157
40M - 1.99 / 34
30M - 1.09 / 45
20M - 1.04 / 52
17M - 1.76 / 62
15M - 3.1 / 24
12M - 4.1 / 13
10M - 4.5 / 11
Quite linear results there, with very acceptable figures in the middle and the rest being easily tunable by my little ATU. The Sigma only cost £90 and has provided me with a great solution to the antenna ban. No, it’s not perfect, but it’s certainly better than nothing and despite its compromised positioning, it’s doing quite well. It also copes with the very heavy winds that we get here (even with the extra loading of that flag).
I should point out that I bought this because my friend G0UXF has one and he has had amazing results with it - although his has a fabulous grounding thanks to it being attached to a huge steel fence.
Just connected my trusty 4W (tr)uSDX and got through to the first six operators I called ❤️
A couple of weeks ago I ran an SWR SWEEP on an EFHW which runs to the back of my conservatory using the NanoVNA and the RigExpert. Everything was looking good. Then last night I decided to do the same on my other EFHW (wireantennas.co.uk) which runs to the shack - and everything was definitely not alright!
I don't spend a great deal of time in the shack except in the Autumn and Winter months. It's a South facing room and it gets unbearably hot in the summer, so I tend to sit in the conservatory with the large doors wide open or even outside in the garden. As a result, it's been a while since I used the shack antenna.
When I tested it with the RigExpert, I was presented with a near infinite SWR reading and I thought it might be my antenna switch throwing up a fault, so I connected the RigExpert directly to the coax coming through the wall, but got the same results.
I checked the coax cable (Messi & Paoloni) but could find no obvious problems. Unfortunately, I wasn't able to reach the Un-Un to check inside it because it was too high up for me, so I had no choice but to cut the coax at a point where I would be able to insert a joint later.
Once the Un-Un was down, I could see that the Messi compression-type PL259 was still in perfect condition thanks to the quality of the connector itself and also thanks to the self-amalgamating tape I'd covered it with. I removed the lid of the transformer and could see that the ferrite looked to be in great condition but the main connection to the SO-239 was not looking good. As soon as I touched the wire, it was obvious that the soldered connection was loose and it simply came out.
Now bear in mind that this thing gets very little use and never more than 10W. It does, however see more FT8 use than SSB, but that shouldn't make a difference at that level of power? This is a 100W rated antenna (probably with a 30W data rating). I’m very disappointed 😢
Anyway, there's no use moping over it - it needs replacing, so I ordered a new one from UKANTENNAS and it has just arrived. The first thing I noticed about it was the size and weight - it’s smaller, but 100g heavier!
I'm not going to throw the other one away of course, I'll order a new SO-239 and clean things up. The repaired Un-Un will then be available for portable work.
Looking back, I recall buying my 17M Double Bazooka from WireAntennas and not being very happy with the quality of construction. Now that the EFHW has failed, I'll probably avoid buying from them in the future. Sorry 🤷♂️.
The UK ANTENNAS 49:1 is very well built and once connected to my wire, produced good readings across the bands. It’s good to be back to normal in the shack.
Three years ago I borrowed an MFJ-259 from a friend to help me with a Slim-Jim that I was building. It was a good antenna analyser, but a bit bulky and old fashioned, so when it came to investing in one for my shack, I decided to buy something more modern - a NanoVNA-F. It cost me around £50 and it covers 10k-1.5GHz, plus it does a lot more than the MFJ. Beware that there are a lot of fakes out there!
And then I got a bargain RigExpert AA-35 for a couple of hundred quid. They're normally around £300. This doesn't actually do as many things as the cheap NanoVNA, so I thought I'd do a 'real world' comparison of the two items. Is the AA-35 really worth 6 times more than the VNA (or 4x in my case)?
I should point out that the VNA can be used to do all sorts of clever things, but at this point, I have just used it to test and tune antennas in the most simple of ways. Thankfully, our local radio club (Bolton Wireless Club) is going to be hosting a "NanoVNA Tutorial Night" soon, so I hope to learn a lot more and will update this post when that happens.
Well let's start off with a look at the NanoVNA. The one I bought was the "F" model which has an attractive steel case and it comes supplied with lots of accessories including an SMA-SMA pigtail and a series of adapters to help calibration. The package came in a nice plastic carry-case, but I found an unused little Pelican Case in the shack which would protect the unit from any possible damage while rattling around the back of my car.
The NanoVNA has a 4.3" colour touch-screen which is very clear and sharp, but to be honest, it is next to useless in strong sunlight, so you have to use your hand as a sunscreen in order to take any readings when outdoors. Using 'touch' to select options isn't always reliable, but there are other ways of controlling things.
With a firmware upgrade, the unit will take measurements between 10kHz and 1.5GHz so that covers pretty much everything - more than I'll ever use, for sure! The unit is powered by an internal Lipo battery but that went kaput after a couple of years, so I now have to attach a USB PowerBank when I want to use it. I could of course order a replacement battery and solder it in place, but I just can't be bothered.
The first thing to do with a VNA is calibrate the device and that's a simple process with the supplied SHORT, OPEN & 50 Ohm dummy LOAD. I calibrated using different frequency ranges and then saved them to the five available memories...
That makes it super easy to quickly choose a working range and have the highest level of accuracy. I put a Dyno-Label on the back of the device to remind me of the memory contents. Being quite a cheap device, I would still insist on a re-calibration if I was carrying out some serious work or if I’d not used the device for some time.
In any case, calibration is quick and easy - just a case of taking three readings with the supplied adapters - OPEN, SHORT, LOAD.
My test of the NanoVNA was carried out on an EFHW antenna that I had installed at home. I set it up to take readings across all the bands and this was the result. SWR Readings are in yellow....
Switching to the RigExpert AA-35 gave me virtually the same results, so you could guess that I wasted £200, but the fact is, the AA-35 is infinitely easier to use. It's a self-contained unit in a traditional hand-held form factor. It's 'coverage' for want of a better word is only 60 kHz through 35 MHz, but that's more than enough for most people.
If you want to be able to work with VHF and UHF antennas, then you'll have to buy one of the more expensive models in the range. The same applies if you want a Smith Chart display - having said that, you can have a Smith Chart on the AA-35 if you connect it to a PC using the USB cable and run AntScope2 software (not very practical out in the field, but not impossible).
It comes with its own carry-case, shoulder-strap and a shielded USB A-B lead with built-in ferrite. The screen is a good size and is perfectly readable outdoors in direct sunlight. The RF connector sits on top of the device in the form of an SO-239. I'd have preferred a BNC connection instead, but it's no big deal.
The unit is conveniently powered by two AA batteries which are available everywhere, so you're unlikely to get caught out without power. They seem to last forever too - if you use good quality batteries and especially so if you opt for the amazing Energizer Ultimate Lithiums - they'll last years (well they do in my wireless CCTV cameras).
The AA-35 has a colour screen but can be set to a high-contrast monochrome scheme for those whose eyesight isn't too good. The buttons are a good size and logically laid out on the front of the unit. I prefer this to the VNA's touchscreen. In fact, I often find myself having to double or even triple the number of times I have to press the VNA's touchscreen to get it to recognise it.
The data produced by the AA-35 can be presented in a number of different ways depending on how much you want (or need) to know and whether you're a visual person (or not). Some like to see lots of numbers and some want a pretty meter. You get to choose.
The AA-35 is self-calibrating, so there's no need to ever worry about that, but, if you ever want to force a calibration (eg if you want the calibration point to be zeroed at the end of some feed line just before an antenna), then you can do that by choosing CALIBRATE in the menus and run through the usual OPEN SHORT LOAD routine and then the meter will basically ignore the feedline and take the baseline to be the very end of the feed, not the meter's SO-239.
The operational-speed of the AA-35 Zoom is quick! The various meters and sweeps work like you might expect analogue meters to work - there's very little delay and everything looks smooth and pretty darned cool.
I mentioned earlier that you can connect the analyser to a computer using the USB lead. This gives you added functionality and the ability to grab screenshots if you want to share readings with other people on a blog or email or whatever.
So overall, I much prefer to use my AA-35 when out in the field (or even out in the garden), but when I'm at home, I'm quite happy to use the cheap NanoVNA. They're both great tools!
A couple of years ago we thought we'd start a bit of a touring expedition - go visit the Isle Of Man, Ireland, Scotland, Holland, France, maybe even Spain. So we bought a big touring bike - the Yamaha FJR1300 complete with all the hard luggage. Personally, I've toured lots of times on a motorbike, but my wife hasn't, so she was looking forward to it.
But then we bought a static caravan! 😲
That purchase pretty much brought an end to the touring idea. We did the IOM, but then found ourselves staying at the caravan every weekend and the idea of us travelling many miles on a bike became less interesting. Plus Liana developed Carpal Tunnel Syndrome in both arms and really struggles to hold on to the grab rails under hard braking.
So the big tourer had to go. It weighed 600lbs and wasn't much fun if all you wanted to do was have a solo blast for a few hours at the weekend. I advertised it and very quickly got a buyer at (almost) the price I paid for it.
So then it was a case of finding me a nice little sports bike and a trip to Blackpool Honda to look at FireBlades. OMG they are £20,000!!!
I then saw an article in a Bike Magazine which really made me question the logic of investing even £10,000 on a brand new bike when you can have all the same fun on a cheap used one? Liana really liked the new ones but I knew from past experience just how good some older models were, so I knew exactly what I was going to do.
The bike I was going to search out was the HONDA CBR600Fi. And I wanted one from the very last year of build - 2007. Local searches revealed one very close to my holiday home, so I went to see it and bartered like a pro! For a couple of grand, you can enjoy all the thrills of a new multi-thousand pound bike, if you play your cards right. It's also in the absolute best colour scheme - Italian Red and Black.
This will be my fourth CBR600F. Here's the previous three....
Being light as a feather and having 109BHP, the CBR can really move! The engine redlines at a touch over 14,000rpm and there's not a great deal of power below 6,000rpm, so you have to ride these bikes like a proper supersports - not like a v-twin Harley 😂. Coming from a big grunty bike, you have to retrain your brain to ride a CBR.
Needless to say, revvy, howling engines aren't everyone's cup of tea, but they are mine! And the great thing about a 600cc supersports is that you can have a lot of fun on UK roads at full-tilt. If you tried the same on a modern FireBlade, you'd probably be arrested or scraped up off the floor.
Let's face it, the CBR600's 0-60 of a whisker over 3 seconds and top speed of 15mph is surely fast enough for anyone.
Of course, buying a bike from the previous generation means that there's going to be a few features missing and in this case - no ABS, no Traction Control, no Engine Mapping, not even a Fuel Gauge! This thing is real old-school, back to basics and if you've spent years benefiting from these 'rider aids' then you're going to miss them initially - especially the ABS. Like I said earlier, you just have to retrain your brain and change the way you respond to certain events. Luckily, the CBR's brakes are quite smooth and progressive, so there's less chance of you locking up the front wheel during an emergency stop.
The handling of the bike is pretty darned good and made even better if you can be bothered upgrading the rear shock - but I can't - so it'll stay original. If I was doing Track Days every week, then yes, I might have considered it. My bike will live its life whazzing around the Lake District, North Yorkshire and North Wales. I'll probably keep it at the caravan throughout the spring and summer months - it's a fabulous launchpoint for some of the best rideouts in the UK (apart from the myriad average-speed-cameras).
The CBR600F is a pretty comfortable bike and can easily be ridden all day. I've done 400 mile rideouts with ease on these bikes and never once had any issues. The only thing that's worrying me slightly is how my left shoulder will cope with the riding position on a long journey because of the Frozen Shoulder problem I had a few years ago - I certainly don't want to irritate my shoulder enough to bring that problem back!
Legroom is pretty good for a sports bike, but having said that, I've not got long legs. I can still get both feet down to the ground, so the 805mm seat height isn't too bad (especially compared to say an R6 for example).
The seat is a one-piece affair which for me is very important, since my wife needs to (occasionally) ride pillion and I don't want her perched up high on a small pad - but for that, I would have bought the CBR600RR model instead of the F.
The standard exhaust sounds good especially when you've got the rev-counter spinning high, but because I'm keeping this machine for a few years, I'm going to change the whole system for an MTC Stainless Steel one.
The Honda downpipes are mild-steel and although they will last a very, very long time, they do rust and look unsightly. Yes, I know they're hidden behind the fairing, but I'd rather replace those too with stainless-steel pipes - it's booked in next week. The new system will sound absolutely awesome!!
The only other things that I'll be changing are clutch/brake levers, tank grips, number-plate, clear indicators, crash-bungs, etc. Oh, and I need to install my SatNav too.
The engine is as sweet as a nut! No surprise there - Honda know a thing or two about engines and this design was good right from the very start - it's virtually bullet-proof. Now bear in mind that many people buy these as their first "big bike" and so there's been a great deal of abuse over the years from inexperienced, twonks who don't know their arse from their elbow - and still, the engines and gearboxes have withstood the test of time.
The fit and finish on CBR's from this era is second to none and it's one of the reasons that people flock to these bikes. Unlike many modern Japanese bikes, these were built in Japan and to a high standard using good quality materials.
The only negatives about this bike IMHO is the effectiveness of the mirrors and the lack of midrange punch. The former can be sorted out with a pair of extenders and the latter can be sorted by - err - dropping a gear.
Other than that, what you get for a couple of grand is a bike that can provide mountains of fun on fast, twisty roads, high-speed shenanigans on big highways and even commute through the city every day. If you want to go to the Isle Of Man for the TT Races, slip over some soft panniers and away you go! This bike will do it all - just keep an eye out for the Fuel Warning light.
I've posted quite a few bits about this radio over the last 3 years and it's become a little fragmented, so I thought I'd pull it all together in a single post. This will result in a very long post, but hopefully, it will include everything that anyone new to the 7610 will need (or like) to know.
The Icom IC-7610 Dual RF Direct Sampling SDRTransceiver has been on the UK market (properly) since 2018 and has become a very popular mid-price transceiver. I say mid-price as though it's not very expensive, but the fact is, it's outside the reach of many hams.
It goes without saying that you would be better to spend big bucks on antennas than on radios, but some of us are extremely compromised when it comes to erecting antennas and it can be a challenge to even find a place for a long wire, let alone a big Yagi on a tower with a rotator!
I'll be honest - most of my enjoyment of radio comes from outdoor excursions with a rucksack on my back and a lovely walk into the countryside or by the seaside. I carry a little IC-705 (or similar) and a SotaBeams wire antenna. I'm a massive outdoor QRP fan and don't do a great deal of indoor radio except in the cooler months. So the 7610 is an indulgence and a waste of 90W since I only use 10W or less. So what?!
Broadly speaking, the IC-7610 competes with the Yaesu FT-101D and the Kenwood TS-890, although the latter has recently shot up in price. I can think of no valid reason for the Kenwood's price hike other than they are supposedly stopping production of ham radios and perhaps the price of the few remaining rigs are being falsely inflated? 😲
Apart from the huge price hike, the TS-890S also lacks a second receiver - that will rule it out for many people straight away (including me). I don't doubt for a minute that the 890 is a mighty fine receiver, but the simple truth of the matter, is that ALL radios at this level are extraordinarily good performers! You would need specialist lab-gear to be able to discern any tangible difference between this trio.
So knowing that you have a magnificent transceiver whichever way you go, then your choice will come down to which radio suits your way of operating. Or maybe you have some brand loyalty? Or you just like the look of one more than the other two. For me personally, the choice was between the Yaesu and the Icom. The single-receiver Kenwood was never in the frame.
I absolutely love the way the FT-DX101D looks! It's big, bold and butch! It's peppered with buttons and dials which make it very appealing to people who were brought up on traditional 'boat anchor' radios. However, the screen design is a bit on the chavvy side. The 101 is the cheapest of the group. I think of it as the Ford Mustang of radios 😂
I absolutely love how understated the IC-7610 looks! It still has plenty of buttons and dials but it it has a much more refined appearance, with its piano-black finish and a screen design to die for. I think of it as the AUDI S8 of radios 😂
Both fabulous performers but which one suits you??
I did actually buy an FT-DX101D at one point and I regretted it. Beautiful looking machine and the performance was as you'd expect, but in terms of day-to-day operation, it drove me nuts.
I hate the 101's chavvy 3D waterfall!
I dislike the 101's 2D waterfall.
I love the 101's overall appearance.
I love the 7610's progressive tuning.
I love the 7610's meter options.
I love the 7610's screen layout options.
I like the 101's 3 antenna ports.
I love the 7610's built-in network server.
I love the 7610's 4 USB ports.
I love the 7610's Remote Control capability.
I love the 7610's QSO recorder.
I like the 7610's compact dimensions
I like the 7610's TWIN CLOCKS (Local/UTC) (FT-101D has none!!)
No one can accuse me of bleating on about a product that I haven’t paid hard-earned cash for. I’ve forked out good money for them all and I look at them without any bias and without any favour. I’m not a blind Icom ‘fan boy’ and I’m not a Yaesu hater either - I've had more Yaesu radios than any other make!
It might be of interest to those people torn between the 101 and the 7610 to look at the review of the FT-DX101D >>here<<
The simple fact is, the IC-7610 without any doubt whatsoever, is the superior radio from an operationalpoint of view - there can be no argument! Of course, if you've never had a 7610, then the 101 will probably seem okay - they say you don't miss what you've never had. At the time of writing, the firmware on my radio is V1.30.
The radio is not(as some ill-informed people think) two 7300's in one box! For a start, the 7610 has much better bandpass filtering than the 7300 and it also has the very valuable Digi-Sel Pre-Selectors which do a fantastic job of rejecting out of band signals. It's like putting a brick wall around your passband filter - great for when you're on a field day with lots of strong, nearby signals.
The 7610's twin receivers make it the perfect choice for the contesters out there. It's difficult to imagine serious contesting without two receivers.
One for each receiver!
So what about the difference between the 7610 and the 7600?? Click Here.
CW OPERATOR POINT OF VIEW
I'm not a CW operator, so I can't really comment on the 7610's performance in this regard, but Steve Ireland (VK6VZ/G3ZZD) said this about this about it....
"For those like myself who are keen CW operators or who dislike clicking transmit-receive (TR) relays such as used in the IC-7300, the IC-7610 has solid-state, totally quiet, TR switching. On the IC-7610, the CW keying waveform generation and shaping is carried out in the radio’s RF Field Programmable Gate Array (FPGA) to minimise any latency (the delay between Morse characters being formed by a key/keyer and then actually transmitted).
The IC-7610 comes with superb audio peak filtering, adjustable in frequency, width and gain and available on both receivers, which is better than any analogue or digital audio filter that I've ever used. This includes the excellent, well-regarded ones on the Elecraft K3, Ten-Tec Orion 2 and Yaesu FT-1000. The IC-7610 filter does an amazing job of cleaning up any CW or digital signal – not just in helping to dig weak ones out of the noise".
The 7610 benefits from the same Icom user-interface as employed by the 9700, 7300 and 705. Everything about it is just so darned intuitive! You see something on the screen that you want to change (eg Mode) - you press it. Simple!
And when you do need to delve into the menus, the information is beautifully and logically presented in a way that makes the User Manual virtually redundant - in fact, I can honestly say that I've barely touched the Basic Manual. The Advanced Manual is different of course, because you're talking about some pretty complex topics in there.
EXTENSIVE SCREEN OPTIONS
One of the most pleasing things about the 7610 is how you can tailor that 7" touch-screen to suit the way you operate. Needless to say, there are a number of colour options available and even font changes that can be made, but it's the ability to change the whole layout which makes it so versatile.
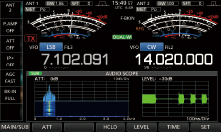
You can alter the scope and waterfall through a very wide range of colours to get it looking exactly as you want it. My own preference is for a green infill, outlined in black and an orange peak indicator behind.
In the image above you can see that I have the big VU style meters which will probably appeal to the older generation, but you can also have smaller bar-meters which allows you to display additional information such as an Audio Scope...
Alternatively, you can display a comprehensive multi-function meter showing Power, Current, Voltage, ALC, Compression, SWR and even Temperature all in one easy to read layout....
DUALWATCH & TRACKING
When I'm only focused on a single band, my favourite layout is to have the radio in DualWatch mode with the Tracking switched on so that VFO B mirrors VFO A. This permits me to have two separate panadapters - one for each VFO. Why would I want that when only working on a singleband??
Well the answer is that I can have the full band displayed on one panadapter (say from 14.100 to 14.350MHz) and a closeup of the tuned frequency on the other! It really helps to tune in quickly and let's you see a detailed view of what's going on immediately around your tuned signal...
You can have the two panadapters side-by-side or one above the other - I prefer the side-by-side option. There's all sorts of variations available to suit every occasion. It's one of the most versatile screens out there. There's no silly gaming graphics - just hi-res, usuable information that let's you crack on with what you're doing, making the whole experience enjoyable.
Here's a few other screens....
Alternative background colour
TX Voice Memories
Scan Parameters
Antenna Memories
Example of large VU-style meters Dual-Receive on different bands with two Pandapters
Sample Menu Screen
Sample Sub-Menu screen
A bit of a negative is that there's no visible passband filter on the screen. Some people will say it's not necessary but most SDR radios (well certainly with things like Flex, Elad, EE, etc) have a semi-transparent overlay showing exactly where the filter is in relation to the signal, but the 7610 just has a single tuning bar. Hopefully, that could be added in a firmware update at some point.
The actual tuning can be carried out by clicking directly onto the screen (finger or mouse) or by using the traditional tuning knob. The latter is nicely weighted (but not too heavy) and Icom's Progressive Tuning is an absolute boon!! The faster you spin, the quicker the rate of movement.
KEYBOARD & MOUSE
I just mentioned a mouse - yes, you can attach a mouse and a keyboard to the radio using any of the USB ports. You can opt for a wireless mouse and keyboard which uses up just a single USB connection for the wireless dongle. You could also use a keyboard with a built-in trackpad, which is what I do.
The only (current) limitation with the mouse is that it will only work within the panadapter area - not all over the screen.
To be honest, I rarely use a mouse for tuning, but the keyboard is great for a number of things including general text/number entry, PSK and RTTY typing and for selecting the Voice and CW Memories (using the F buttons at the top of the keyboard).
REMOTE CONTROL - PC
Another very worthwhile connection to make to the 7610 is an ethernet cable. Physically connecting your radio to your router provides you with an accurate real-time clock, plus of course, it links the radio's inbuilt server to the internet for simple Remote Control function without a computer!
Having the ability to use your radio remotely without having to invest in a separate PC switched on permanently is a fabulous feature of the IC-7610 - something that the FT-DX101D lacks. Icom's software (RS-BA1 V2) is excellent and makes light work of remoting into your radio. The radio can be placed into a sleep-mode to save energy and then be woken up remotely when you're ready to use it (and then put back to sleep again later).
Some people expressed concern over the required processing power of the computer, but I use an old Microsoft Surface Pro and it runs superbly with no latency.
REMOTE CONTROL ~ APPLE
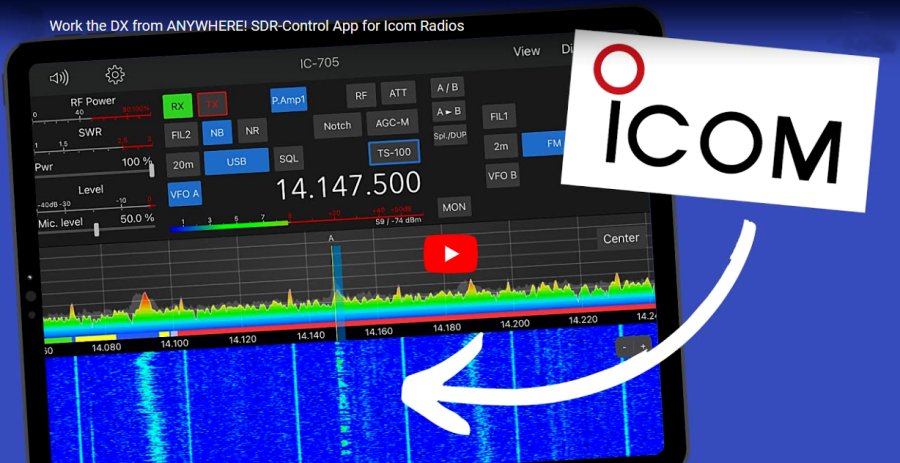
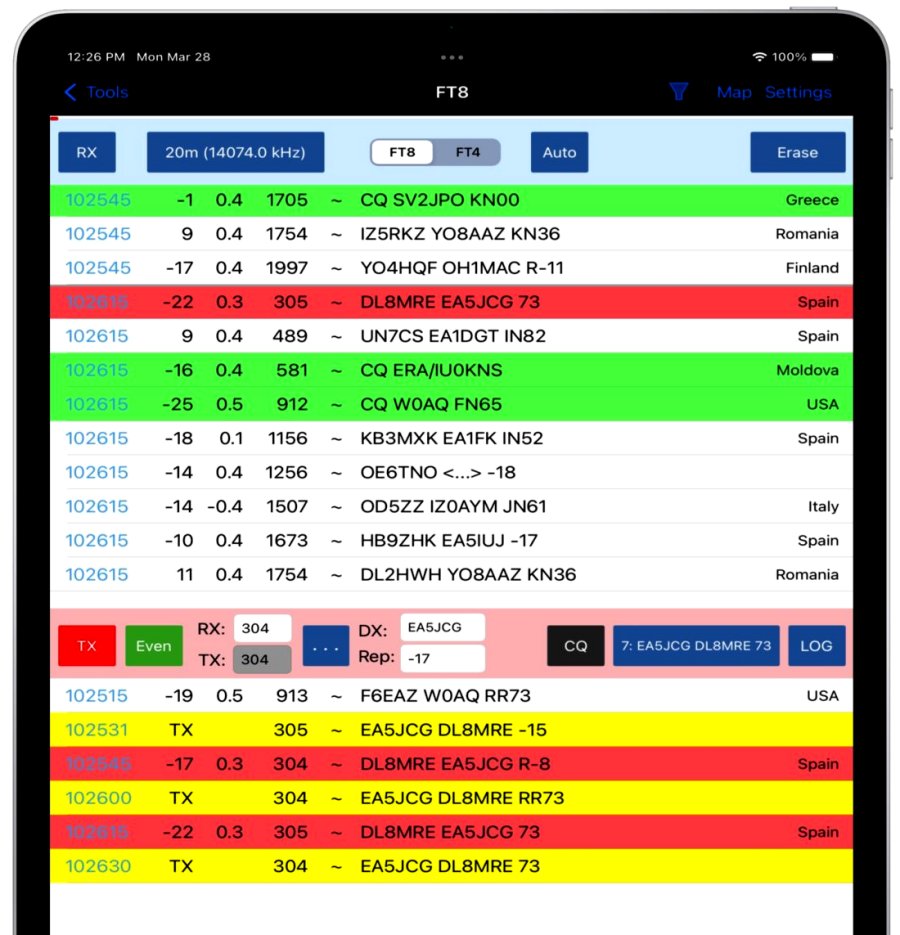
If you have an iPad or Mac, you can purchase the excellent SDR-CONTROL FOR ICOM app. This is an amazing piece of software and it works not only with the 7610, but also with the IC-9700 and IC-705. Obviously, it won't work with a 7300.
This app costs around £50 which is incredible value for money and offers not only control of your radio, but it also offers integrated FT8 and FT4 with Auto-CQ, Auto-Logging and Map Displays and much, much more!
‘
EXTERNAL PANADPTER via IQ-OUT
Another useful piece of software for IC-7610 owners (if you use an external screen) is HDSDR. Icom support this software through the use of the radio's IQ output and it is covered in the Advanced Manual.
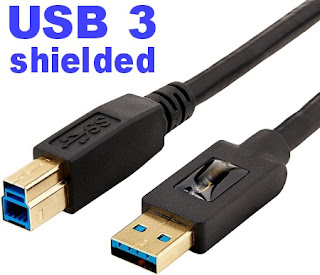
Icom purposely made it possible to easily integrate HDSDR and they included full instructions in their manual. It's extremely simple and straightforward and I recommend that you do it. All you need is a Blue USB 3.0 lead.
Please note that in order to keep your transceiver tune-frequency and LO frequency synchronised, you need to got into the ExtIO settings ( ExtIO onscreen button) and tick the option for synchronising both ways. You can stop there and enjoy your new Panadapter.
Many people will be satisfied with HDSDR but personally I think SDRPLAY's SDRUNO is infinitely more sophisticated and offers better control of the radio. And the good news is, once you've got HDSDR up and running, it's then simple to add SDRUNO because HDSDR installs everything that you need.
So the first step is to install HDSDR and get that running, following the very detailed and simple instructions in the IC-7610 manual. PLEASE NOTE that you will need a good quality BLUE USB 3.0 LEAD and a computer with a USB 3.0 socket! If you don't have both, don't bother trying to install any of this software. The IQ output from the IC-7610 comes from that BLUE USB 3.0 socket.
DO NOT skimp on quality when buying this cable - buy a double-shielded one of good quality!!! And don't buy one longer than you need to. Use a piece a piece of string between your radio and PC to determine the minimum length of cable you can get away with.
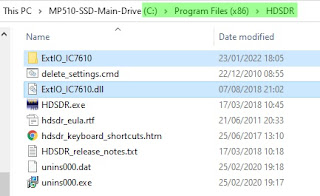
So with HDSDR installed and running, you now need to copy a folder and a file to the "DOCUMENTS FOLDER" of your PC. That folder and file can be seen in the image below. Locate them, copy them and then paste them into your Windows documents folder.
Now you're ready to download the SDRUNO SOFTWARE and install it as normal. If you are asked which SDRPLAY device you will be using with the software, just select RSP1A (it doesn't really matter which because you won't be using one anyway). You only need to download one file - SDR UNO! Don't bother with anything else.
People might wonder what makes SDRuno better than other similar style software and to me, it's not so much the functions and features (although that's very important), it's the efficiency of the software in terms of how slick it is, how fast it operates, how glitch-free it is and how regularly updated it is.
Install the SDRUNO SOFTWARE and you will end up with an SDR UNO icon on your desktop but that is NOT the one you'll be using to open the software. If you double-click that one by mistake, it will go looking for an RSP1A device, won't find one and will close down.
What we need to do to start the software is run a different tool. Go into your Windows Menu by clicking in the bottom left corner of your desktop and in the list of programs, find SDRPLAY and go to the SDR ExtIO icon and right click it so you can run it as Administrator (you can save a copy to your desktop while you're there).
The software will now run and will start with the initial panel open. From there you can click on the buttons to open the RX window, SP1 & SP2 to open the scope and waterfall. If you're used to SDRuno, you'll very quickly figure it out, but if you're new to it, you'll probably have to watch a few YouTube videos to understand and fully benefit from this fabulous software.
If you try an older version of SDRuno that is already on your PC, you'll need to pay particular attention to the part of the instruction videos relating to separating the tune frequency from LO frequency! It's a minor point which if ignored will cause you much grief. I think the very latest software may have removed the requirement to offset - you'll have to check.
I should point out that my computer had OmniRig pre-installed and I don't think you need it for this application, but just in case you end up needing it - you can find the software HERE. Be sure to use the official V1.2 and NOT V2.
That's it! You've got some of the best software in the world running on your PC and controlling your IC-7610. Best of all, it's FREE! The only cost is about 20 minutes of your time.
After installing SDRuno, I'd been using it as an extra receiver but a friend of mine wanted to use it to control his 7610 completely, so I was on the phone with him trying to sort that out. To be honest, I didn't actually think there was a problem, but we learned that SDRuno wasn't keeping the Radio freq, Tuned freq and LO freq synchronised if you clicked on a signal in the scope.
Adjusting frequency with the mouse wheel was fine, but not if you clicked on a signal.
There has to be a way to resolve that issue and I'll update when I find it. I noticed also that opening the SDRuno software with the ExtIO icon meant that there was no SaveWS button to save your workspace, so each time you open the program, you have to lay out the various panels all over again.
Apparently, SDRuno V1.4.1.1 has a bug which is causing this inability to click on the scope to tune when using IF output mode as opposed to using RF. It will be fixed soon.
EXTERNAL SDR RECEIVERS - RF OUT
If you prefer to connect aphysicalexternal SDR Receiver such as anSDRPLAY RSP1Avia the radio's RX-OUT connector, you will need a Splitter as shown in my (rough) diagram below.
With previous radios, I have shared the antenna with my SDRPLAY device via an MFJ-1708B which has certainly worked, but it's messy and you never feel 100% convinced that it's going to protect the front-end of your external receiver. The best way to protect it is to not put it in harms way in the first place and you can do that if your radio has a suitable connector. Some transceivers (like the FT-DX3000) have a very simple RF-OUT connector which means that you just plug your external receiver into that connector and hey presto, it works.
The Icom IC-7610 has a different arrangement. It has RX-IN/RX-OUT BNC sockets on the back which form an RX loop, allowing you to insert a receiver inline. This means that you are never putting your SDRPLAY (or whichever receiver you use) at risk. I thought originally that I could just plug my SDRPLAY into the 7610's RX out, but when I did, I got nothing! Apparently, you need to place the external receiver into the loop using a splitter. Why? I have no idea. Presumably it's due to the fact that the IC-7610 has Dual Receivers and very comprehensive antenna switching capabilities - I don't know.
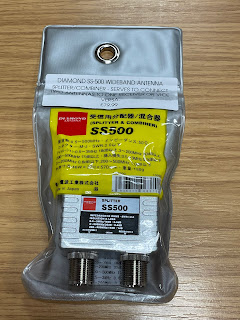
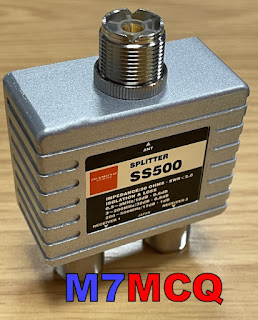
By using a high quality splitter such as a Mini-Circuits ZCS-2-2+ or a Diamond SS-500, you can be assured that you are also providing a good degree of isolation between your transceiver's receiver(s) and the external receiver. Typically, you're talking about more than 30dB isolation, so there's very little chance of interference from one receiver to another.
At the time of purchase, the Mini-Circuits splitter wasn't available anywhere in the UK - fresh stock wasn't expected for another 3 months, so I turned to the Diamond SS-500 which is beautifully made but at £80 is horribly expensive. The Mini-Circuits device cost around £60. As usual in these post Covid times, stock shortages pushes prices up to ridiculous levels, and you have to choose between stumping up the cash or waiting months. I chose the former.
The Diamond SS-500 is good from 0.5MHz up to 500MHz which falls way short of the SDRPLAY's frequency range, but that's of no consequence to me, since I'm only interested in HF coverage.
Before I could install the splitter, I needed to make up some BNC-PL259 coax leads and a PL259-SMA lead. Once that was done, I somehow managed to connect them all up without pulling out the IC-7610 from its tight-fitting place on the shelf - miracle!!
I then loaded the latest version of SDRuno along with all the various add-ons and also made sure that OmniRig was running and configured for the IC-7610.
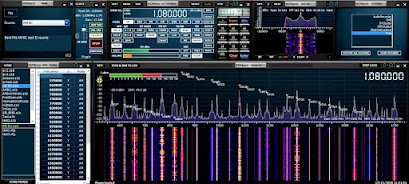
With everything setup correctly I switched on the radio and ran RSDRuno. The two interfaced perfectly and it was good to see the full layout and tools of SDRuno instead of the very limited EXTIO version which I'd tried previously with limited success.
Version 1.4.2 is the latest version of SDRuno at the time of writing and is incredibly rich in features. There are a couple of bugs, but the software writers are fully aware of them and are working hard to sort them out. In the not too distant future, SDRPLAY will be releasing the long awaited SDR-CONNECT software which will be a massive improvement.
Anyway, the V.1.4.2 software ran perfectly and it feels good to have SDRuno back on screen, especially this latest version. Things have changed significantly since the last time I connected an RSP to the radio and I'm looking forward to exploring and experimenting.
Below are a couple of images showing the Diamond SS-500 and RSPDX prior to connecting it to the 7610 and then there's a screenshot of the software up and running. PLEASE NOTE that using this splitter method, you MUST hold the onscreen antenna button until a * appears in order to share the signal.
Conditions are poor at the time of testing, so there's not a great deal going on in terms of signals. I’ll post more when conditions (and activity) improves.
Up to now, I've only ever connected SDRPLAY devices to my radios because the software easily allows you to control the radio. I do have though, a very nice Expert Electronics ColibriNano which I might try out. I was thinking about trying it with either OmniRig or RigSync If it works, I'll be very pleased because the EE software is fabulous! I'll investigate and update this section at a later date.
MAKING FT8 WORK!
In order to get my 7610 working with WSJT-X, I watched a few YouTube videos and used their menu settings. It worked. But I thought I could get better results, so I looked into it a little more. One of the first things that I noticed was that the recommended setting for MENU/SET/CONNECTORS/USB/AF Output Level was "MIC/USB". Now that setting worked fine, but a couple of days ago I noticed that the scope was showing a fairly wide TX spike. And then I noticed that if I spoke close to the desk-mic, the output increased. So basically, the mic was picking up (and transmitting) ambient sounds from the shack. This was easily cured by choosing "USB" only from the menu and that cuts off the microphone, leaving a nice, clean data transmission. For the benefit of anyone else who's just got an Icom IC-7610 and they're wanting to get it setup for WSJT-X, then please feel free to follow my guide below. This includes a couple of things which were not included in any video I watched.
These instructions assume that you have installed the necessary USB drivers and your radio is already working with your PC
PLEASE NOTE that I always work FT8 in "Split-Mode" and I recommend you do to. Be sure to edit the WSJT-X settings in the RADIO-Tab accordingly. First thing is probably to RESET your radio back to its factory setting to be SURE that you don't have any oddball configurations within the menus from playing around earlier. BEFORE YOU RESETmake sure you save your current configuration so that you can get back to it later if need be. Okay once you've done a factory reset, you'll need to re-enter your callsign into the radio (MENU, DISPLAY, MY-CALL). So that your computer will still speak to your PC you need to go to CONNECTORS, CI-V, CI-V USB Echo, ON.
Now make sure that your COMPRESSION is switched OFF in the side-menu on your radio's main display. Then go to MENU, SET, CONNECTORS, USB AF/IF OUTPUT, and set it to 20%. Note that this setting will determine the strength of your received signal in WSJT-X. Ideally, it should be 30dB when there's only noise. Once everything's up and running, you can adjust this AF/IF OUTPUT to attain that figure, but for now it's better to start off low to avoid clipping.
Another very important adjustment is the ALC. Ideally, you want almost ZERO ALC and that's quite easy to achieve.... Go to MENU, SET, CONNECTORS, MOD INPUT, USB MOD LEVEL and set it to 15%. If you are going to be using Data mode instead of the usual SideBand mode in FT8, you should also set DATA1 MOD to USB. Okay, let's get back to the main radio screen. TUNE YOUR ANTENNA with the radio's built-in tuner. Switch the meters to ALC. Set your POWER to 15W (you can increase this later if your licence permits, but for now, just do the same as I did. Find an empty part of the FT8 band using the WSJT-X waterfall and Click the TUNE button on the WSJT-X software and it will provide a carrier so that you can see your ALC reading on the radio (if you're in Split-Mode it will be the right-hand meter). Hopefully the meter needle will not even budge because you already set the USB MOD LEVEL to 15%. If the needle does swing over, then reduce the USB MOD LEVEL a bit lower until there is no ALC reading (or next to none).
Now switch your meters to POWER and you will see that your power output is about two thirds of your radio's power-setting. That's fine for me - but if you have the licence for it, you can now increase the power to 20/30/40W or whatever you like. Recheck the ALC reading again. Click the WSJT-X TUNE button to stop transmitting the carrier. So now you should have a tuned antenna with good SWR reading, a good ALC reading and the power you choose to use. Don't forget to check the RX Signal Strength meter in the lower left corner of WSJT-X to make sure you are averaging around 30dB and if not, increase the MENU, SET, CONNECTORS, USB AF/IF OUTPUT figure until you achieve that. Don't go too high! FINALLY,be sure to save these settings with a relevant name such as "WSJT"so you can quickly change your radio for playing FT8, etc. Spending today sorting this out has immediately reaped rewards by bagging my very first UNITED ARAB EMIRATES and my first PAKISTAN contacts! Very pleased :-)
Mike (VE9KK) in Canada, says that he set his 7610 according to an instructional video posted by K0PIR. I've also seen that video and in it, Richard says we need ALC in digital modes...
ADDING ALC IN DIGI MODES
There's loads of these videos for the 7300 and 7610. Who knows best?? Not me! I have tried both ways and having cut the ALC right back on my 7610, I've just made some amazing contacts which I've not managed previously. I guess you just gotta try each way and see what your results are with your radio, your antenna and your location.
DIY EXTERNAL KEYPAD
It's possible to purchase an external keypad for the 7610 (and 705) instead of pressing buttons on the radio's screen, but it's much more fun to make one (and cheaper too).
All the latest Icom SDR transceivers have the facility to store a number of brief VOICE, CW, PSK or RTTY recordings to re-transmit at the push of an onscreen button. The biggest benefit of this facility is when you're participating in a competition and don't want to keep repeating your CQ Call over and over into a mic or through a key.
Depending on the mode you are in, a different set of buttons appear on screen. You may choose to record different messages in there such as...
T1...CQ CONTEST CQ CONTEST, THIS IS M7MCQ CALLING CQ AND STANDING BY
T2...CQ 20 CQ 20 CQ 20 THIS IS M7MCQ CALLING CQ AND STANDING BY
T3...CQ 17 CQ 17 CQ 17 THIS IS M7MCQ CALLING CQ AND STANDING BY
You get the idea! 😂 Pressing the on-screen button transmits the message once, but if you hold the button for a second, the transmission will go into a loop with a predetermined pause inbetween transmissions.
It's a great facility but the buttons take up a lot of screen space which makes your waterfall virtually redundant. The way around this is to buy or build an external 8-Button KeyPad that you can use instead of the screen buttons. Such a keypad can be connected to a 3.5mm stereo socket on the back of the radio marked EXT KEYPAD.
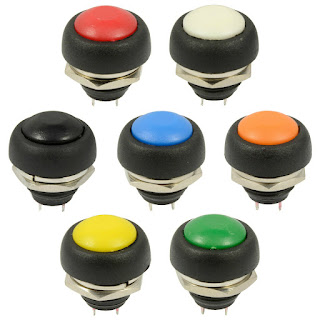
I decided to make my own keypad and ordered a suitable enclosure and buttons from an eBay seller. I also ordered a few resistors (values listed at end of the post). They were super cheap and quick to arrive.
Now there's an advantage and a drawback to choosing a small enclosure - a small one will look real neat and will occupy very little space on your desktop (a big issue in my tiny shack). The disadvantage of a small case is that there is no room for any sort of labelling, so you pretty much have to remember what is stored in each of the 8 buttons.
That's not a massive issue for me because I have a small laminated card pinned to the wall, showing what's stored where. Once I've used the KeyPad for a couple of weeks, I'll no doubt edit it.
Construction : The first job was to drill the 8 holes in the lid of the enclosure to match the diameter of the switches - 12mm in my case. I had chosen these particular buttons because I liked their domed appearance and the colour-coding. Initially, I tried a 12mm drill bit which immediately ripped into the lid and damaged it. Luckily, I'd bought two enclosures so I got out the other lid and this time I used a cone-cutter (often referred to as a step-drill-bit). This worked superbly.
The only thing I did wrong, was to drill by hand! I should have used a pillar drill because although I thought I was controlling it perfectly, it turned out that the drill bit was moving slightly and as a result, the buttons are not perfectly spaced 😡. Ah well, I know for the next time.
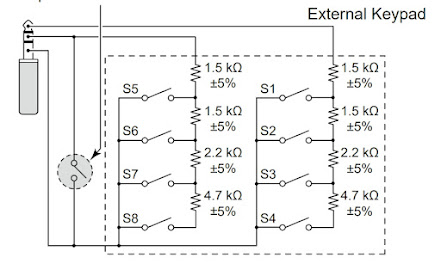
Once drilled, it was a simple case of fitting all the buttons, being careful to align the terminals in a way that assisted the insertion of the resistors. The circuit diagram is listed in the Basic Manual of the IC-7610 (Section 13-4) and it's very easy to understand even for a dummy like me...
Circuit diagram for the IC-7610
I was going to leave out that ninth switch (shown on the left of the diagram) - it's there to act as a Mute button and I just didn't think it was useful enough to include, but in the end I chose to tag it onto the end of the enclosure. CAUTION: I noticed in the IC-705 diagram, it does not have the mute facility, so if you're building this external keypad for that radio alone, it's best to leave it out (although I'm not really sure what would happen if you left it in and pressed it) 💥💥
As you can see from the images, it's just a case of connecting one side of each bank of switches with the correct value resistor and the other side with a continuous connecting wire. Then you simply connect up the wir directly to the jack plug or (as I preferred) to a 3.5mm socket. Because the small socket was reliant on a very small ring-nut to hold it in place, I decided to provide additional stability with a Hot Glue Gun just to be on the safe side.
Putting the resistors in place made me realise that the case was indeed very compact! There was little room for the last two (the 1.5Ks) so I had no choice but to bend them back on themselves and locate them in the centre of the switches. Since there was no reference to the required wattage in the circuit diagram, I bought 2W resistors and I could probably have got away with much smaller 0.5W instead 😳.
I'm not very good at this sort of stuff, but it worked out in the end anyway. The rest of the job is very simple and straightforward and the end result looks pretty good. I just might do another one to keep in my IC-705 rucksack (and this time I'll drill correctly and use small resistors).
This was a very simple little project which was fun to make and is a very useful addition to the shack.
COMPONENT LIST
4 X 1.5Kohm +/-5%
2 X 2.2Kohm +/-5%
2 X 4.7Kohm +/-5%
1 x 3.5mm Stereo Socket
1 X 12V Latching Push Button (optional mute switch)
8 X 12V Momentary Push Buttons (whatever you have)
1 x Enclosure Box (100x51x22mm is what I used)
LEARNING PSK ON THE IC-7610
DATA MODES WITHOUT COMPUTERS
Being relatively new to the Amateur Radio hobby, I've never experimented with PSK or RTTY and I thought it was about time that I tried it - after all - experimentation is what this hobby is all about, isn't it??
Thankfully, the ICOM IC-7610 has a built-in Decoder for PSK & RTTY, so no computer is required. At the back of my mind I'd always linked software to operating these data modes and I've always felt that I've got enough on my plate without having to involve computers, software and drivers.
The IC-7610 can operate these modes without any PC involvement and thanks to its ability to connect a keyboard (wired or wireless), it's a doddle to just have a go!
It was G4ILO's great enthusiasm for the mode which originally got me interested and I was very sad to hear that Julian passed away. Apparently, he'd been battling cancer for quite a while and finally succumbed to it 😢
Julian Moss - G4ILO - RIP
One of the things that I learned straight away from Julian's blog was to take great care not to transmit bad signals on PSK. InterModulation Distortion (IMD) was apparently a huge problem due to poor or careless operators transmitting very distorted signals which would wipe out other operators on the band and make it impossible to decode messages.
Measuring intermodulation distortion of course, is not an easy thing to do unless you have specialised equipment, so most operators just ‘ wing it ’ by dropping their ALC levels and hoping for the best. Julian chose to invest in a very neat and affordable meter which gave clear indication of your station's IMD - KK7UQ's IMD METER!
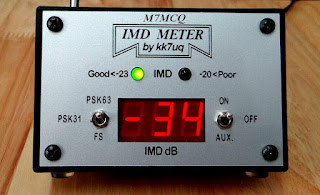
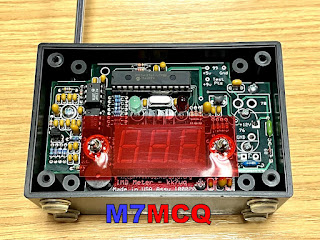
These meters are pretty cheap and can be found on the secondhand market for around £50. I got mine on eBay - a bargain. Of course you don't need one of these, but it's good to know that you're running a clean station and not causing interference to others. That is, after all, part of our licensing conditions.
So the IMD Meter is super simple to install - there are no connections to your computer, radio, or even antenna. You just sit it in the shack, raise its built-in telescopic aerial and away you go!
Julian had this to say about the IMD...
"The IMD Meter is an excellent, reasonably priced shack accessory that does a very important job helping you to operate within your license conditions by occupying the minimum necessary bandwidth for the mode, and it could not be simpler to use. I just wish it could be made compulsory that everyone had one of these meters! "
After setup, any transmissions with unacceptable levels of distortion will result in a warning light, and audible tone and an informative readout on the display. It also has a Field Strength mode, so you can use it to sniff out RF in your shack or anywhere else. Now onto the actual operating procedures...
It's always difficult to go into a new mode of operating when you're brand new to the game. The very last thing I wanted to do (apart from transmit noisy signals) was to interrupt other people, annoy them with my rookie attempts and get flamed!
So I looked around the internet for some tips on how to start. Thankfully, there's some great advice out there for learning both PSK and RTTY. It seems that PSK can be more of a chat environment, whereas RTTY appears to be made up of brief 599/73 type activity. I might be wrong there, but that was my initial impression, so I might end up coming back here editing this paragraph, 😂. In any case, I don’t think there’s a great deal of RTTY activity these days.
Anyway, I decided to start with PSK and the first thing to do was find out where the signals are to be found on the bands, so a quick trip to the RSGB BandPlans revealed the correct part of the spectrum to be tuning into for the digibands.
With the correct frequency range tuned in and the IC-7610’s decoder switched on (it’s visible in the Menu once you’re in PSK Mode), I started to watch the messages going backwards and forwards. It all seemed a little confusing at first and I wasn’t sure at which point I would be CQing or responding to a CQ. So I watched for a while and followed other people’s interactions and did my best to learn about the best operating practises in this mode.
So I started with the 20M band because that's where my EFHW antenna is most efficient. Tuning into 14.070.150 brought in a stream of messages between operators and it allowed me to get an idea of how people were using PSK and what sort of exchanges were favoured.
Following particular individuals, it soon became apparent that some operators liked to 'chinwag' just like on SSB, while others were less keen on that and simply wanted a short exchange for the log.
The IMD Meter showed that my transmissions were perfectly clean at -34dB which makes you feel good that you're not splattering the band with distorted signals.
The other thing I'd have to learn about is all the abbreviations! I'm obviously familiar with most, but some I had to look up like KN and OM. My overall lack of knowledge of this mode led me to start off by responding to CQ's rather than me calling CQ. I usually do the same in FT8.
It's been a very enjoyable start to learning to use PSK and (like FT8,etc) I'm sure it's going to be a regular mode of operation when the bands are quiet on SSB phone.
Common operating frequencies...
Amateur Band
USB Dial Frequency
160 metres
80 metres
40 metres
30 metres
20 metres
17 metres
15 metres
12 metres
10 metres
1838.150 kHz
3580.150 kHz
7040 kHz and up
10142.150 kHz
14070.150 kHz
18100.150 kHz
21080.150 kHz
24920.150 kHz
28120.150 kHz
If you're a newly licensed operator and have never tried PSK, give it a go! It can be fun.
UPDATE : DECEMBER 2023
Icom have released firmware V1.40 in Japan, so it will be available globally soon. It gives the 7610 Adaptive Pre-Distortion and maybe in the near future Diversity Noise Cancellation. There’s an interesting video here…
CONCLUSION
The IC-7610 is an amazing radio with two independent fabulous receivers which are on par with any of the competition. Icom’s user-interface, the screen and the ease with which the operator can control things and access information makes this the No.1 mid-price transceiver, without any doubt.
It’s an absolute pleasureto use and that’s what keeps you going into the shack.
Since writing this post, the prices of premium transceivers have gone up significantly. As you can see below, in 2020 they were £3k but now they're £3,300.
Specification from ICOM EU...
Innovative RF Direct Sampling System
Whether it is poor band conditions, or battling to pick out a call in a large pile-up, faint signals have always been a challenge for DXers and Contesters around the world. The difference between putting the QSO in the log or having to try another time is the capability of your receiver. One key factor is the RMDR capabilities, the ability to pick out a faint signal in the presence of stronger, adjacent signals. The IC-7610 introduces dual RF direct sampling receivers, achieving 110dB RMDR, rivaling that of top-of-the-line transceivers.
Astonishing 110 dB* RMDR The RF Direct Sampling System in the IC-7610 is capable of 110 dB RMDR. This performance gives you the ability to pull weak signals out of the noise of strong adjacent signals. There is a difference you can actually hear as the desired signal comes out of the pileup! *Representative value at 2 kHz frequency separation (Received frequency: 14.2 MHz, Mode: CW, IF BW: 500 Hz)
Customized VCXO Is Used for the Master Clock Reducing phase noise in a receiver is always a challenge as it is a natural characteristic of a receiver. The master clock of the IC-7610 utilizes a low phase noise VCXO (Voltage Controlled Crystal Oscillator), combined with Icom’s years of technical expertise to design a common power supply for the VCXO and FPGA, yielding an ultra-low phase noise. Also, a 10 MHz reference signal can be input to the IC-7610 for higher precision.
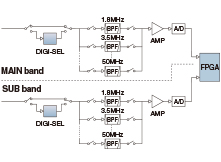
Independent Dual Receiver Whether listening to both sides of a rare DX station running split, or looking for a multiplier on a different band or mode, the dual receivers in the IC-7610 have you covered. Two separate DIGI-SEL preselectors, two separate Band Pass Filter networks, feed two separate A/D converters into the FPGA.
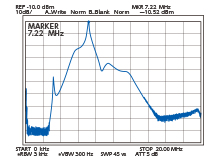
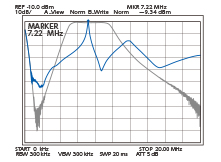
DIGI-SEL for Main and Sub Bands The DIGI-SEL preselectors are RF filters with sharp, narrow passband characteristics preventing Analog-to-Digital Converter overflow from large out-of-band signals when sampling the RF signals. Additionally the third and higher order IMD components are reduced. This is ideal when strong signals are received in a contest pile-up or from broadcast stations on adjacent frequencies or bands.
a) b)
a) BPF and preselector passband characteristics receiving on 7.22 MHz b) Passband characteristics between the antenna and the preselector (at the preselector output)
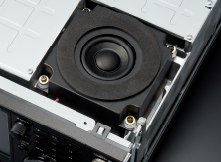
High Quality Speaker Sound To finish out the receiver, is an internal speaker cabinet. The cabinet is tuned to reproduce clear, natural sounding audio, and is insulated from the radio chassis to prevent noise from vibration and panel resonance. .
Digital-Up-Conversion (DUC) for Clean TX Breaking with the tradition of mixing a carrier signal with a local oscillator, a Digital-Up-Conversion (DUC) method is used to generate the required signal from the Digital-to-Analog Converter. The chart to the right shows the difference made by this new design.
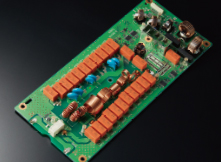
EBuilt-in Automatic Antenna Tuner The built-in automatic antenna tuner memorizes its settings based on your transmit frequency, so that it can recall the tuning setting when you switch operating bands. The emergency tuner function* enables you to operate for short periods of time with an antenna with a high SWR. *Output power not guaranteed and power may be reduced.
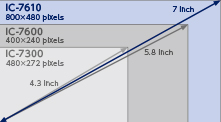
7-inch Color Display with Touch Screen Function The large 7-inch color display shows various operating and setting information at a glance in high resolution (800 × 480 pixels.) The display clearly shows various features, for example the dual spectrum scope aligned vertically or horizontally, simulated analog meters and RTTY, PSK31/63 mode decoded messages.
Dual Receivers, Dual Spectrum Scopes The IC-7610 provides dual reception, on different bands, as does the high-speed, high-resolution spectrum scopes. Whether watching for a band opening, working a rare DX station operating split, or searching for a multiplier, the ability to watch each receiver separately allows the operator to concentrate on pulling in a weak signal. The scopes provide class-leading performance in resolution, sweep speed and a 100 dB dynamic range. To navigate around the band easier, connect a PC mouse to the USB port for point and click tuning of the receivers. *Number of pixels shown at the 60 dB level, when receiving a signal.
Audio Scope Flexibility The Audio Scope screen shows both a FFT scope with waterfall along with an oscilloscope for both transmit and receive audio. This makes it easy to monitor AF characteristics such as microphone compressor level, filter width, notch filter, and in CW, you can monitor received CW keying wave forms.
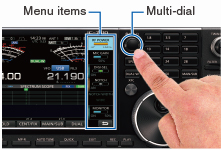
Touch Screen and Multi-Dial Knob for Smooth Operation The combination of the touch screen and the multi-dial knob offers quick and smooth operation. When you push the multi-dial knob, menu items are shown on the right side of the display. You can select an item by touching the screen and can adjust the levels by turning the multi-dial knob.
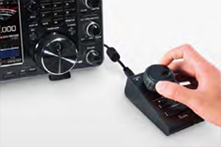
Remote Encoder for Second VFO Knob The optional RC-28 remote encoder enables you to add an external Sub dial for controlling the Sub band. Main band and Sub band can be switched with the F1 and F2 buttons and can be controlled with the RC-28. The LED above the F1 and F2 buttons turns ON to show the active band.
DVI-D Connector for an External Display Connection The IC-7610 has a DVI-D connector for an external display. Operating frequency, setting information and spectrum scope can be observed on a large external display.
SD Card Slot and USB Port for Saving Data When used with an SD card or USB flash drive, various contents including firmware updates, memory channels, captured screen images, and other personal settings, can be saved and loaded. TX/RX audio, voice memories, RTTY/CW memories and RTTY decode logs can be saved and used on the SD card.
I/Q Signal Output The IC-7610 can output I/Q signals to a connected PC. Using the I/Q signals on the HDSDR (freeware), you can listen to received signals, or observe the spectrum scope on the PC. Used in combination with the CW Skimmer (Shareware) or N1MM Logger+ (Freeware), you can virtually decode all Morse signals in the operating band. This function is very useful for contesting and DX hunting, such as monitoring the activity in the band, and effective callback in split operation. *The function is only available for a future firmware update
VSimplified Remote Control for RS-BA1 Whether from a remote part of your home QTH, or on a remote location somewhere around the world, the RS-BA1 software enables you to operate your IC-7610. Not only can you control the radio settings and have both RX/TX audio paths, you are able to display a single band spectrum scope with the waterfall. With the addition of an Ethernet connector, a base station computer is not required. .
Other Outstanding Features RX antenna BNC type RX IN/OUT connectors for a receiver antenna or external BPF/preamp connection
CW mode FPGA-controlled CW keying waveform shaping Multi-function electronic keyer CW pitch control from 300 Hz to 900 Hz Auto repeat function Contest serial number counter Normal or short Morse number style Double key jack system Full break-in and semi break-in CW auto tuning APF (Audio Peak Filter) function adjustable filter shape, width and AF level
Receiver 30 kHz to 60 MHz receiver (Some frequencies are not guaranteed.) Two types of preamplifiers Preamp 1: Improves intermodulation characteristics Preamp 2: High gain preamplifier 3 dB – 45 dB variable attenuator IP+ function improves 3rd order intercept point performance 101 memory channels RTTY encoder and decoder Twin peak audio filter for the RTTY mode Adjustable AGC time constant from 0.1 to 6 seconds Digital twin PBT eliminates interference from adjacent signals Main/Sub band tracking function for diversity reception
Transmitter TX monitor function All mode power control VOX (Voice Operated transmission) capability BNC type transverter connector Microphone equalizer and adjustable transmit bandwidth 50 CTCSS tones
Operation Memo pad stores up to 10 operating frequencies and modes Quick split function Quick Dualwatch function RF gain and squelch control with a knob RIT and ΔTX variable up to 9.999 kHz UTC/local clock and timer function 1 Hz pitch tuning and display Dial lock function Adjustable main dial brake External speaker jacks for Main and Sub receivers Screen saver function Multi-function meter (S-meter, Power, ALC, COMP, SWR, ID, VD and TEMP) Auto tuning step function
Supplied accessories (May differ depending on version)
Hand microphone, HM-219
DC power cable
Fuses
Plugs
End
UPDATE : 2024
To my own amazement, I decided to sell my 7610. Since buying a holiday home, we spend virtually every weekend there and the already under-utilised king of HF was being used even less. I will miss it badly - not because I used it all the time, but because I just love everything about it.
Despite the great sadness in giving it up, there will also be a weight off my shoulder too, because it troubles me having very expensive items sat idle. It's quite wasteful. Anyway, it's gone to a new owner and he will hopefully get the same enjoyment from it as me.
All my time is devoted to QRP and for that I have my IC-705. I might look at buying a SUNSDR for the shack - not sure yet.


 b)
b)