
A VERY BRIEF LOOK AT THE HERMES LITE 2

I became aware of the Hermes Lite about three years ago, but the chip shortage meant that it was extremely difficult to get hold of one, so I did my usual thing of saving a search on eBay and then forgot all about it until one day, I received an email notification telling me that there was one up for grabs.

When the package arrived, it was basically untouched. The boxes had been opened and the inner packaging too, but the kit hadn’t been put together. I didn’t bother asking why.
I’d already read about assembling it and had bought a 1/8 drill bit and some thermal paste for the heatsinks. I’d also downloaded the latest firmware and all the available software including SDR CONSOLE and THETIS (the latter being the one I was most interested in).
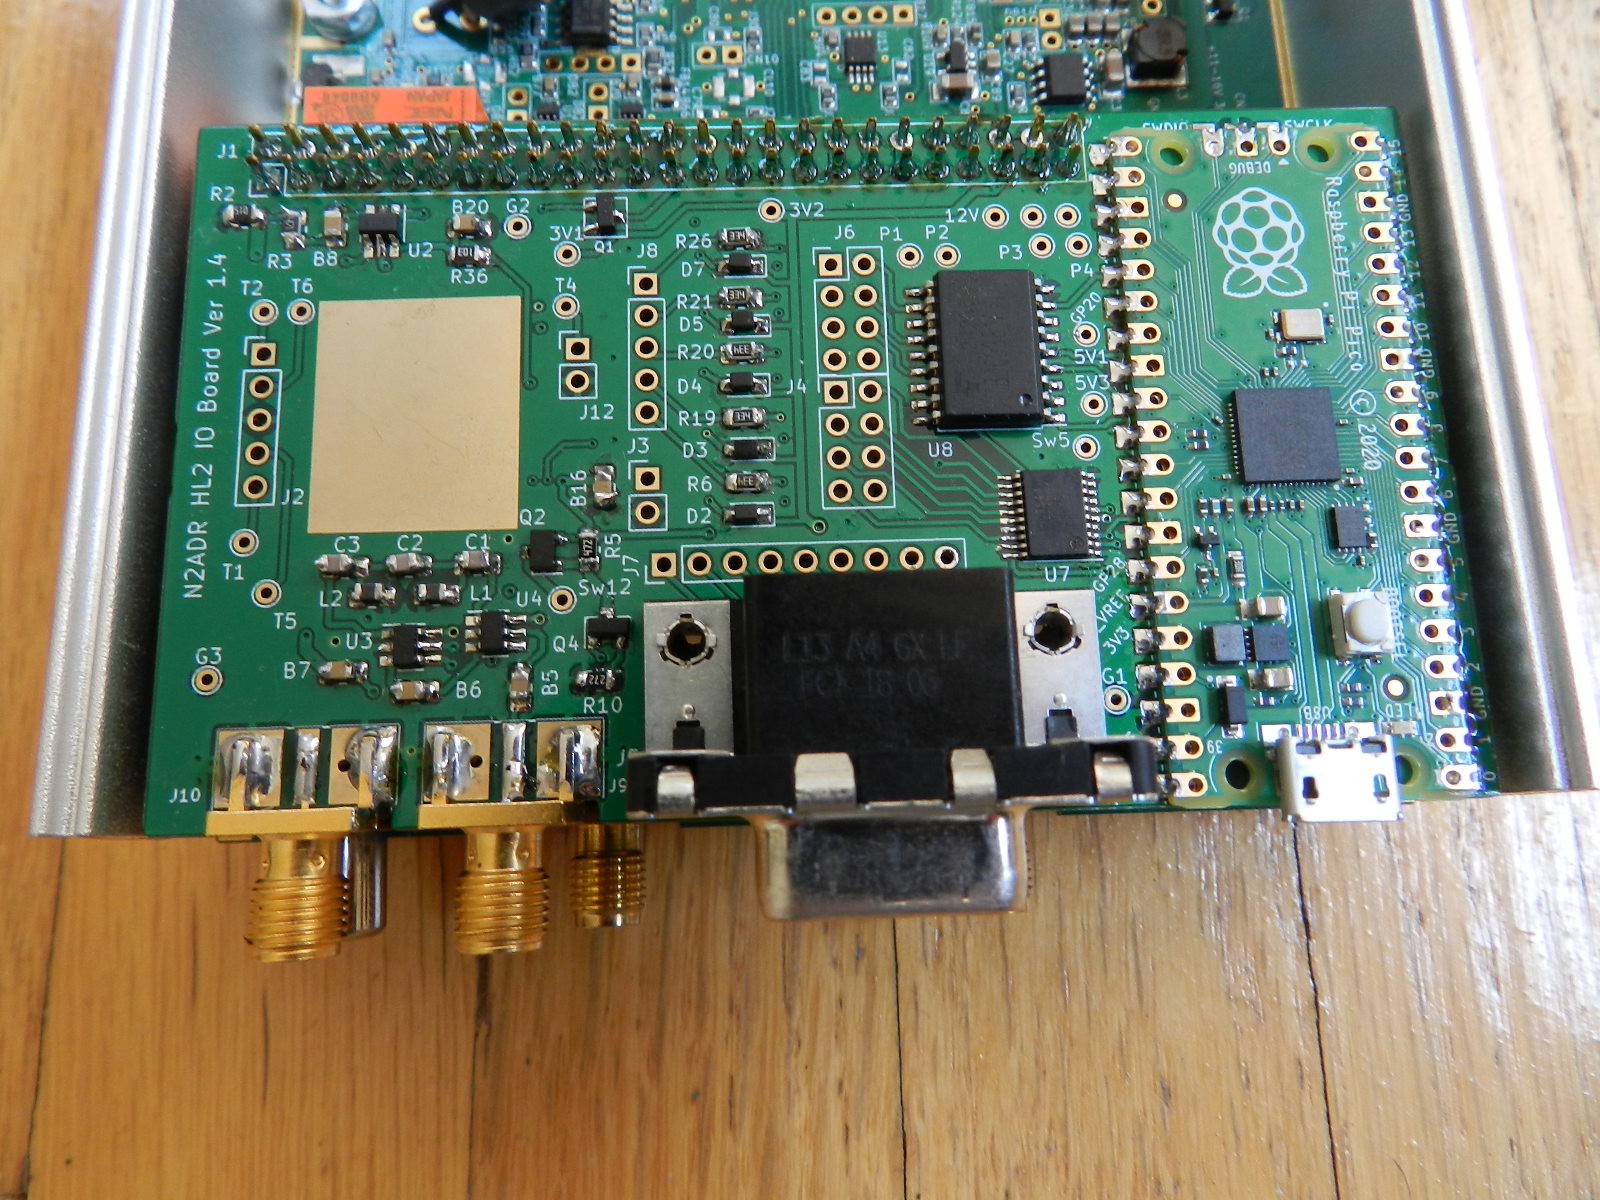
The “kit” is really nothing more than a couple of PCB’s, a connector-block, heatsinks and a 4-piece case. It goes together very quickly and easily and before you know it, it's ready to go.
When it came to fitting the heat sink shim for the PA, I sanded off the paint inside the case with rough grade Wet&Dry and then finished it off to a smooth finish with a fine grade. I did the same to the mating surfaces of the actual heat-transfer shim. I applied small amounts of non-conductive thermal paste to the mating surfaces and also along the channel which the PCB slides into, since that acts as a path for dissipating heat too.


Before going any further, let's talk about the Hermes Lite 2 and what it is.
Well basically, it's a network-connected direct-sampling (DDC/DUC) SDR HF transceiver covering 130kHz to 30MHz with 5W transmit capability. It's based on the opensource HPSDR/Hermes SDR project, which means that there's a wealth of software available! The Hermes Lite 2 is not a standalone radio - it must be connected to an internet-router and accessed remotely by computer (although I believe you can also connect directly to a PC too (but why would you?)). Either a 100Mbs or a 1000Mbs ethernet connection can be used and the speed is automatically sensed.
It will run on a variety of platforms including Windows, Linux, macIOS and on a variety of devices including Raspberry Pi's and iPads, although the software features may vary from device to device.
To use the transmit capability of the Hermes Lite 2, you need to add a Low Pass Filter board (N2ADR) to supress any unwanted harmonics. It's easy to add one and it costs around $50. You will also need to connect a PSU capable of at least 2A. A linear supply is recommended but I use a switched power supply that was designed for a KX3 and it's perfectly fine.
The main attraction to this radio is that it's incredibly cheap considering just how good it is. People have compared it to much, much more expensive SDR receivers (like ANAN) but of course it only has a 5W TX output, so that (for some) is a huge negative. Even adding a cheap 100W amplifier to it, you're talking about another £560 for something like the Xiegu XPA125B, so your total outlay for a new HL2 with a new amp would be close to £1000.
I guess you'd still be hard pressed to find such a good 100W SDR package for a grand. Anyway, that's a dilemma for someone else - because I love QRP and its challenges.

So, back to playing radio! I got the HL2 over a month ago, but I've been a bit poorly these last few weeks and have only just felt good enough to start tinkering with it. Once it was fed with an antenna, power and broadband, it was time to download some software to my PC and get stuck into the config. As much as I wanted to play with Thetis and PowerSDR, I thought I'd try to make things easy by getting the radio to work with SDRconsole before moving onto other software.
IMPORTANT NOTE : When connecting an antenna make sure you use an SMA pigtail instead of connecting a big heavy piece of coax with an adapter on. The antenna connector sits on the very edge of the PCB and I seriously doubt that it would cope with much stress at all before breaking off and potentially causing damage to the tracks on the board.
Getting the radio working remotely (locally) on my MicroSoft Surface Pro6 with SDRC, was an absolute doddle. I simply selected the HERMES LITE from the software's list of radios and it worked straight away. It couldn't possibly be easier!!

 |
| Rather than have open holes in the back of the radio, I fitted a DB9 connector and a Ground Screw. |
Being a Foundation License holder, I am currently unable to operate remotely away from home, so I’m stuck with operating over the local wi-fi. That’s still very convenient because it means I can sit wherever I want in the house or garden - and that’s a lifesaver during the summer when the shack temperatures are just unbearable!
I have a high quality 3-way antenna switch which I could use to switch between the Hermes Lite 2, an Expert Electronics ColibriNANO receiver and my beautiful Icom IC-7610 (unfair I know). Each one of these devices can be operated remotely. The Icom software offers nothing other than control of the radio - there’s no additional filtering or any other enhancements, whereas the EE software is rather special.
 |
| Icom's RS-BA1 |
 |
| Expert Electronics ExpertSDR2 |
The full test had to wait for the bands to open up - there’s nothing worse than trying to do a comparison when there’s hardly any activity - it’s much better when you can find operators who’ve got pile-ups going on, so you’ve got time to listen to the same signal on each receiver.
20M and 40M were the busiest bands, with a good mix of signal strengths, so I switched the antenna to the HL2 and ran SDRconsole. The panadapter lit up with signals across the screen and everything looked great.


Now I've got to admit I'm not overly familiar with SDRconsole, so apart from the basics of tuning, changing modes and bandwidths, etc, I was floundering a bit. The panadapter was way too hot and the colours a little on the gawdy side as you can see above, lol. But it was working!!
If video doesn't display, CLICK HERE
I was well aware that operators held this software in high regard and so I had to spend quite some time to really get familiar with it. But it was worth it - I really like it now! My only criticism would be that it's a bit cramped on the screen of my Surface Pro and looks massively better on my 2K desktop (and even more so at 4K).
Straight from the get-go I could tell that the Hermes Lite 2 was a superb receiver! It was more sensitive than my EE ColibriNano and the quality of audio was excellent too. Flicking between the two resulted in me feeling slightly disappointed in my little Russian receiver - something which surprised me because I'd previously held it in high regard.
The HL2 had a slightly lower noise floor and was easier on the ear! With big incoming signals, there was nothing between them in all fairness, but when it came to weaker signals, the HL2 definitely took the prize. And don't forget - this was using the basics of SDRconsole which is all new to me - I'm sure that the HL2's performance will shine even brighter once I invest more time in it and other available software such as Thetis.

I still love the ColibriNano and take my hat off to its incredibly small format. The software too is just a delight to use, with excellent filtering and noise reduction facilities, but, at £250 I would definitely opt for the HL2 unless you are desperately short of space, where the tiny EE device would win hands down - especially if you're a frequent traveller and want to have a HF receiver with you.
So what about the big boy - the IC7610? Well that's a mighty unfair comparison isn't it? The Icom costs £3,300 and the HL2 can't possibly compare - can it?

Well this is where you start to be effected by the laws of diminishing returns. When 'upgrading' radios (just like upgrading hi-fi), you have to spend an awful lot more money to achieve relatively small improvements and that's how products like the HL2 succeed. The Hermes receiver is really quite excellent, but not as good as the Icom. Can you live with that? For the difference in money - hell yeah!
Needless to say, the glorious 7610 has more capability than the HL2 and a comparison is a little silly, but it does give you some real life appreciation of this remarkably cheap SDR and you would have to be equally silly to ignore it.
So what's not to like about the HL2? For me, just daft little things like those pathetically flimsy end-plates on the case. I've seen stronger yoghurt tops! And how the SMA connectors are left floating instead of being secured to the chassis. And having the power and network connectors at the front. Yes, I said they were daft things.
Everything else is just amazing! If you are a QRP fan on a budget, this is the HF SDR for you. If you are a QRO fan who already owns an amplifier, then bingo!! The HL2 will suit a lot of people (who are happy to play radio through a computer). And if you have a remote location with a fantastic take-off, this little radio could be the answer to your prayers!
If OFCOM change the regulations, allowing me to operate remotely from any location, I can leave the HL2 running at home on my base antenna and access it from my holiday home instead of putting up with my compromised vertical which is installed there. Yes, I could do the same with my IC-7610, but honestly, I don't fancy putting that at risk when I'm so far from home. It's easier to repair/replace a HL2 than an IC-7610 :-)
So what now? Next step is to try out the other software that's available - I'll update this page accordingly. I also need to sort out some sort of low-cost ATU that I can leave connected to the HL2. Not sure which one yet - I'll have to look into it. But with that sorted, it will be a force to be reckoned with.
If you have any comments, tips, advice, please add something to the comments section below. Be kind, lol.
And thanks for visiting the blog!
73, Tom, M7MCQ.
UPDATE : 27-07-23 : Someone from the Bolton Wireless Club pointed out that I hadn't covered the PURE SIGNAL feature of the radio and the truth is, I haven't even explored that far yet. He hinted that he’d go through it with me. I'll report back if he’s good enough to help me :-)
UPDATE : 27-07-23 : I found a very interesting little BLOG where some ingenious soul (Larry, WR9R) managed to squeeze an ATU inside the HL2 case!! He had to have new endcaps made, but other than that, it looked pretty straightforward. Very clever!
UPDATE : 27-07-23 : I managed to get THETIS working and although it is based on an old platform, it works exceptionally well. It would be nice to see a full rewrite but that is very unlikely to happen. Many people have produced "skins" to make the front-end look more up to date, but it remains a bit old school in appearance. In operation, it is simply superb - especially the Noise Reduction!!
I managed to get some cracking contacts into the log with 4W output and received some very complimentary reports from people.


- A built-in CW keyer.
- A CW sidetone.
- A microphone socket.
- A headphone socket.
- A power-switch option.
- An ATU control-interface.
- A HR50 amplifier control-interface.
- Reduced Latency on SSB and CW.


